Passing i18n Messages Dynamically
i18N Localized Messages enable multilingual support, improve user experience, expand the application's reach, and provide a more personalized user interface across the globe.
WaveMaker has predefined localized label messages in i18N, you can now set the locale messages dynamically that can take the response from the APIs and set the local messages automatically.
RTL languages like Persian, Arabic, Hebrew, and others are now supported by introducing RTL language Layout.
Dynamic Localization Messages
With Dynamic local message responses from APIs, you can avoid the need of defining the content as labels in the Localized Messages section in WaveMaker and directly import the API into WaveMaker and use the response for translation.
To fetch the response from APIs and pass it for translation,
- Import an API. This helps to print the selected multilingual messages received from any API in the same
en.jsoncreated in the i18N folder.
The API response needs to be the same as the message in the default language JSON file, en.json.
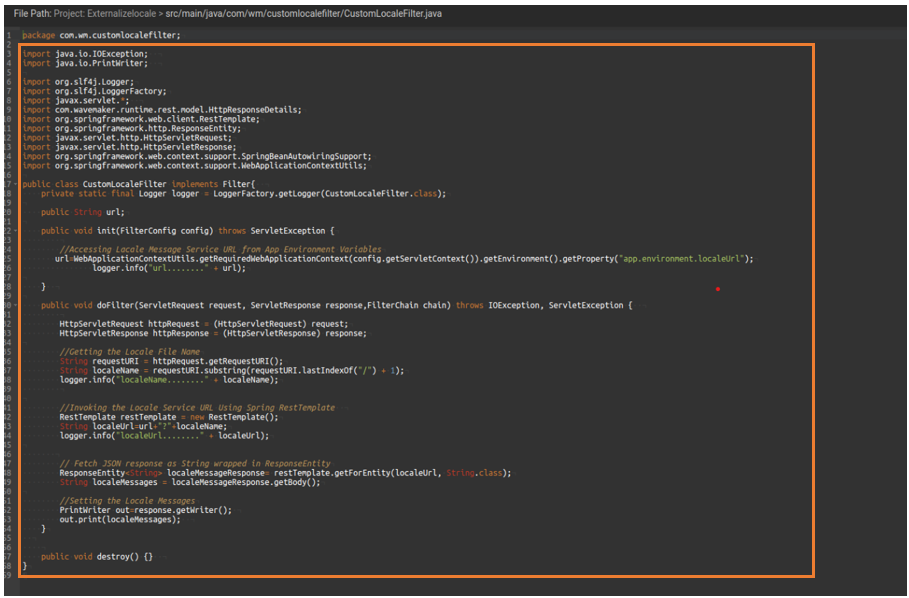
Create Filter Class
- Create a custom Java file in the src/main/java directory and add the below Java code.
Filterclass calls the external APIs and the response from external APIs is sent to theFilterclass that gets printed in the UI.
For example, create a file for the Filter class named CustomLocaleFilter.java
//FilePathProject:Externalizelocalesrc/main/java/com/wm/customlocalefilter/CustomLocaleFilter.java
import java.io.IOException;
import java.io.Printwriter;
import org.slf4j.Logger;
import org.slf4j.LoggerFactory;
import jakarta.servlet.*;
import com.wavemaker.runtime.rest.model.HttpResponseDetails;
import org.springframework.web.client.RestTemplate;
import org.springframework.http.ResponseEntity;
import jakarta.servlet.http.HttpServletRequest;
import jakarta.servlet.http.HttpServletResponse;
import org.springframework.web.context.support.SpringBeanAutowiringSupport;
import org.springframework.web.context.support.WebApplicationContextUtils;
public class CustomLocaleFilter implements Filter{
private static final Logger logger=LoggerFactory.getLogger(CustomLocaleFilter.class);
public String url;
public void init(FilterConfig config) throws ServletException {
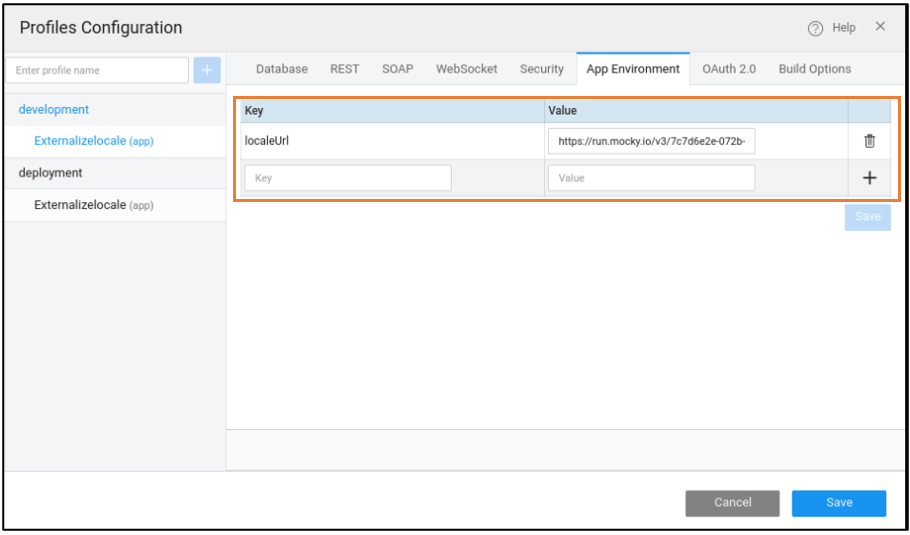
//Accessing Lacale Message Service URL from App Environment Variables
url=WebApplicationContextUtils.getRequiredWebApplicationContext(config.getServletContext()).getEnvironment().getProperty("app.environment.localeUrl");
logger.info("url………….... + url);
}
public void doFilter(ServletRequest request, ServletResponse response, FilterChain chain) throws IOException, ServletException {
HttpServletRequest httpRequest = (HttpServletRequest) request;
HttpServletResponse httpResponse = (HttpServletResponse) response;
//Getting the Locale File Name
String requestURI = httpRequest.getRequestURI();
String localeName= requestURI.subString(requestURI.lastIndexOf("/") + 1);
logger.info("localeName.....…... localeName);
//Invoking the Locale Service URL Using Spring Rest Template
RestTemplate restTemplate= new RestTemplate();
String localeUrl=url+"?"+localeName;
logger.info("localeUrl........" + localeUrl);
// Fetch JSON response as String wrapped in ResponseEntity
ResponseEntity<String> localeMessageResponse = restTemplate.getForEntity(localeUrl, String.class);
String localeMessages = localeMessageResponse.getBody();
//Setting the Locale Messages
PrintWriter out=response.getWriter();
out.print(localeMessages);
}
public void destroy() {}
}
- Go to File Explorer and search web.xml file.
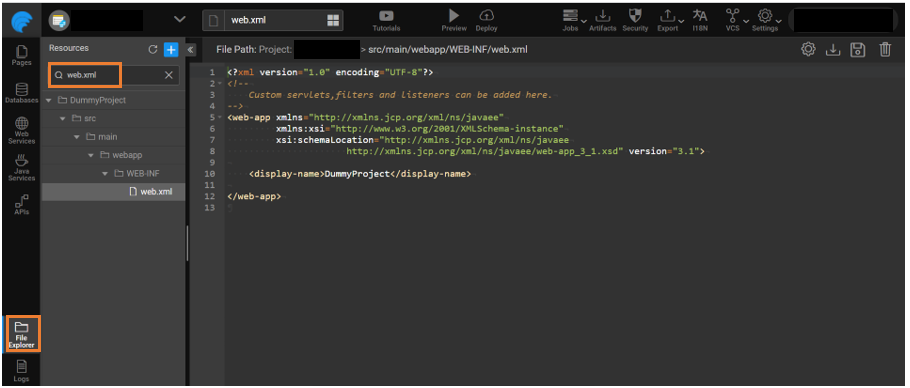
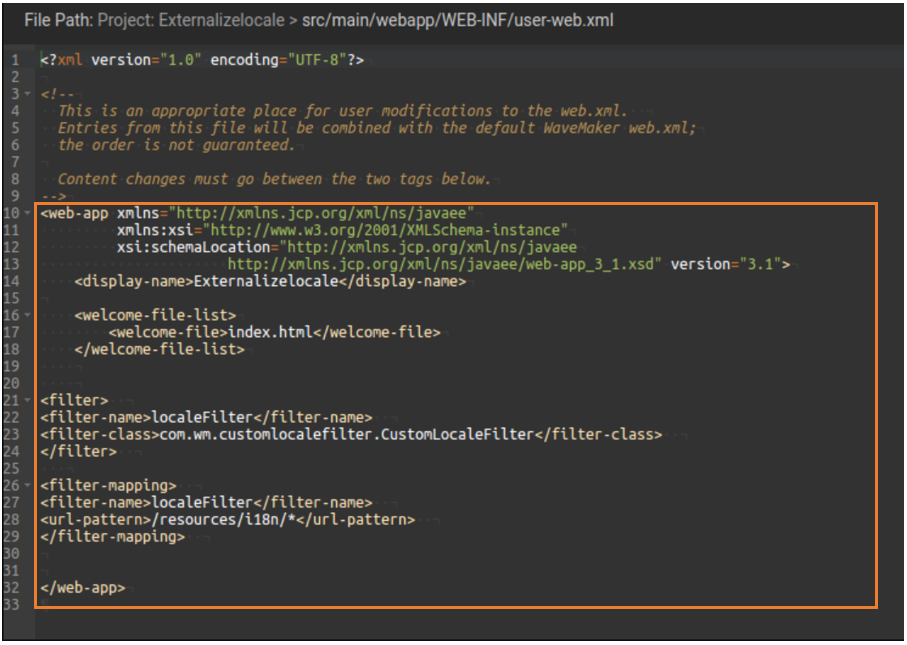
- Add the below XML code to initiate the
Filterclass. TheFilterintercepts the requests to localization files and calls the external rest service and the response from the external service will be sent to the caller.
<filter>
    <filter-name>localeFilter</filter-name>
    <filter-class>com.wm.customlocalefilter.CustomLocaleFilter</filter-class>
</filter>

<filter-mapping>
    <filter-name>localeFilter</filter-name>
    <url-pattern>/resources/i18n/*</url-pattern>
</filter-mapping>
- You can now preview the application and find the translated message.