· 3 min read
📢 Update (8 August 2026)

The planned transition from WaveMaker Online to WaveMaker.ai, originally scheduled for 9 August 2026, has been postponed by one week and is now scheduled for 16 August 2026. This additional time will allow us to complete further validation and testing to ensure a smooth and reliable transition. We appreciate your patience and understanding and will continue to share any further updates as needed.

A Unified Platform for the Future of Enterprise Application Development

Over the past year, WaveMaker.ai has evolved from an AI-powered assistant into the primary platform for building the next generation of enterprise applications with WaveMaker.

As part of this evolution, we are bringing our cloud offerings together by transitioning WaveMaker Online to the WaveMaker.ai platform.

This milestone enables us to deliver new capabilities faster, simplify platform management, and provide a more consistent and modern development experience for all cloud users.

What's Changing?

Starting 10 August 2026, accessing www.wavemakeronline.com will automatically redirect you to platform.wavemaker.ai.

As part of this transition:

  • Your existing workspace, projects, and development artifacts will be available on WaveMaker.ai.
  • Requests to the previous WaveMaker Online URL will be automatically redirected to the new platform.
  • Apart from the URL change, your day-to-day development experience will remain largely unchanged.

The transition has been designed to be seamless so that you can continue your work with minimal disruption.

Existing and New Projects

Existing Projects

All your existing projects will continue to be fully supported. When you open these projects, they will launch in the existing WaveMaker Studio, ensuring compatibility with your current applications and development workflow.

New Projects

All new projects created in WaveMaker.ai will be created as Design System projects by default and will open in the latest WaveMaker Studio with Design Tokens support.

This approach allows you to continue maintaining existing applications while taking advantage of the latest platform innovations for new development.

What You Need to Do

No action is required from your end, except for the following cases:

  • If you have deployed applications:

    Please note that deployed application URLs have changed from cloud.wavemakeronline.com to apps-platform.wavemaker.ai. So, you will need to update any references to the old URL accordingly.

  • If SSO is configured:

    Please update the following configurations to reflect the new URLs:

    • Identity Provider (IdP): Update the Preview and Deployed application URLs.
    • Application Security Configuration: Update the Deployed application URL.

Planned Transition Window

The platform transition is scheduled for 9 August 2026 (Sunday).

To facilitate this transition, WaveMaker Online (WMO) and WaveMaker.ai will undergo a planned maintenance window from 00:30 – 06:30 UTC

During this period, both platforms will be unavailable.

This planned downtime is required to ensure a smooth and successful transition. We recommend planning your work accordingly to avoid any disruption.

Questions

Will my existing projects be affected?

No. Existing non-Design System projects will continue to work as before and will open in the existing WaveMaker Studio.

Will I lose any projects or data?

No. Your workspace, projects, and development artifacts will be migrated to WaveMaker.ai.

Do I need to update my bookmarks?

Existing WaveMaker Online URLs will automatically redirect to WaveMaker.ai. However, we recommend updating your bookmarks to the new URL for convenience.

Will all new projects use Design System?

Yes. New projects created on WaveMaker.ai will be created as Design System projects by default.

Does this transition apply to WaveMaker Enterprise (WME)?

No. This change applies only to WaveMaker Online customers. WaveMaker Enterprise (WME) customers will continue using their existing deployment model and development environments.
· 4 min read

note

This change takes effect starting with release 11.15.

caution

This change introduces a new precedence model and a one-time migration. Existing projects are migrated automatically, but we strongly recommend validating the result in a CI/CD-managed environment before promotion. The migration removes only duplicated, system-generated entries and preserves explicit user overrides.

For configuration management and externalization, WaveMaker applications use profile.properties to store configuration as key–value pairs. This allows the same WAR (build artifact) to move across environments without rebuilding, with values supplied via environment variables, bundled files, or by building profile-specific WARs (QA, production etc.) using a selected build profile (for example, mvn clean install -Pproduction).

As projects grow, it’s normal for configuration to end up in a few different places (service configs, profile files, etc.). That flexibility has helped teams move fast, but it also meant that the same value could appear in more than one place. Over time, it became harder to tell which values were defaults and which were intentional environment-specific changes.

Old Behavior: REST Service Property Management

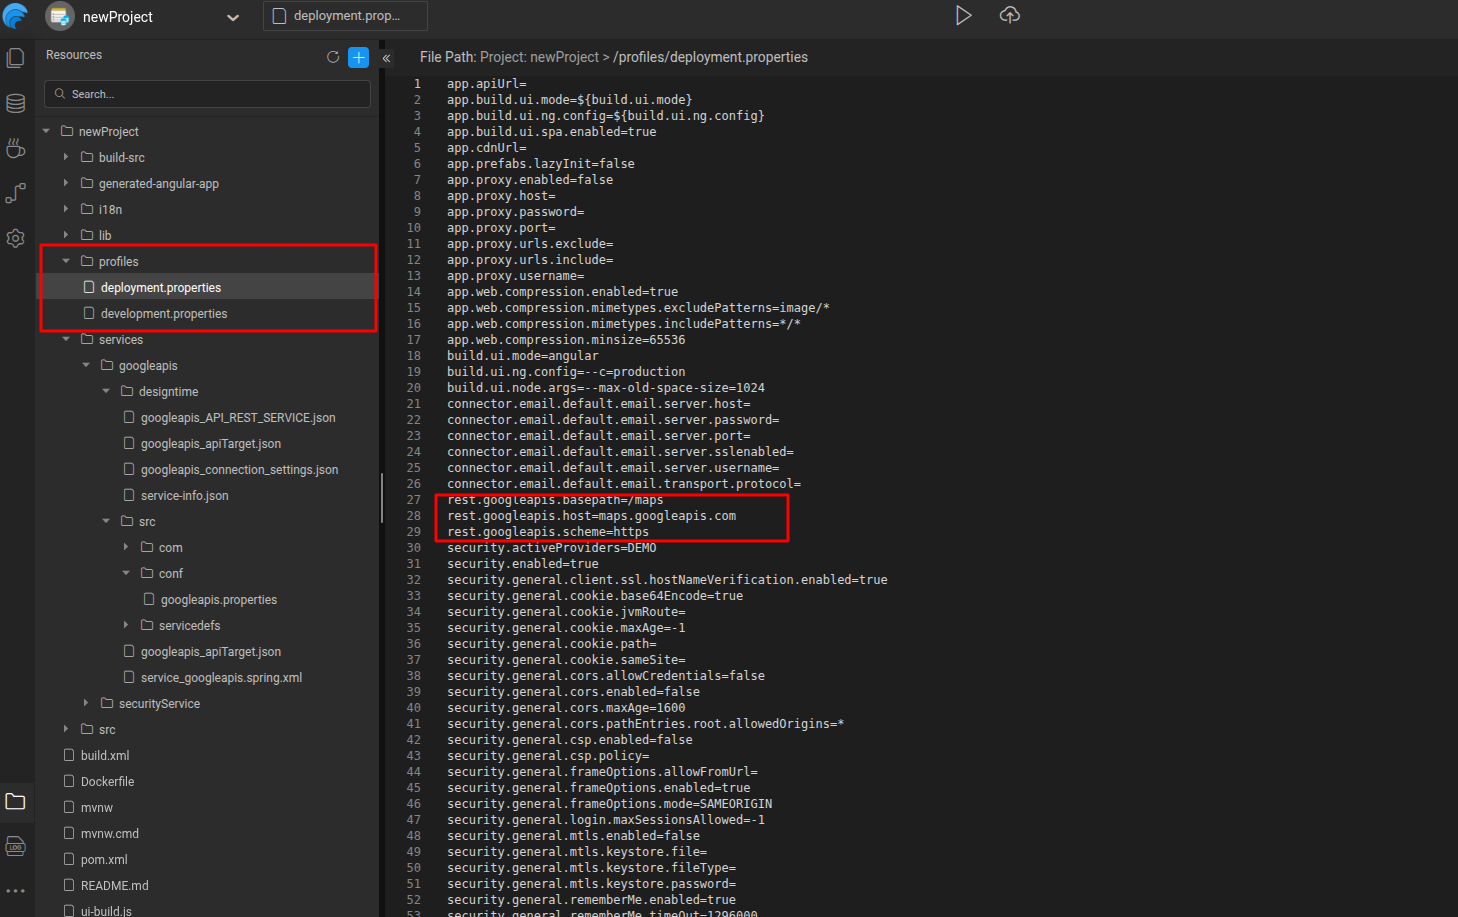
Previously, REST service properties could be defined in multiple places to support flexibility across environments.

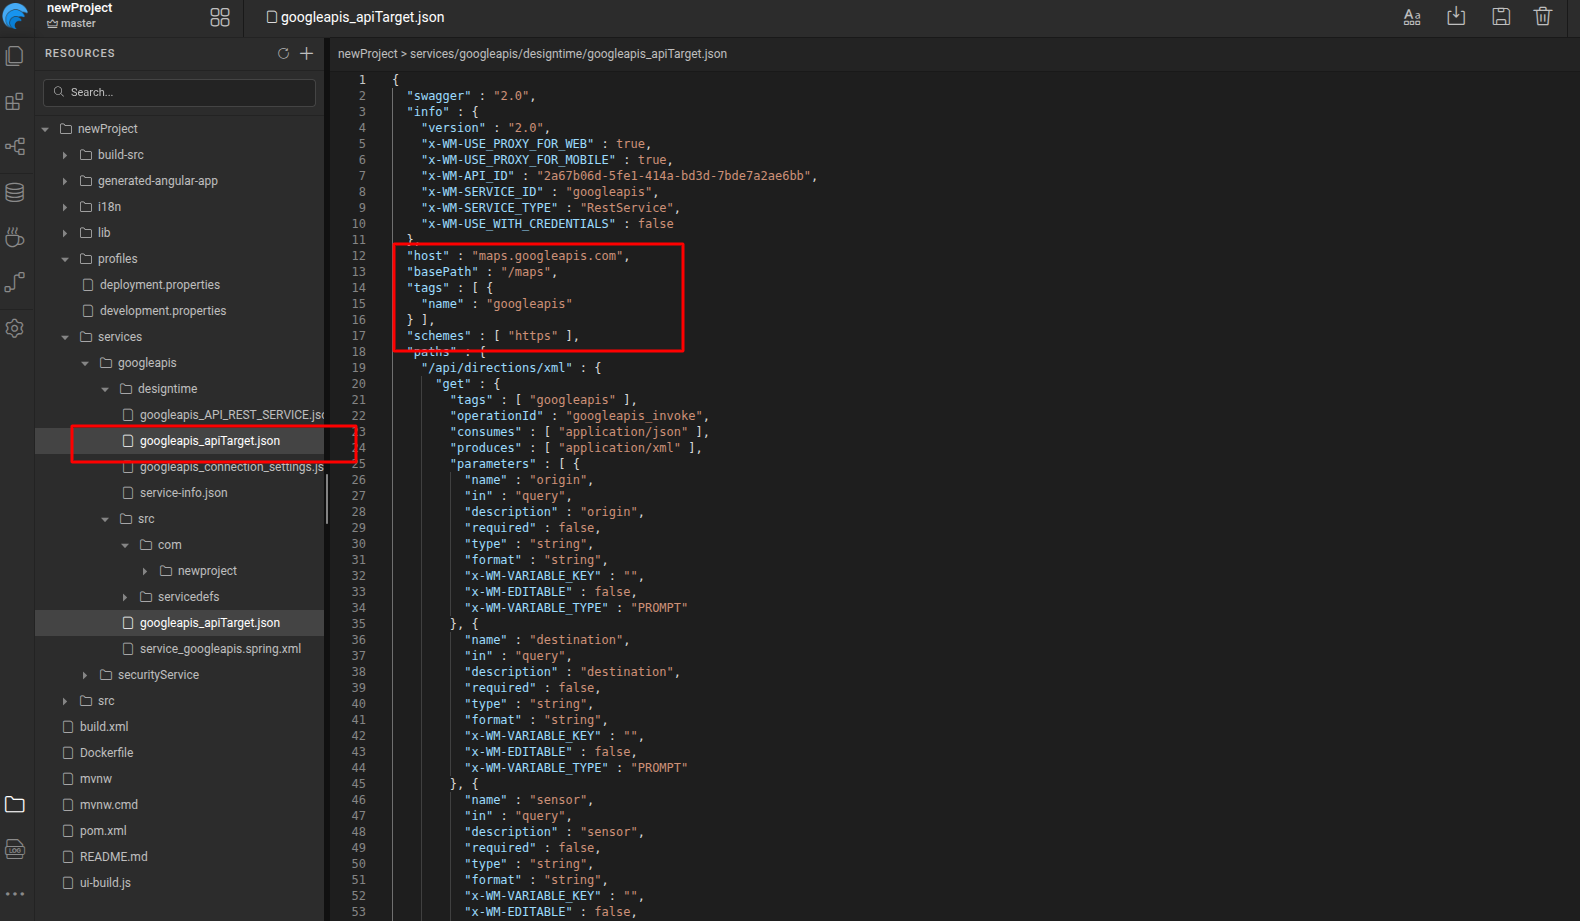
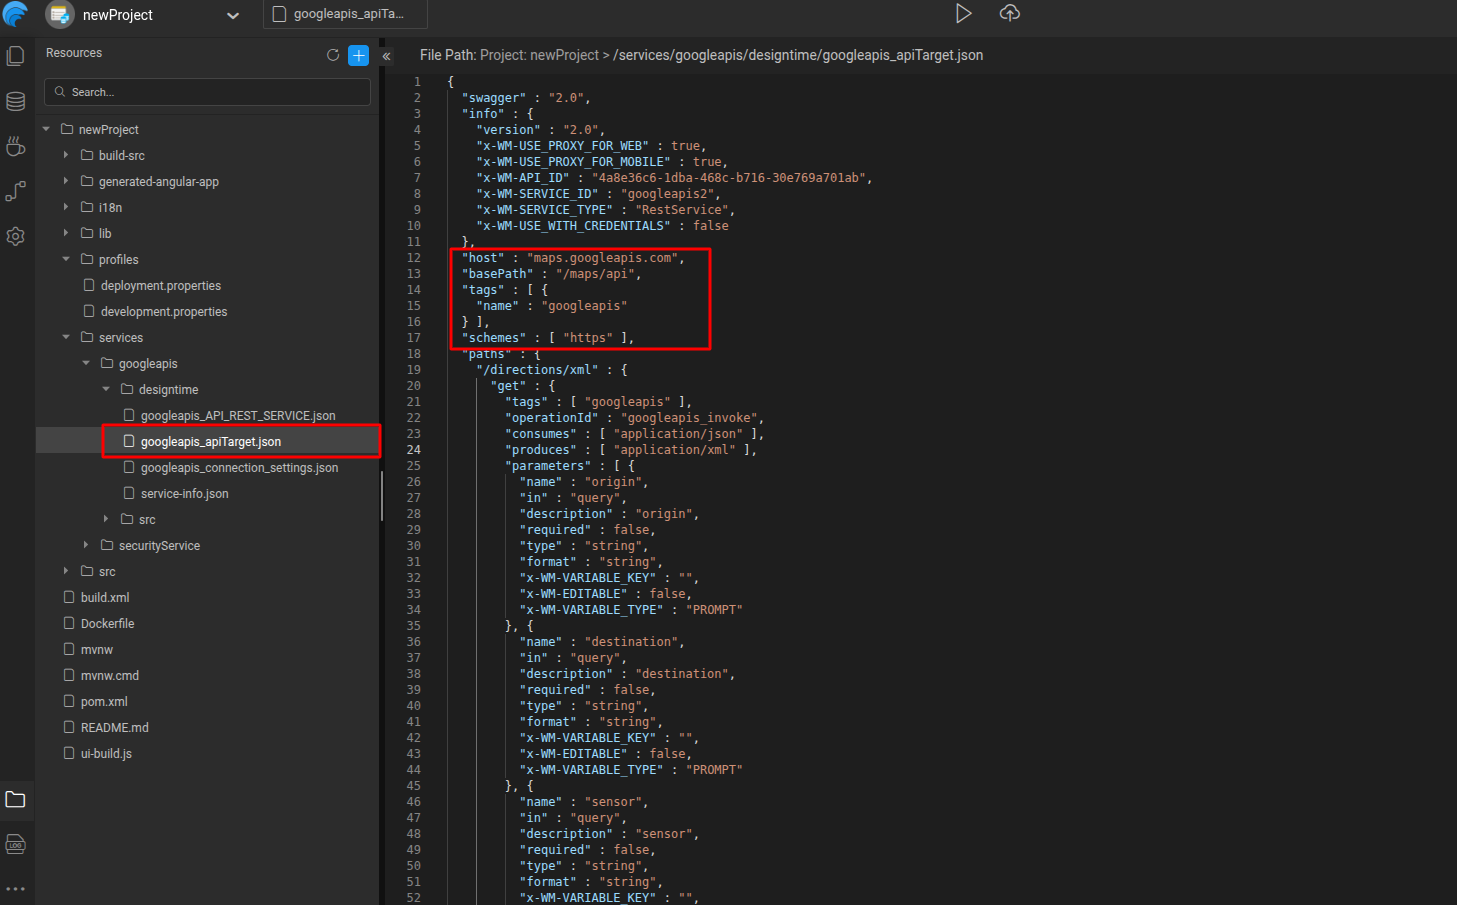
  • In Service JSON
    • host = maps.googleapis.com
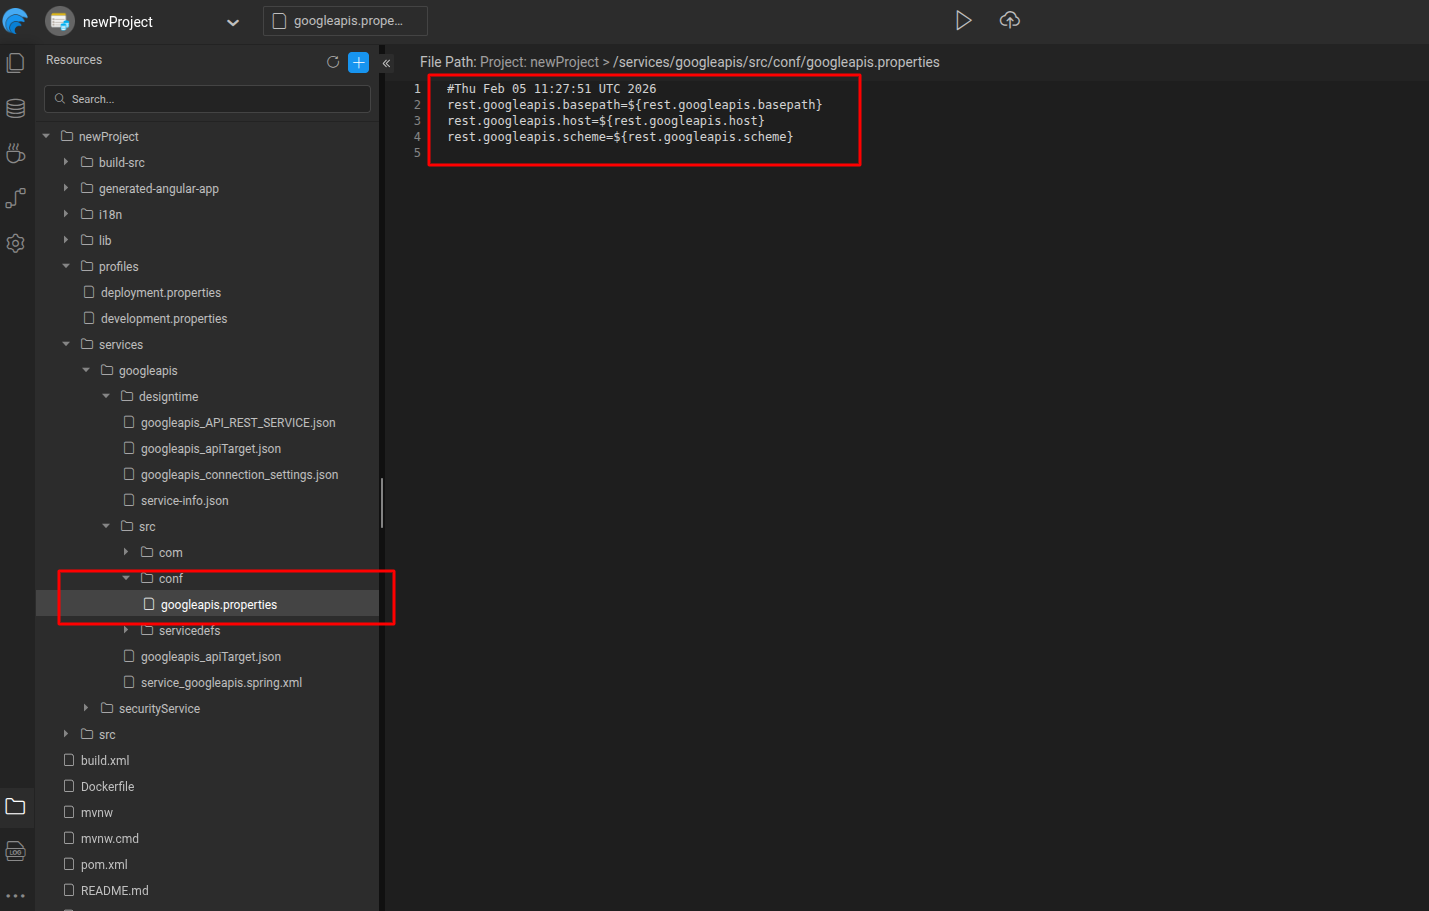
  • In serviceName.properties
    • rest.googleapis.host = ${rest.googleapis.host}
  • In all profile.properties
    • rest.googleapis.host=maps.googleapis.com

This approach made it easy to run the same service across different environments. As a result, profile files typically contained a full set of service properties, even when most values matched the defaults.

If a user updates rest.googleapis.host in one profile using the design canvas:

  • the system cannot tell if this is an intentional override
  • or if the service default itself has changed
  • or if the change should apply to other profiles

Understanding the effective value of a property therefore required checking multiple locations.

Solution Overview

The solution introduces a Single Source of Truth (SSOT) and a strict separation between defaults and overrides.

Core Principles

  • Each property has one authoritative default location
  • Profiles contain only explicit user overrides
  • Defaults are never copied into profiles automatically
  • The effective value of a property is always easy to locate

New Behavior: REST Service Property Management

With the updated model, REST service properties follow a much simpler and clearer approach. Using the same REST service example:

  • The default value
    • host=maps.googleapis.com
    • exists only in the Service JSON
  • conf/serviceName.properties files are removed entirely
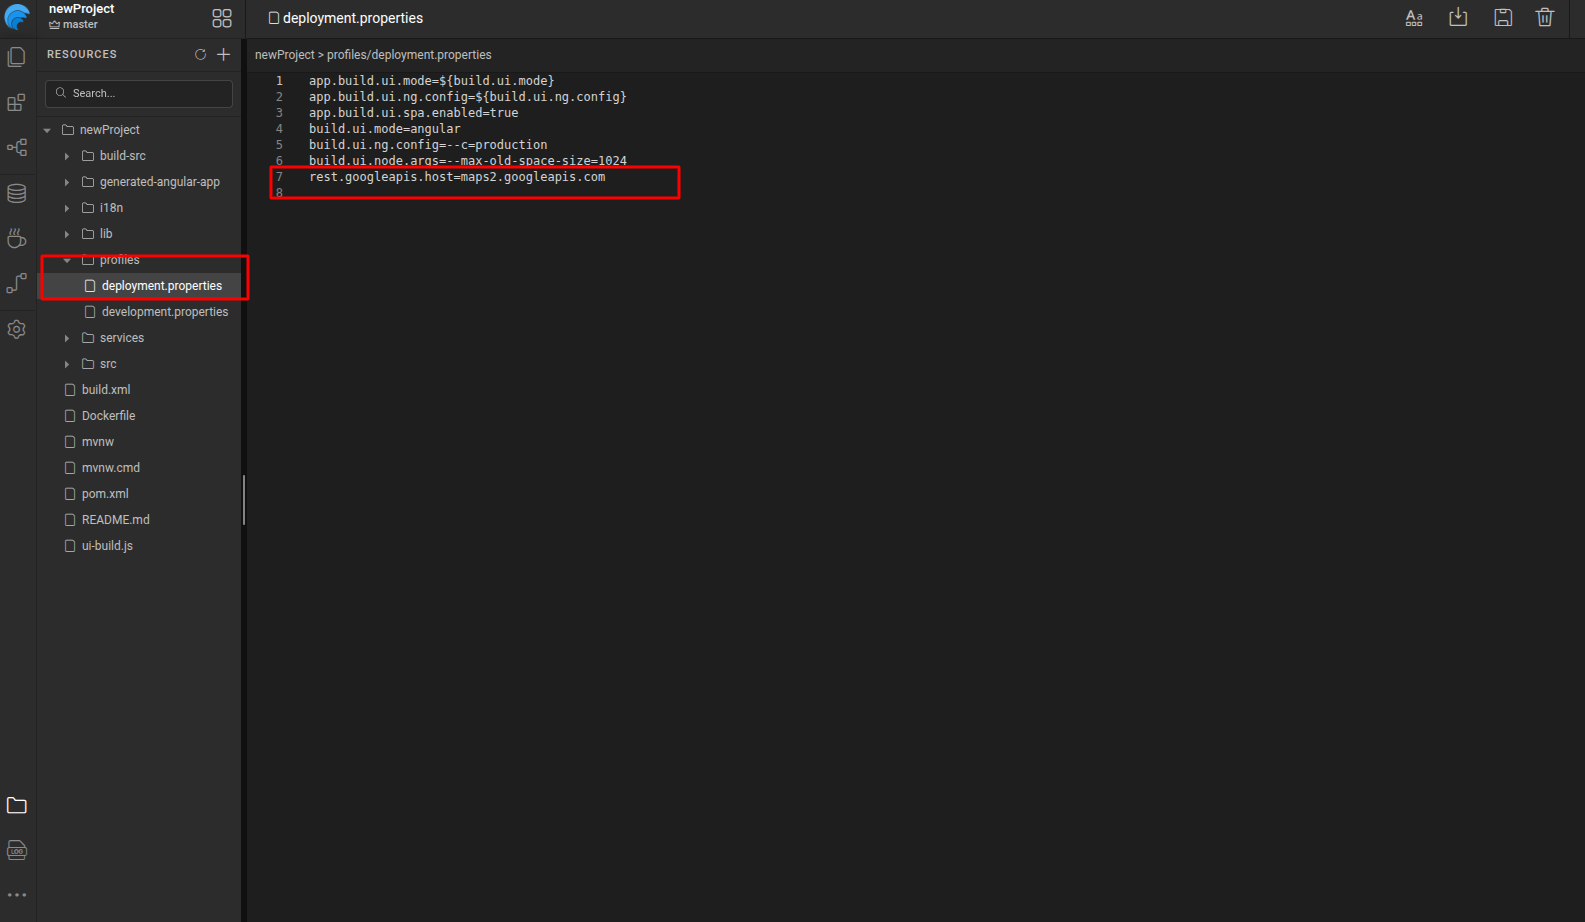
  • profile.properties contains this property only if a user explicitly overrides it

Result:

  • If the property is not overridden, the service default is used
  • If the property is overridden, the intent is explicit and localized to that profile
  • Profile files remain clean, readable, and easy to maintain
  • It is always clear whether a value is a default or a user change

Profile Packaging and Environment-Agnostic Runtime

To support both single-artifact deployments and profile-specific behavior, the build can package configuration for multiple profiles in a controlled way.

Profile Packaging:

  • packAllProfiles (default: true) packages configuration for all profiles.
    • (eg., mvn clean install -DpackAllProfiles=true)
  • application-profile.yaml is generated for each profile.
  • application.yaml is generated using the selected build profile.
  • If no build profile is specified, application.yaml is generated using deployment profile.

This allows the same build artifact to be deployed across dev, QA, and prod without rebuilding, while still supporting profile-specific configuration when required.

Runtime Profile Selection (Tomcat):

  • The active profile is selected at runtime using:
    • -Dspring.profiles.active=<profile>
  • If set, the application loads application-<profile>.yaml.
  • If not set, application.yaml is loaded by default.

Configuration Default Values and Override Methods: Where They Live

The same REST model applies consistently across all configuration types. Each property category has one clear default location, and profiles are used only for overrides.

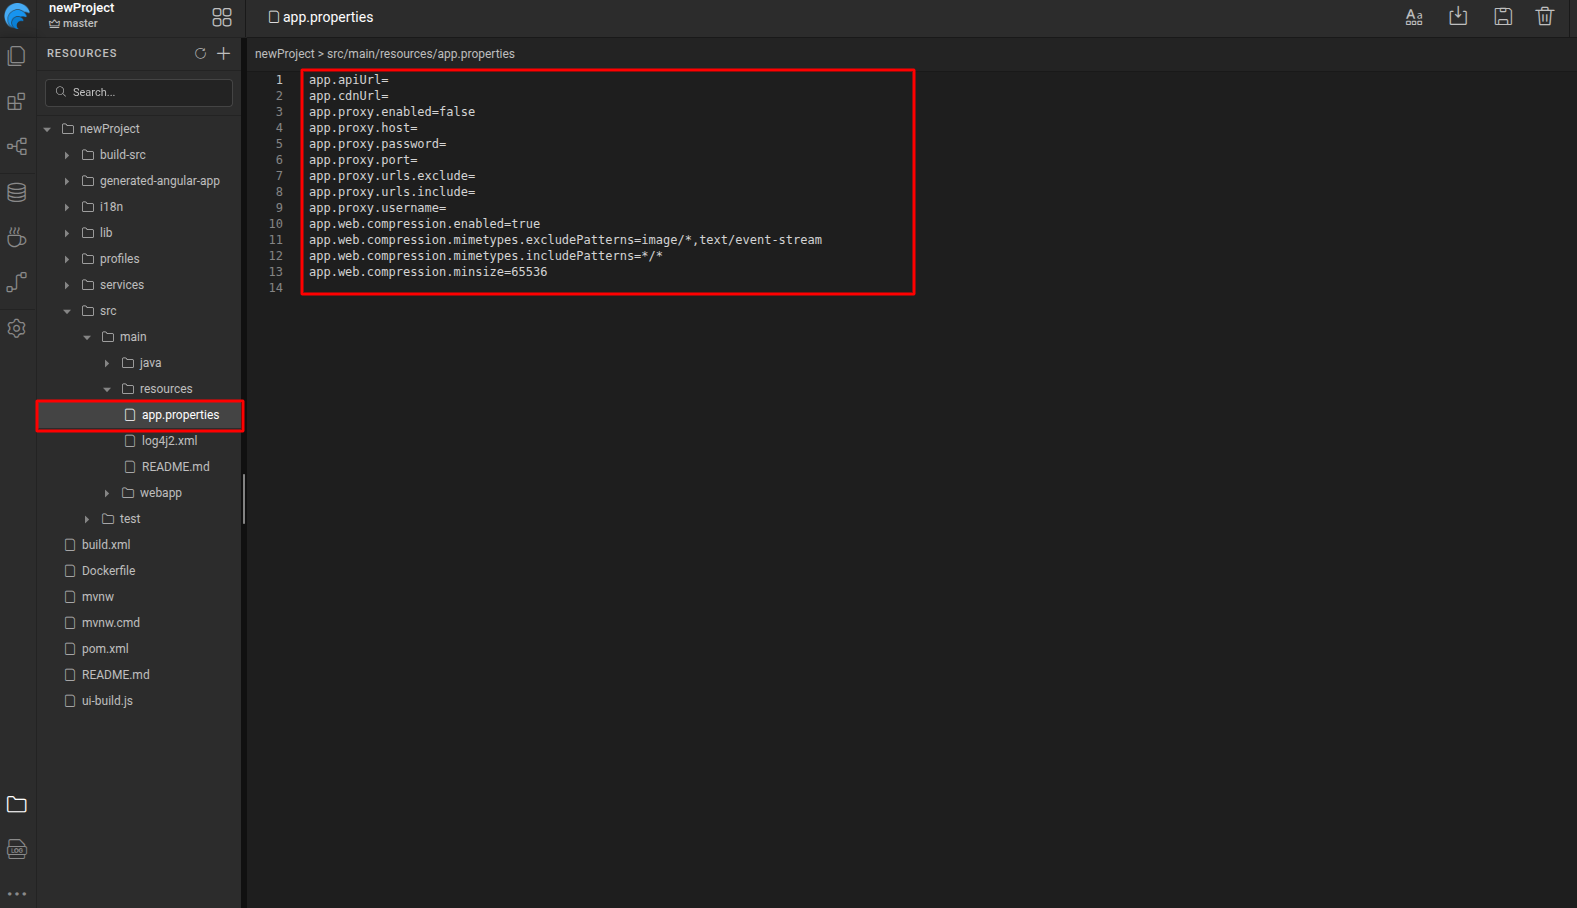
Application Properties

  • Default values are defined in app.properties.

Security Configuration

  • Defaults live within their own service JSONs:
    • auth-info.json, general-options.json, roles.json, intercept-urls.json

Service Properties

  • Service defaults are defined in service-specific configuration JSON files based on the type of service:
    • REST / OpenAPI / WebSocket: <serviceName>_apiTarget.json
    • Database Services: db-connection-settings.json
    • Auth Services: oauth-providers.json
    • SOAP Services: <serviceName>.settings.json

Prefab Configuration

  • Defaults are defined within their owning component (for example, prefab-properties.yaml)

Connector Properties

  • Defaults are defined in connector-externizable.properties

Profiles

  • profile.properties contains overrides only when a user explicitly changes a value. If a value is not present in profile.properties, it always comes from the owning component’s default file.

Final Thoughts

This refactoring establishes a clear Single Source of Truth for all configuration types, strictly separates defaults from overrides, and eliminates duplication across profiles.

The result is predictable configuration behavior, clean profiles, safe component updates, and a fully immutable, environment-agnostic deployment artifact.

· 2 min read

We’re excited to share that starting with WaveMaker 11.13, you can now use ng serve with WaveMaker exported Angular apps. This enhancement allows users to locally serve, test, and debug their generated Angular projects outside WaveMaker Studio with greater ease and flexibility.

How to Use ng serve with Your Exported App

Follow these steps to get up and running:

1. Export your project

  • In WaveMaker Studio, Click on Export Project -> Project as an Angular zip.
  • Download and extract the ZIP.

2. Install dependencies

cd <exported-angular-app>

#Use Node.js version recommended by respective WaveMaker Studio Version

npm install

3. Run the app locally

ng serve --open

The app runs locally at http://localhost:4200 similar to standard Angular app.

At this point, services/APIs will not load yet.

Configuring Backend Services

The wavemaker application's backend server should be running/hosted either locally or in a remote server. That backend server url should be configured in the proxy configuration file.

  1. Open the proxy.conf.js file in the exported app.
  2. Update path targets with backend server URL.
  3. If required add the paths, based on the app use cases.

Sample proxy.conf.js entries:

module.exports = {
"/services": {
target: "https://<your-deployed-app-url>/",
secure: true,
changeOrigin: true
},
"/j_spring_security_check": {
target: "https://<your-deployed-app-url>/",
secure: true,
changeOrigin: true,
cookiePathRewrite: "/",
cookieDomainRewrite: "localhost"
}
};

Then re-run again with new proxy configuration.

ng serve --open

Now app will load APIs and services properly in the browser.

With ng serve working, we can now debug the WaveMaker Angular app locally like any standard Angular application.

note

Refer this documentation to extend WaveMaker generated Angular applications.

· 5 min read

Mobile design has come a long way from boxed-in layouts and padded screens. With modern devices offering bezel-less displays and immersive user experiences, it's become essential for apps to keep up with edge-to-edge UI standards. Until now, our mobile apps didn't fully embrace this capability—but that changes today.

We're excited to introduce full support for edge-to-edge mobile experiences in our platform. Whether you want a completely immersive layout or prefer to keep safe insets and margins, it's now up to you. With this release, we're giving developers complete control over how their apps appear—ensuring your product looks and feels modern, fluid, and native.

· 5 min read

WaveMaker Studio 11.11 brings smarter tools, cleaner workflows, and a more intuitive experience. This release focuses on performance and a future-ready architecture.

You’ll see major improvements to the Studio Canvas, a fully revamped Changes View for cleaner migrations, and a shift to standalone components in Angular for more modern, maintainable apps. On top of that, this release includes optimization tools, UI flexibility, and critical bug fixes—making 11.11 one of our most packed and purposeful updates yet.

Let’s walk through what’s new in 11.11.

· One min read

WaveMaker Studio now features dynamic browser titles, enhancing navigation and usability. Introduced in version 11.11.0, this update allows the browser tab title to reflect the current module, page, or action within the Studio, providing immediate context and making it easier to manage multiple open tabs.

This enhancement is to improve developer user experience by providing immediate context and making it easier to manage multiple open tabs.

· 4 min read

WaveMaker's Wizard widget now offers dynamic features for building flexible, multi-step forms.

WaveMaker Dynamic Wizard widget offers the following benefits.

  • Auto-generate wizard steps from a dataset
  • Load partial content into steps
  • Build forms dynamically based on user context
  • Set the default wizard step with index
  • Step management (Add, remove, and goto step)

· 3 min read

WaveMaker Studio v11.11 introduces significant enhancements to the Canvas, delivering a true What You See Is What You Get (WYSIWYG) experience. This update ensures that the design view in the Studio closely mirrors the live application.

Why This Matters

The Canvas is the primary workspace where developers design and arrange UI components. Previously, inconsistencies between the Canvas and the live application led to confusion and additional adjustments.

With the latest improvements, the design-to-preview workflow becomes more seamless, allowing developers to build interfaces with greater confidence and efficiency.