Page Artefacts
You would have witnessed by now that you can accomplish most of the tasks of creating an application in the Design mode itself - using intuitive drag and drop options and properties. However, some situations may require you to edit the code of your application pages. Also, some advanced users and experienced developers may prefer to code. Thus, WaveMaker provides different Page Modes - Markup, Scripting, and Styles - apart from the default Design mode. We will look at each of these modes separately.

Page Markup
In the Markup mode, you can view a set of tags assigned to the elements of the page. Markup may also include attributes and other details of the elements. These details and attributes can also be set in the Design mode.
The Markup mode gives the user an option to add widgets and customize the widget behavior programmatically. While building custom apps, it may be noted that WaveMaker generates custom markup automatically. This markup can be accessed via the “Markup” tab in the toolbar. The markup would make much more sense if you have an idea of “directives” in AngularJS. (In short, AngularJS is a JavaScript framework that helps in building Single Page Applications (SPA)).
Each of the directives represents an element that has to exist at that point of time in the canvas. So for example, if you select a 3-column layout for your App, you will notice the following directives under the Markup tab - wm-page, wm-header, wm-top-nav, wm-content, wm-left-panel, wm-page-content, wm-right-panel, wm-footer.
Custom markup can be added as needed directly in the code (if you are familiar with it). If not, WaveMaker automatically generates code when the elements are dragged on the canvas. This mode shows the styles that are associated with the particular widget. For instance, consider the Button widget. In the Design mode, drag and drop a Button widget and name it formSubmitButton. Set some of the properties of the button, say Left Margin, Right Margin and Top Margin, using the Properties Panel.
Now, switch to Markup mode. You can see the corresponding markup for the _button _as shown below.
The Button widget is identified by name="formSubmitButton" and some of the properties are margin="unset 0.5em" and caption="Button" . These properties can be modified in the markup. After saving the changes, the respective widget would get updated with the properties and values defined in the markup.
Page Script
In the Script mode, you can define JavaScript functions that can be executed on specific events of user interaction. You can use JavaScript to further customize your WaveMaker application. The various methods and properties associated with each of the WaveMaker elements can be found in the API Documentation. The various ways to access the variables, widgets etc. within an application can be found here.
For instance, to call a JavaScript function for a widget event, choose the _JavaScript _option in the Events section of Properties Panel. WaveMaker automatically switches to Script mode.
Here is an example to illustrate the process. Suppose you have a button named _formSubmitButton _and you want to create custom JavaScript to execute when the user clicks this button. To set up the JavaScript you follow these steps
- In the Design mode, select the button named formSubmitButton.
- In the Property Panel, click on Events.
- Select JavaScript from the On Click event drop-down menu.
- WaveMaker will switch to Script mode with the function that will be called when the button is clicked.
- Call the alert function to display an alert when the user clicks formSubmitButton as shown below.
Once you have saved these changes and run the application, clicking on the button will display an alert box with the above message.
Page Style
There are four ways in which you can apply a custom style to your app:
Inline Styling
This is the locally applied style for individual widget or container, used for alignment (padding, margin, border etc.) and applying custom style such as h2, btn-info etc. The class property for widgets is rendered as a class picker. This is a multi select drop down list with various classes that are contextual to the widget displayed. You can select classes and see the effect of those applied classes on the canvas with immediate effect.
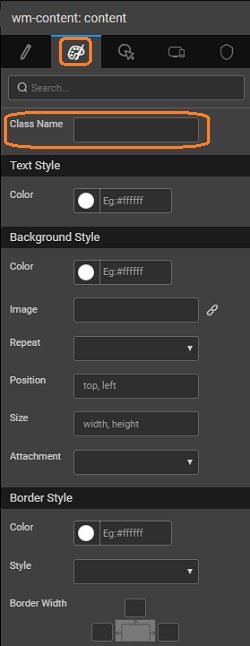
A comprehensive list of the available classes can be wm-widgets. In addition to the list, you can create your own classes and use them, as mentioned below.
Style editor
In the Style mode, you can create and edit styles for the page using CSS. Let us create a CSS class for a button formSubmitButton.
- In the Design mode, select the button named formSubmitButton.
- In the Properties Panel on the right side, click on Styles.
- Enter the class name, say buttonSample, for the property ButtonClass. This property defines the CSS class that is supposed to be associated formSubmitButton.
- Switch to Style mode and enter the following:
- This would make the formSubmitButton appear red due to the properties mentioned in the buttonSample CSS class.
These style changes can be made at two levels:
- Page Styling: Page-only overrides can be applied by making entries to the corresponding page.css file. This option can be used mostly for alignment and custom styles localized to the page.
- App Styling: Styles over all pages of the App can be applied by making entries in the corresponding app.css file. This can be used to override theme to apply a custom style to widgets.
- Theme: These can be used across all widgets of the app. These can be reused over multiple apps for a standard look-n-feel. More about Themes.
In this document, we have seen how Markup, Style and Script mode for a page can be used to customize the page components of your app. Be aware that this needs to be done with caution and it might result in breaking of the page if you are not well versed with HTML and CSS.