Guidelines To Create WM Release Notes
We have two types of release notes, WaveMaker Online (WMO) and WaveMaker Enterprise (WME).
WMO Release Notes
WMO release notes mainly consist of five sections, which may vary from release to release:
- New Features
- Migrations
- Enhancements
- Bugs
- Tech Stack
We further categorize features, migrations, enhancements, bugs, and tech stack updates into three categories:
- Web
- Studio
- React Native
Steps to Create WMO Release Notes
To create the WMO release notes, follow the steps below:
- Reach out to leads to get the tickets assigned.
- Once assigned, check the tickets for necessary information.
- Create a new branch for the release.
- Update the necessary documents.
- Get approval and merge the release notes.
1. Reach Out to Leads
Ensure that the tickets are assigned to you in Basecamp. To get the bugs, enhancements, and features assigned to you, reach out to the following teams:
- Backend and Tech Stack Upgrades
- Studio and Frontend
- React Native
2. Check for Information in Basecamp
Once assigned, verify that each item has the necessary description. The required information may vary for each item:
For Feature:
- What is the feature?
- Why do we need the feature?
- How to implement?
- Impact of the feature (optional)
- Relevant images or videos (optional)
Videos should be created using Guidde.
For Migration:
- What is the migration?
- Why are we migrating?
- Impact of the migration (optional)
- Relevant images or videos (optional)
For Enhancement:
- What is the enhancement?
- Why do we need the enhancement?
- How to implement?
- Impact of the enhancement (optional)
- Relevant images or videos (optional)
For Bug:
- What is the bug?
- How did we fix? (optional - only if the fix is not internal)
- Impact of the bug (optional)
- Relevant images or videos (optional)
3. Create New Branch for Release
- Create a new branch under the master branch using GitHub Desktop with the name release-notes-11.x.x.
- Navigate to docs -> learn -> wavemaker-release-notes and create a new file for the release notes with the name v11-x-x.
Adhere to the naming convention mentioned above.
Types of Release Notes
We create two types of release notes:
- Pre-release notes: Published on the Wednesday prior to the release. These prepare users in advance for any features, migrations, enhancements, or tech stack upgrades.
- Post-release notes: Published along with the version upgrade.
Points to keep in mind when documenting pre-release and post-release notes:
Pre-Release Document
- The tone used in the overview of this document should always be in the future tense. For example, the overview should start: "This release will include...".
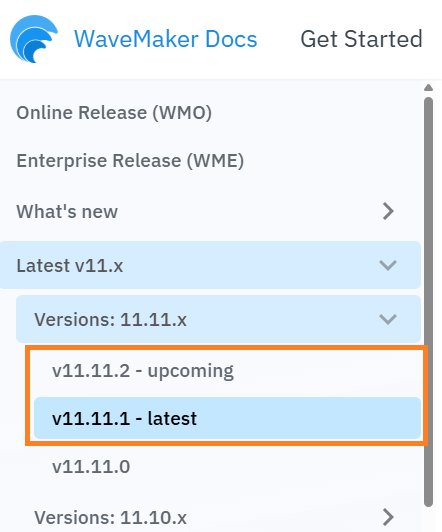
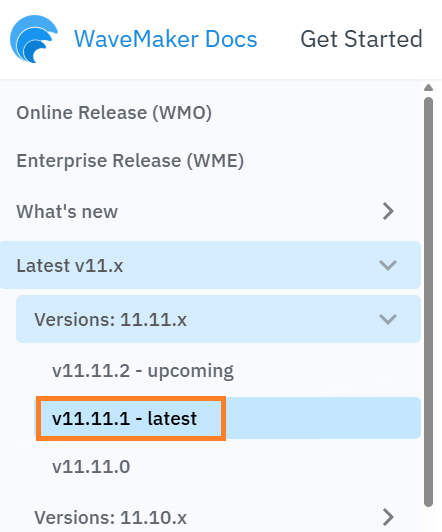
- The sidebar_label should have the upcoming suffix. For example: v11.11.1 - upcoming.
Adhere to the naming convention mentioned above.
Post-Release Document
- The tone used in the overview of this document should always be in the present tense. For example, the overview should start: "This release includes...".
- The sidebar_label should have the latest suffix. For example: v11.11.1 - latest.
Adhere to the naming convention mentioned above.
4. Update Necessary Documents
Along with the release notes, four other documents are updated with every release:
- wavemaker-release-notes.md
- sidebar.json
- index.json
- docusaurus.json
- release notes for previous version
wavemaker-release-notes.md:
This is the overview document for all releases. With every release, update the following segments:
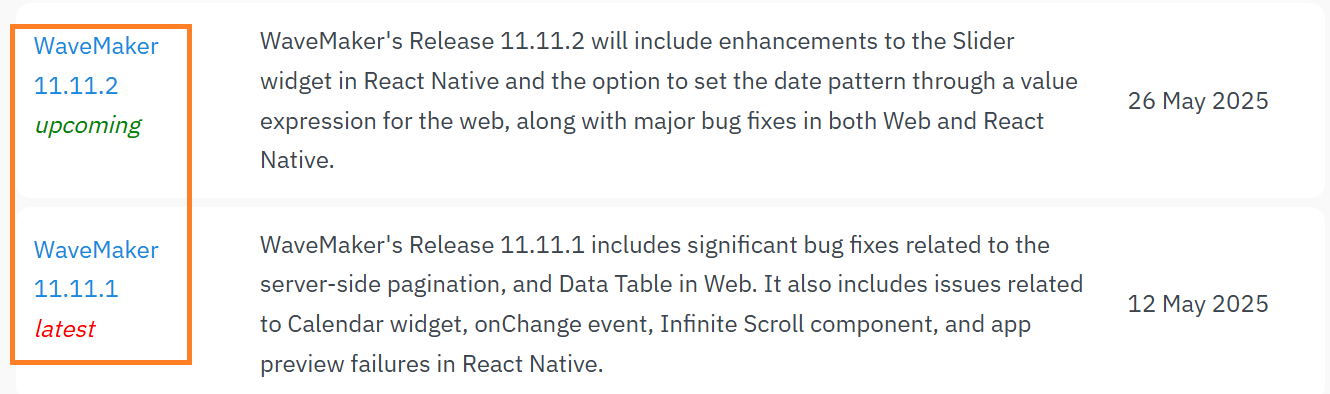
- Under Release History, add a new table or a new row to the existing table with an overview of the respective release and its release date.
- For the pre-release document, add the suffix upcoming and style the color as green. For the post-release document, use the suffix latest and style the color as red.
- Update the Tech Stack with the latest version details and update the Last Updated section with the release version and latest tech stack.
sidebar.json:
Add the latest release in sidebar.json so that it appears in the left navigation bar.
index.json:
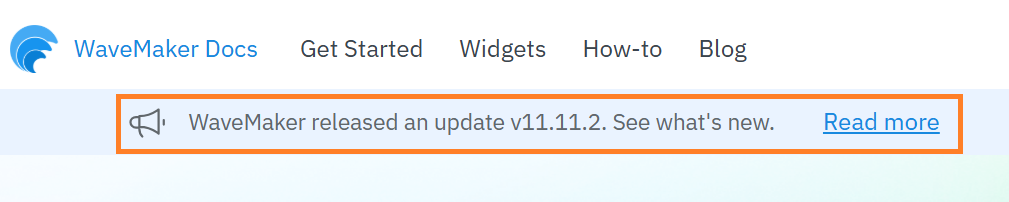
Update with the latest version of the release and its path. This message is shown on the homepage of the documentation, allowing users to directly navigate to the release document.
docusaurus.json:
Update with the latest version of the release, as it is displayed as the latest version on the documentation site.

Release Notes For Previous Version:
For the post-release, remove the latest suffix.
5. Get Approval to Merge
Once documented, share the pre-release and post-release documents with the respective team leads for approval in Git. After receiving approval, merge the release notes.
WME Release Notes
WME release notes are specifically for enterprise users. To create the WME release notes, follow the steps below:
- Create a new branch named wme-release-notes-11.x.x.
- Go to enterprise-release-notes.md and, under Release History, add a new table or a new row for the latest version.
- Add the version name, the overview from the WMO release notes corresponding to the respective WME version, and the date of the WME upgrade. Add the suffix latest and style the color as red next to the release version.
Remove the latest suffix from the previous version.
- Update the tech stack to match the latest version mentioned in the WMO release notes.
- Get it approved and merged.