Configuring for Azure Deployment
Learn how to deploy your app to Azure server.
WaveMaker allows you to deploy your app to your Azure cloud account for Live (and Stage for WME users) phase. Know more about App Phases from here.
To deploy your app to Azure account, you need to configure the Live (Stage) phase.
This document covers the Live Phase configuration for your AWS account and is a part of the Manage Deployed Apps
Prerequisites
You are expected to have an Azure account.
You must set up an Active Directory application and assign the required permissions to it. The permissions include access to Microsoft.compute, Microsoft.network and Microsoft.storage. See here to create AD app.
Once the application is created, get the authentication details.
- Click on the Configure tab to configure your application's password.
- Copy the CLIENT ID.
- If the application will run under its own credentials, scroll down to the Keys section and select how long you would like your password to be valid.
- The saved key is displayed and you can copy it. You will not be able to retrieve the key later so you will want to copy it now.
WME users need to request the copying of the deployment vhd (Virtual Hard Disk) to their Azure account.
For this, you need to write to support@wavemaker.com with the storage account name and sas (shared access signature) token. To obtain Shared Access Signature, you need to:
- Create a Storage Account,
- From the Storage Account access Blob and create a Container named vhds
- Obtain the shared access signature token.
Steps in Azure Configuration:
From Apps Portal, select the project.
Click Configure on the Live Phase option.
While configuring the Live phase choose to host your app on your Azure account.
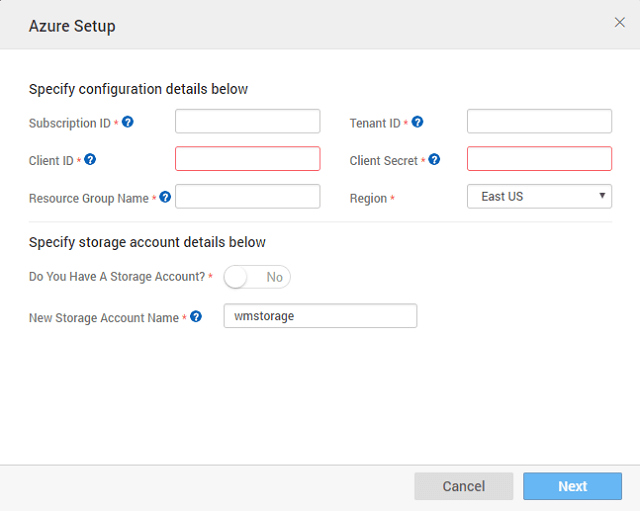
Enter your Azure account credentials to proceed with the configuration. You need to enter:
- Subscription ID (see here for details)
- Tenant ID, Client ID, and Client Secret (see here on how to obtain it)
- Resource Group Name (see here for details)
- Azure region where the app needs to be deployed
- A new storage account at Azure will be created with the name you provide. Make sure you enter a unique name.
- If you already have a storage account (see here on how to create the same) you can give the details, test the connection before proceeding to the next step.
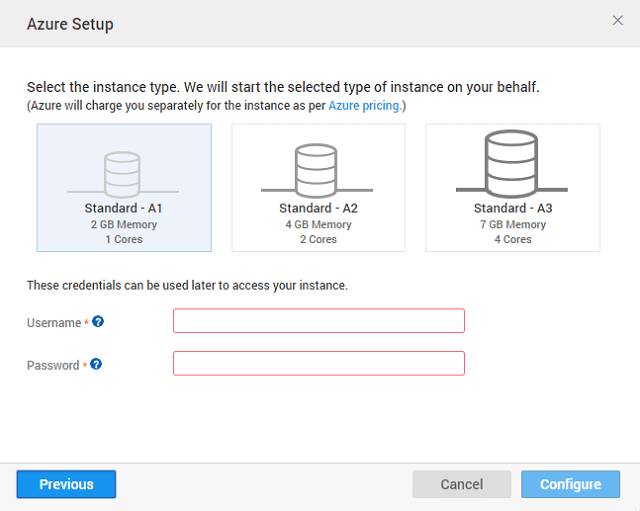
Select the appropriate instance based on your app requirements. You can choose from the three options provided (see here for size comparisons) and enter the Username and Password details. See here for more information regarding setting up of Azure VM like username, password, etc..

Please make sure your Azure subscription should allow launching an instance with Standard_A1, Standard_A2, and Standard_A3
- Once the setup is done (this could take upto 30 minutes in case the storage account has to be created), you can push the app from Demo to Live (Continue from here).
