Creating Themes using the Manual Setup
Themes are used to apply a style to the entire application. WaveMaker app (web, and mobile) themes are based on the BootStrap CSS markup and it requires you to know HTML, CSS, LESS, and Grunt.
Styling Elements
Mainly, themes contain the following styling for all the elements on a page.
- Color: Background, text color, border color, hover/active/focus colors, and more.
- Properties: For text like text-align, text-decoration, font-size, font-weight, and more.
- Layout: Includes margin, padding, border-radius, and more.
You can also develop themes instantly without needing to code; you can do this by using WaveMaker theme builder. For more information, see the Theme Builder Editor Tool.
Using the Manual Setup
In this document, see how to develop themes in WaveMaker using the manual approach which requires you to install the whole setup into the local environment.
Prerequisites
Before creating a theme, make sure you have installed the following on your machine:
Setup
Open GIT Bash prompt
Install grunt using the following command
For more information, see Grunt.
Install bower using the following command:
For more information on bower, see click here.
Setup the WaveMaker Theme repository.
- For Git clone, see Grunt WaveMaker Theme.
Follow the instructions given at the Git repository.
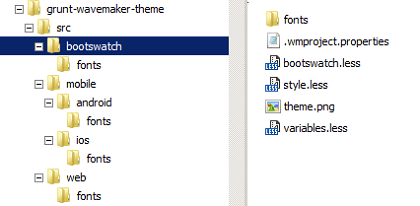
After setting up the repository, under the src folder you will find the following files that can be modified as per your needs.


Themes for Web and Mobile (Android/iOS) apps are different, use the appropriate theme source file to generate the theme bundle.
Theme Package Structure
Directory Structure
Fontsfolder: The web fonts can be copied here and referenced in the theme. There will be references to Roboto regular fonts in the variables.less (src/web), to avail them please download Roboto regular fonts and paste them in fonts directory (src/web/fonts)..wmprojects.properties: This contains essential properties required to identify the theme..wmprojects.propertiesname:for the theme,version: of the theme. Updated version will be used to replace the existing theme in the project.description: a short meaningfuldescriptionof the theme,type:THEME (DO NOT CHANGE THIS), andauthor: name of the author for the theme.
theme.png: Used to visually identify the Theme in the Theme dialog. The size of the image should be 160 x 120 px.style.less: This less file includes styles for components like header, footer, leftnav, calendar etc., which are not defined in the bootstrap CSS. These components can be further customized in this file by using the variables defined at the beginning of the file eg header background color can be changed using the @wm-header-bg-color variable.variables.less: This less file includes the styles defined by bootstrap. The values defined in this file are used by widgets like buttons, links, textbox, and more. For more information, see Bootstrap documentation on LESS variables.
Web Responsive
For creating a custom theme for a WaveMaker application, you need to understand the package structure. The theme package contains the following files:
| Name | Description | |
|---|---|---|
| Fonts | Folder containing web-based fonts used in the app. | Required |
| .wmproject.properties | Containing essential properties required to identify the theme which includes the name of the theme, version of the theme, a short meaningful description of the theme, the type should be THEME (DO NOT CHANGE THIS), and the name of the author for the theme. | Required |
| style.css | Containing styles related to the theme. | Required |
| theme.png | Theme icon. | Required |
| variables.less | LESS variables to define colors, sizes and more. | Required |
Hybrid Mobile
In a hybrid app mobile theme, there can be different flavors for android and ios systems. Hence, in a theme bundle, there are different folders for android and ios.
Following is the package structure:
| Sub-Folder | Name | Description | |
|---|---|---|---|
| none | .wmproject.properties | Containing essential properties required to identify the theme which includes the name of the theme, version of the theme, a short meaningful description of the theme, the type should be THEME (DO NOT CHANGE THIS), and the name of the author for the theme. | Required |
| none | theme.png | Theme icon. | Required |
| Android | Fonts | Folder containing web-based fonts used in the app. | Required |
| style.css | Containing styles related to the theme. | Required | |
| variables.less | LESS variables to define colors, sizes and more. | Required | |
| ios | Fonts | Folder containing web-based fonts used in the app. | Required |
| style.css | Containing styles related to the theme. | Required | |
| variables.less | Less variables to define colors, sizes and more. | Required |
Creating Theme for Web Apps
Follow the steps below for creating a theme for a web app.
After setting up the theme repository, navigate to the web folder.
Open
style.lessandvariables.lessin the editor of your choice.To use the web fonts in the theme, copy the web fonts (.ttf,.eot, .woff) in the font folder and include the font definition in
variables.less.The
variables.lesscontain variables which are used while building the bootstrap CSS. For example,@brand-primaryvalue change will affect all the styles using this specific property value. For more information on variables, see Bootstrap customization.For more information, see Styling App Components.
Replace the
theme.pngwith your image in the web folder.Update the
.wm-propertiesto provide theme information.The theme will be saved under
grunt-wavemaker-theme/distasweb.zip.
Creating Theme for Web Apps - Bootswatch
Bootswatch provides bootstrap themes that can be integrated into your WaveMaker web apps. The prerequisites and setup for building the WaveMaker theme are the same as above.
- Select a theme from Bootswatch.
- Download the
variables.lessandbootswatch.lessfiles for the selected theme. - After setting up theme repository, navigate to the bootswatch folder.
- Copy
bootswatch.lessandvariables.less files togrunt-wavemaker-theme/src/bootswatchfolder.
The variable files downloaded from bootswatch will fail if placed in any other theme folders like mobile or web.
- You can further customize the theme in
style.lessspecific to the header, footer, leftnav, etc. See here for details. - Replace the
theme.pngwith your image in the bootswatch folder. - Update the
.wm-propertiesto provide theme information. - Build the theme.
- The theme will be saved under
grunt-wavemaker-theme/distasbootswatch.zip - Import and Apply the Theme to your app.
Creating Theme for Mobile Apps
Mobile Apps come in two flavors - Android and iOS. The theme renders differently on these platforms and as such the theme needs to be packaged differently.
For example, below is the rendering of a Live Form within the List.
For Android
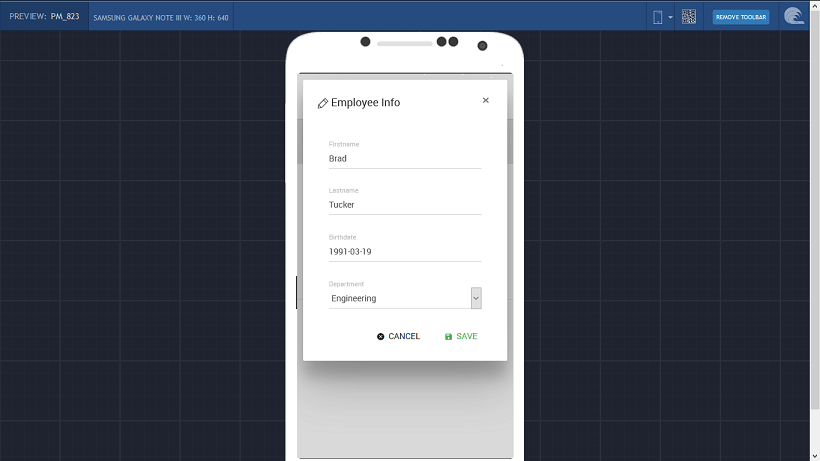
For iOS

As mentioned earlier in the setup structure, WaveMaker provides two folders for Mobile Themes - Android and iOS. The structure is a replica of that for Web with the content tailored for the specific platform. When building a theme for Mobile Apps, make sure that you use the appropriate files and make the same changes to both sets. DO NOT replicate the files, make changes only where needed.
Build Theme
Once you have incorporated all your changes to the Theme files, you'll need to build it.
From the command prompt, build the themes using the following commands:
A
zip file(web.zip/mobile.zip/bootswatch.zip)for the theme will get generated in thegrunt-wavemaker-theme/distfolder.You can import the theme and apply it to your application.
Testing the Theme
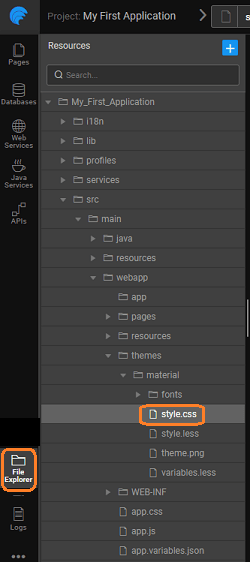
You can test the custom theme, before import, by copying the style.css file directly into your app. From the left Developer Utilities, open File Explorer and you will find the style.css file under webapps -> current theme folder. Save and run the app.
These changes are temporary, for the permanent change, you have to import the Theme.
If you make changes to the default theme style.css file, and if you do not import it as your custom theme, updating the theme will erase those changes.
Publishing the Theme
Applies for Enterprise Version from 10.0 release.
In order to make a custom theme available to developers across the enterprise, it needs to be published. Follow the steps below to publish a Theme.
Once you have created a custom theme, import and test it in your application.
From the Project Configurations, under Export select the Theme to EDN option.

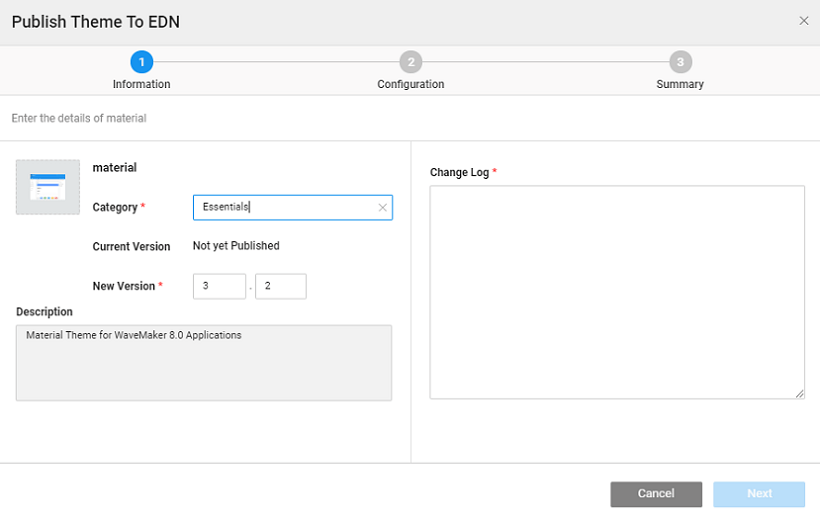
The theme publishing wizard with three steps will display as below.
- Information regarding the Category, Version, Description and Change Log.
- Configuration allows you to add Tags for search and tracking purposes and also includes the Metadata populated automatically.
- Summary for a review before Publishing.
Note that the current Theme applied to the application will be selected for Publishing.
Once the EDN Admin approves the Theme, the same will be available in the Artifacts listing in the Themes dialog for other developers to select and apply.

See Also
Apply and Import Theme
Customize an Existing Theme
How to Customize Themes