WebSocket Usage - Chatroom App
Chatroom App utilizes a WebSocket service to enable chat among multiple users.
WebSocket Service Import
Step 1: WebSocket Service Import
- Create a mobile project
- From Web Service resource, add new web resource and select WebSocket
Test the WebSocket Service
Step 2: Test the WebSocket service
- Provide the service URL (Use the
wss://URL, for example, here we are usingwss://websocket-demos.wavemakeronline.com:443/websocket/chatroom?username=user1) - Enter
testagainst Sample Request Body - Click Test.
- Once the connection is established successfully with the service, the client will start receiving messages from the service and display it under the MESSAGES section.
- Select one of the response messages by clicking on the radio button on the left. This will help the platform to generate metadata info against the service. This metadata will be helpful while binding the corresponding WebSocket Variable with widgets.
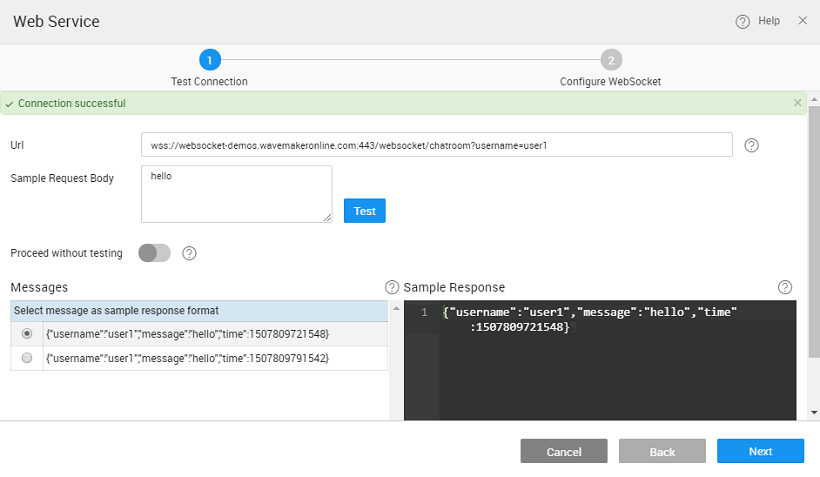
- If the server does not respond with any message or the message you are expecting at runtime is different, you can provide the same manually in the editor under the SAMPLE RESPONSE section. Please note providing Sample Response is useful only if the target WebSocket service returns homogenous data. If the data is heterogeneous, selecting a sample response is not going to be much of a use as you will end up writing JavaScript code to deal with different data structures returned by the service.
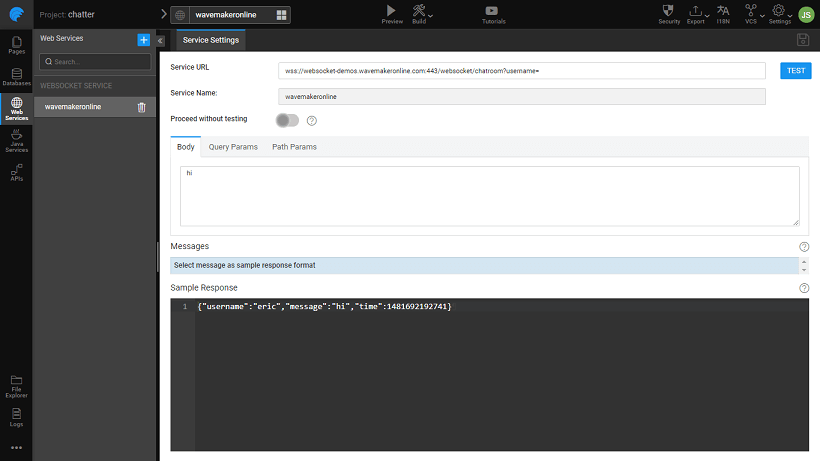
Configure the Service and Import
Step 3: Configure the Service and Import
After successfully testing the service, click Next to configure the service with any parameters if required.
- If the service requires query params, they will show up under the query params section. You can make the path of the URL dynamic by adding path params under the second tab.
- Give a name to the service (in this case chatroomservice) and click Import and the service will be successfully imported into the project.
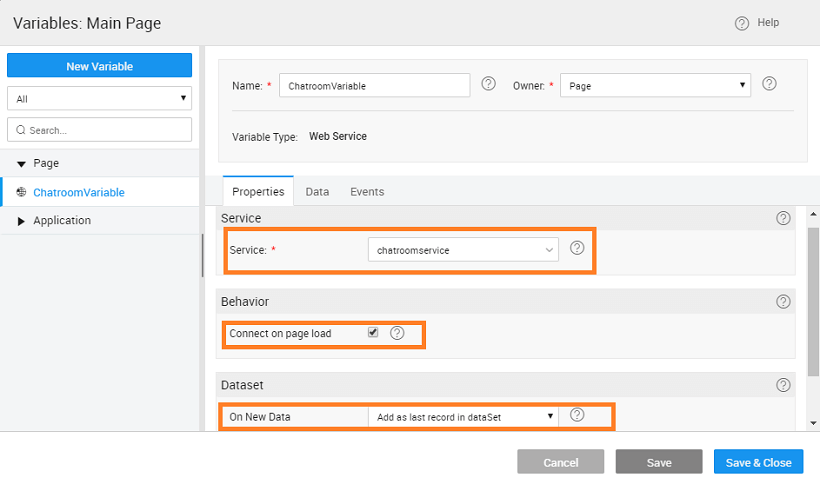
Create a WebSocket Variable
Step 4: Create a WebSocket Variable against the service
This variable is an interface between the client and the server. Follow the below steps to create the variable:
Open the page where you want to use the chat service
Select
chatroomservice(WebSocket service name entered while import) against the Service property.Give the variable a name (in this case ChatroomVariable)
From the Variables dialog:
- Check the properties Connect on page load and set On New Data to Add as the last record in dataSet (since we want to display the latest message at the bottom of the list)
- Click Save & Close to save the variable.
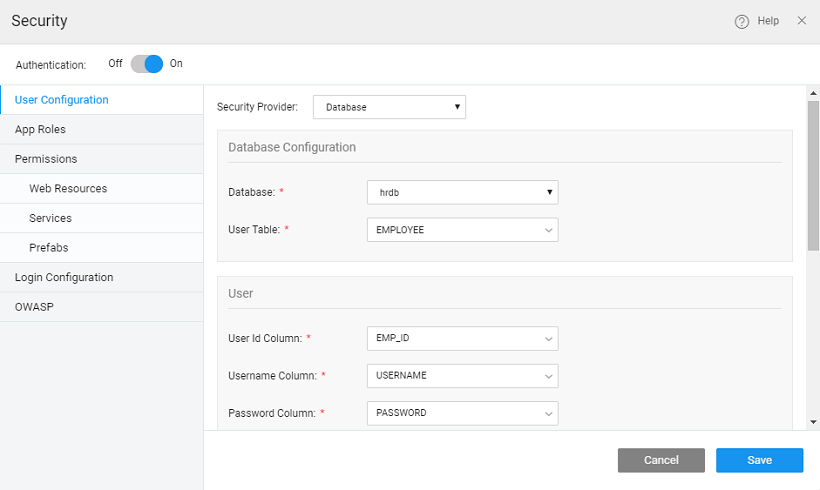
Secure the App
Step 5: Secure the app
- We will be using a Database for login details
- Import the Database with the login details (here we will be using the sample hrdb Employee table
- Enable Security and use Database as Service Provider
- Configure the Security as follows:
Create a DB CRUD Variable
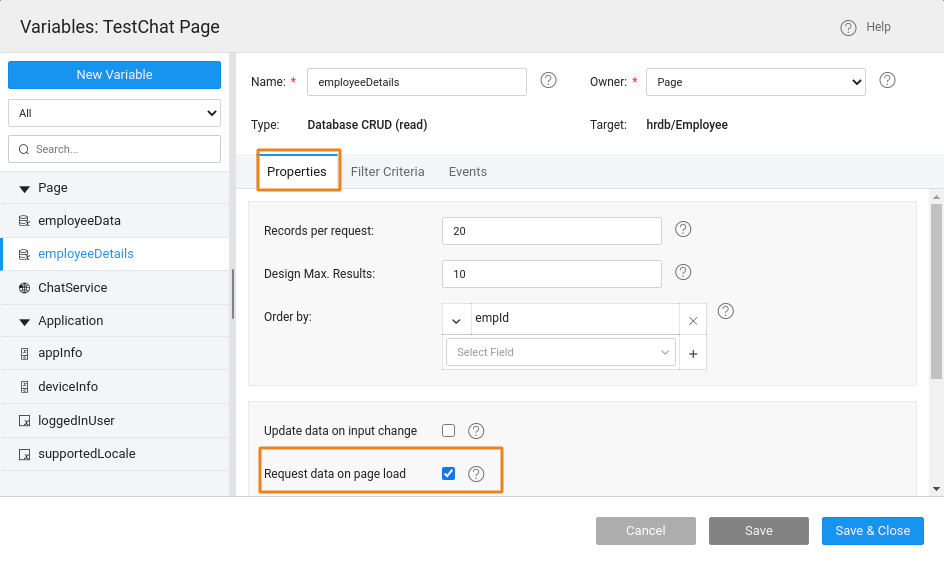
Step 6: Create a DB CRUD Variable to get the logged-in user details.
This variable will get the logged-in employee details. Follow the below steps to create the variable:
- Create a Database CRUD Variable (in this case employeeDetails) for
hrdbEmployeeentity.- Check the properties Request data on page load
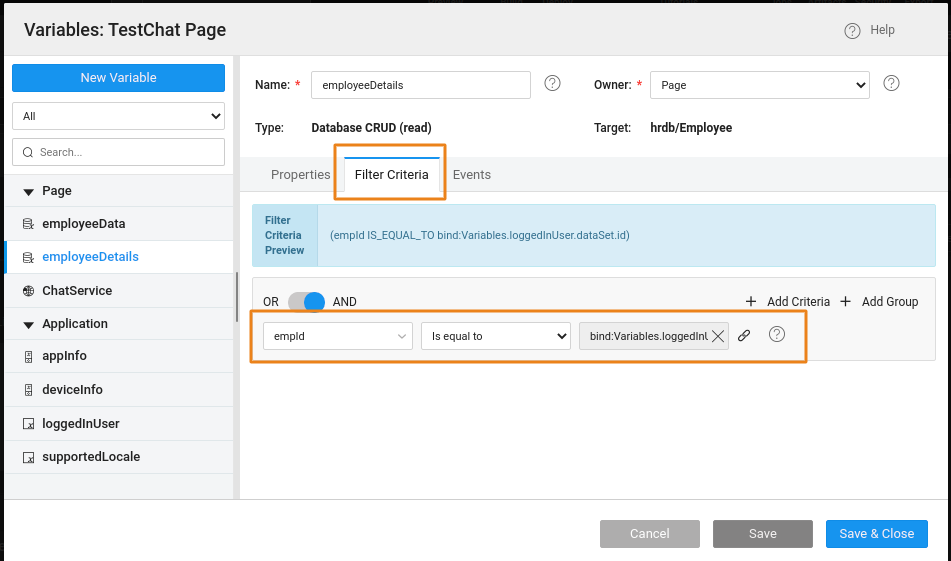
- From the Data tab, set empId Filter Field to
loggedInUser.dataSet.idusing the bind icon next to the empId
Create a Database CRUD Variable
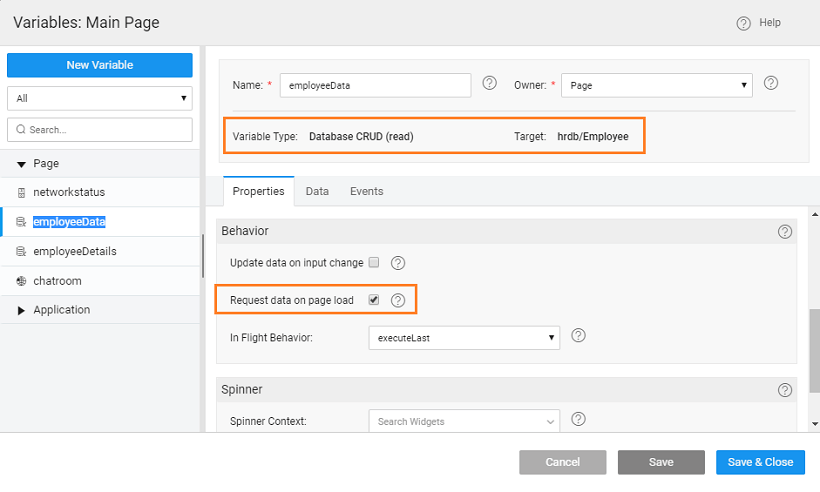
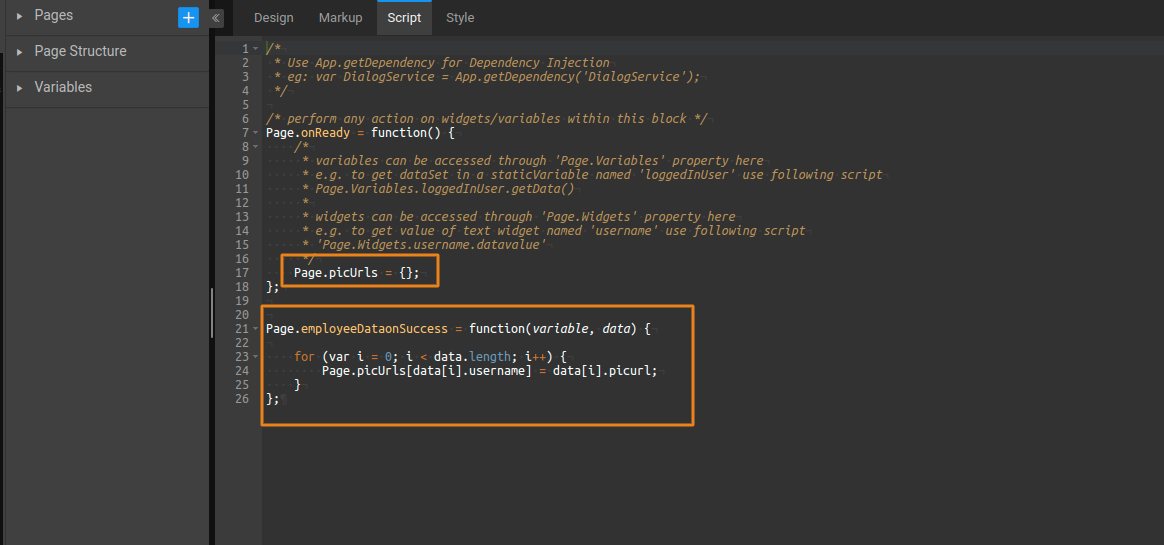
Step 7: Create a Database CRUD Variable to get all user details
This variable will get employee details to be displayed against the chat messages. Follow the below steps to create the variable:
- Create a Database CRUD Variable for
hrdbEmployeeentity (in this case employeeData).
- Check the properties Request data on page load
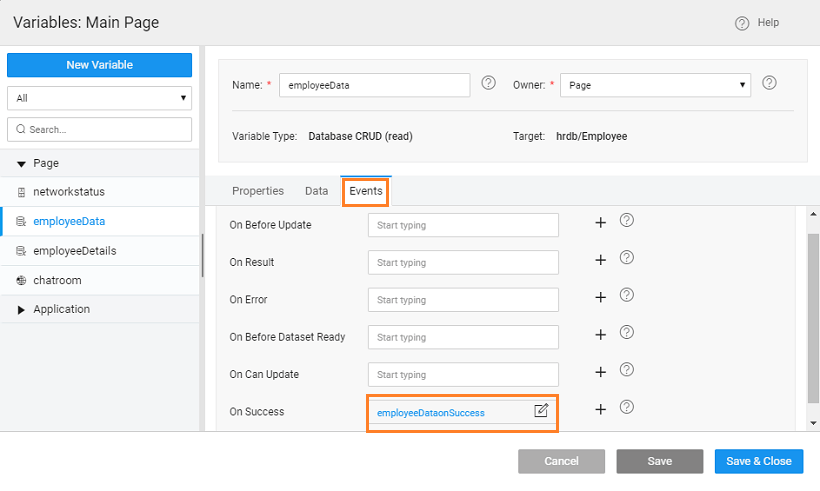
- From the Events tab, set On Success to trigger
JavaScript.Enter the following code to retrieve thepicurlof the employees:
Design the Chat Room
Step 8: We will design the Chat Room page
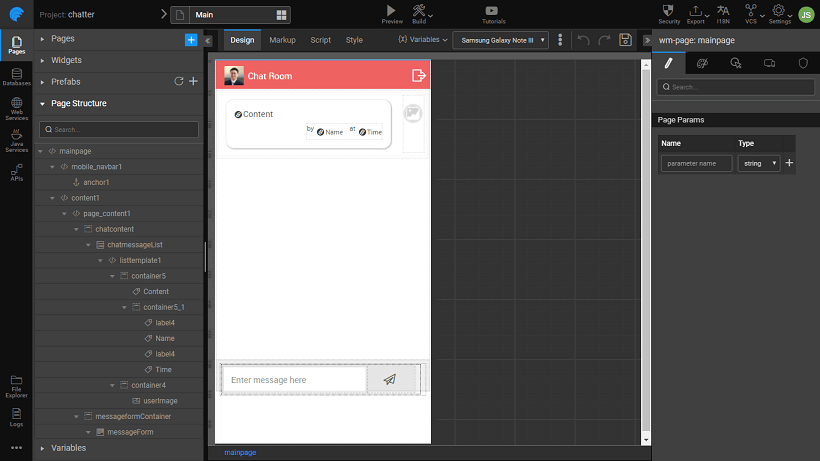
- We have chosen One column layout with top navbar for the Main Page
- Select the top navbar and set:
- Title as Chat Room
- Image Source as the
employeeDetails.firstRecord.picurl
- Drag and drop a List. Use
Chatroomas the Data Source.- Bind Name label to Chatroom -> username field
- Bind Time label to Chatroom -> time field
- From the canvas
- For the Time label Use Expression to set the time format to:
toDate: 'hh:mm:ss a' - For the Picture widget Use Expression to set it to the appropriate picurl:
picUrls[Widgets.chatmessageList.currentItem.username]
- For the Time label Use Expression to set the time format to:
- Drag and drop a Grid Layout inside the Panel Footer. Set:
- GridColumn1 width = 10
- GridColumn2 width = 2
- Drag and drop Textarea in GridColumn 1
- Drag and drop a Button in Grid Column 2. Set
- Icon Class =
wi wi-paper-plane - on Click to
chatroom.send
- Icon Class =
Variable Binding
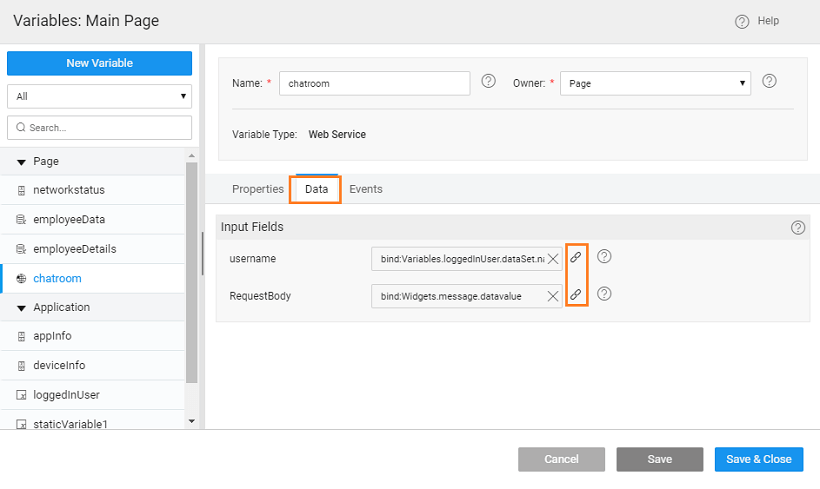
Step 9: Variable Binding.
- Open Chatroom WebSocket Service Variable. From the Data tab, bind
- username to
loggedInUser.dataSet.name, - RequestBody the
datavaluereturned bytextareawidget
Run the app
Step 7: Run the app
- Open three instances of the Chatroom app and login as three different users.
- When one user sends a message, the remaining users will receive the message in real-time.
- When remaining users send messages, the other users also receive it back in real-time.