WaveMaker Docs

WaveMaker Docs

  • Get started
  • Widgets
  • Mobile
  • How-to
  • Enterprise
  • Releases
  • Blog
  • Sign-in

›Mobile UI design

How-to-documents

  • How-to Wiki
  • WaveMaker Best Practices

App solution

  • Creating a Registration Page
  • Support for Password Encryption
  • Error Handling in WaveMaker App
  • Leaving Page with Unsaved Changes
  • Micro frontend using iframes
  • Enabling PWA

UI design

  • Passing Parameters to Pages
  • Passing Parameters to Partial Page
  • Accessing Script
  • Use Static Variable to pass data between pages
  • Customise Login Page
  • Incorporating Additional Icons
  • Change Icon Color on Condition
  • Change Icon for the Global Spinner
  • Changing Default Favicon
  • Changing App Logo
  • Changing Page Title
  • Customise App Style
  • How to use Conditional Class Property
  • How to use Conditional Style Property
  • Customize an Existing Theme
  • Adjust Left Navigation Width
  • Customizing Theme
  • Enable SPA
  • Choose Widget Template and Layout
  • Widget Template and Icons
  • Custom Template for Widgets
  • Apply Custom Data Formatter

Nav & Dropdown

  • Dynamic Menu based on User Role
  • Restricting Menu Items based on the User Role
  • Localization for Dropdown Menu

Localization

  • Localization in WaveMaker Apps
  • Setting Language and Date Format
  • Localization Using Select Locale
  • Localization of Error Messages

Security

  • SAML Integration - OneLogin
  • SAML Integration - ADFS
  • OpenID Integration - Azure AD
  • Custom Security using Google OAuth Prefab
  • Multiple Security Provider Implementation
  • Customizing Post Authentication Handlers
  • Configuring Content-Security-Policy
  • Configuring MTLS

Databases

  • Queries with Dynamic Where Clause
  • Connect To Azure SQL Server
  • Recommended JDBC Driver Versions for Databases
  • How to fetch more than the default number(100) of records from database?
  • How To: One-to-Many Relationship
  • Working with Temporals
  • Connect To AWS Redshift Database
  • Connect To SAP Hana Cloud Database
  • Transactional History of Entity
  • Row-Level Security using DB Event Listeners
  • Validations using CRUD Listeners
  • Custom Logic DB Event Listeners
  • Connect to MySQL database using SSL
  • How to Switch MariaDB to MySQL Connector

Web services

  • Using App Environment Properties
  • Consuming an Existing WaveMaker API
  • Using POST method to send data to a REST API
  • Request-Response Processing for REST Services
  • How to Intercept Request and Response of all API Calls in One Place
  • WebSocket Usage - Chatroom App
  • UI for API Server-side Pagination
  • Working with API with different pagination formats

Java services

  • Sending Email using WaveMaker Connector
  • Implementing Forgot Password feature using Java Service
  • Accessing REST APIs from Java Service
  • Scheduling a Java Service
  • Integrating JUnit Tests for WaveMaker Application
  • ORM Artifacts
  • Pre-Post Processing for Database Service APIs
  • Accessing Logged-in User Details using Java Service
  • Design a workflow in Camunda BPM and integrate into a WaveMaker app
  • Integrate Azure File Storage
  • Insert Data from Excel into Database
  • Integrate Amazon S3 into WaveMaker App
  • Integrate Twilio Connector
  • Integrate OTP (One-Time Passcode) Verification with WaveMaker App

Variables

  • Using Filter Conditions on Variable
  • Using Live Variable APIs
  • Using Notification Actions
  • Using Navigation Action
  • Using Variables for Queries and Procedure
  • Using Service Variable in a Form
  • Using Filter Criteria for a Data and Live Widgets
  • Using Filter Criteria for a Database CRUD Variable

JavaScript

  • Using JavaScript in Binding
  • Using JavaScript from External URL
  • Using JavaScript to loop a command
  • Using function for evaluating conditions

Developer options

  • Synchronizing WaveMaker Apps with IDEs
  • Synchronizing Java Services Controller
  • Integrating Amazon Cognito for User Authentication
  • Integrating Sample Jasper Report in WaveMaker Application
  • How to generate PDF File using Jasper Reports
  • Upgrading an App from WaveMaker 9.x to WaveMaker 10.0
  • App Migration from WaveMaker 9x to 10x
  • Setup Fusion Reactor for Debugging Issues

Deployment

  • SSL Termination in LoadBalancer

Mobile App Solutions

  • Notify users about new update

Mobile gesture

  • Setting Swipe Gestures on a List Widget
  • Working with Pull to Refresh

Mobile widgets

  • Using Search Widget within the Navbar

Mobile UI design

  • Setting Splashscreen Images and App Icons
  • Using Cordova Plugins
  • Designing Tablet Views in Mobile Project
  • Sliding left navigation for Mobile App
  • Mobile App using Bar code
  • Custom Date Picker in Mobile

Cards

  • Capturing Card Items

DataTable

  • Customising Data Table Row Action
  • How to Configure Row Expansion in a Data Table
  • Using Widgets to represent Data Table Columns
  • View Master-Detail Data Records using Data Table
  • Add Master-Detail records using Data Table
  • Export Data from Data Table
  • Export Data from Data Table - 2
  • Setting Blob Filename
  • Dynamic Data Tables
  • Customize Dynamic Datatable
  • Data Table Column bound to Query
  • Combining Columns in Data Table
  • Custom Styling Data Table Columns & Rows
  • Formatting Data Table Columns
  • Concurrency and Record Locking in WaveMaker
  • Edit DataTable records bound to Query API

List

  • Creating an Employee List grouped by City
  • Creating an Employee List grouped by Birth Month and City
  • OnRender Event
  • Including a Data Table within a List
  • Building an Editable List
  • Building Cascading Lists
  • Accessing List Items
  • Localization of Data Table Column Headings

Forms

  • Using Live Form
  • How Tos: Form
  • Building Tabbed Live Form
  • How Tos: Live Form
  • Linking Live Form with another Widget for Input
  • Handling Related Fields in a Live Form
  • How to Get Validation Messages from a Form
  • Adding Master-Detail records in the same transaction
  • Submit Parent and Child Records in a Single Transaction
  • Submit Parent and Child Records in a Single Transaction using Form and Data Table
  • Using Cascading Select & Autocomplete for Live Form Fields
  • Using Cascading Select within Live Form
  • Using cascading Filter to populate Live Form
  • Using Wizard for Master-Detail Live Form
  • Copy to Clipboard
  • Create a form with multiple wizard steps
  • Smart Forms: Conditional Flows for form Widget

Calendar

  • How Tos: Calendar
  • Calendar Usage - Create an Event
  • Calender Usage - Google Calendar Integration

CheckboxSet

  • CheckboxSet to Filter List data

FileUpload

  • FileUpload - Basic Usage
  • File Upload Widget Operations
  • Upload File & Save in Database
  • File Upload & Blob Data
  • File Upload - Custom Directory
  • Accessing File Upload from Java Code
  • Upload Files from Live Form & Form

Radioset

  • Radioset to Filter a List

Rating

  • Building Rating Widget using Static Data
  • Building Rating Widget using Static Variable
  • Build Rating Widget using Model Variable
  • Building an Interactive Rating Widget

Select

  • Configuring Select Widget from a Static List of Values
  • Configuring Select Widget from a Static Variable
  • Configuring Select Widget from a Variable
  • Configuring Select Widget using Display and Data Fields
  • Configuring Select Widget from Database Fields
  • Configuring Cascading Select
  • Selection Widgets - Use Case

Progress Circle

  • Using Progress Circle Widget

Charts

  • Working with Charts
  • Display User Selection in another Widget
  • Handling Dynamic Data
  • Custom Data

Richtext Editor

  • Adding Custom Fonts to Richtext Editor

Live filter

  • Applying Live Filter to a Data Table or a Chart
  • Building a Multiple Selection Live Filter
  • Building a Range Live Filter

Container

  • Setting partial page content for Accordion within a List
  • Setting partial page content for Panel within a List using JavaScript
  • How Tos: Wizard
  • Dynamic Tabs and Accordions

Tree

  • Tree using Static Variable
  • Tree using Java Service
  • Tree using Dynamic Tree

Prefabs

  • Creating Partials in a Prefab
  • Create Prefab using Third Party UI Widgets
  • Create a Simple Prefab
  • Create Prefab Using D3 & NVD3 Charts
  • Create Prefab Using D3 Library DataMaps
  • Create Prefab using JQuery Plugin
  • Create Prefab using Angular Module
  • Create Prefab using Angular, React Components
  • Azure OAuth Prefab Integration

Team Poral Configure Vcs

  • Configure Azure Repos In CodeRepository
Edit

Mobile App using Bar code


Learn to create a simple mobile application that will scan an employee id barcode and display the corresponding Employee Profile. We will be using the sample hrdb shipped with WaveMaker.

Through this mobile application, you will learn about the following functionalities:

  • Creation of a Hybrid Mobile app
  • Importing a Sample Database
  • Usage of LList widgets
  • Creation of Device and Live variables

The following steps will help you to build a simple mobile app with the above-mentioned functionalities.

Login to WaveMaker using your credentials. You will be directed to Projects Dashboard page.

Create Mobile App

Creating an app involves the following steps:

  1. Click Create App, from the project dashboard page. NOTE: If you have not created any projects, you will be directed to Sample Apps. Select the Apps tab to see the Create App option.
  2. Choose Mobile, from Select your platform dialog. Selecting_mobile_app
  3. On Create Mobile Application dialog, enter the Project Name and Description for the project in their respective fields and set the project avatar (project image) if required and click CREATE. Name_Description
  4. A project settings dialog will be displayed. settings You can modify the following (optional):
  • package prefix – Package prefix defines the default package for the generated code across all services. This can be modified as per your requirements.
  • copyright information – created by default, which can be modified.
  • set the default language for the project, this can be used in conjunction with Localization to set the language for the application.
  • Click SAVE.
  • The Main Page is created by default, with a Two Column layout with top navbar and tabbar.

Adding Datasource - Database

We will Import a database to add data source to our application

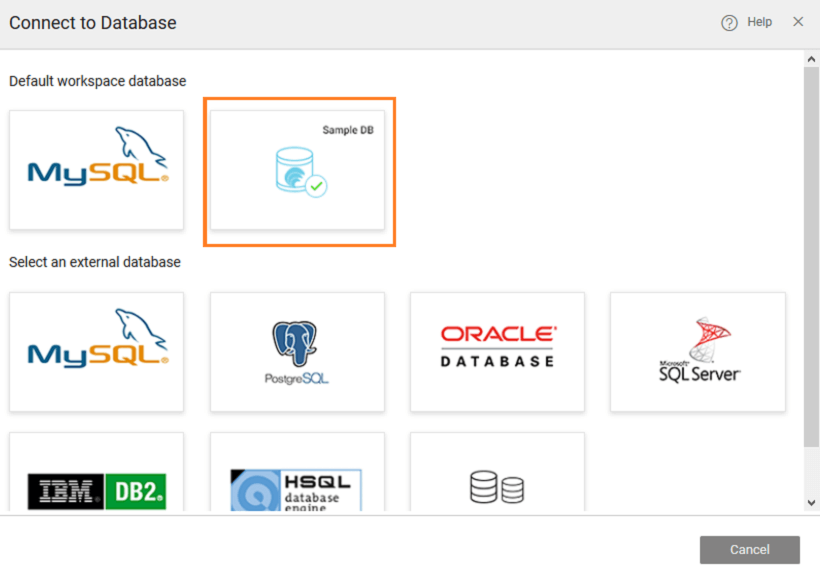
  1. From the Main Menu, click on Import and select **Database **from the drop-down list. This will enable us to include a data source (database) into our application.

Import_DB

  1. You need to choose the Database Provider of the database being imported. For this tutorial, we will use the inbuilt sample database that ships with WaveMaker. Click sample database link.

bs_dbimport

  1. Select tables that you want to import from the chosen database. Here we will go with the default setting and import all the tables by clicking NEXT.

bs_dbtables

  1. Upon successful import, you can choose to work with the data model generated or use the DB widgets created or go back to the canvas you are working on. Click CLOSE to get back to the project workspace.

bs_dbfinal

UI Design

Drag and drop following widgets

WidgetUsage
Barcode scannerUsed to scan product id
ButtonTo search the fetched product
Textbox(text1)To view the scanned barcode value(Employee id)
Textbox(text2)To view fetched Employee Name
Textbox(text3)To view fetched Employee Designation
Picture(picture1)To view fetched Employee image

Variable Creation

Select the Variable option from the Create Menu. From the variable dialog:

  1. Select variable type as live variable
  2. Create a variable (say, empSearchVariable) with Employee table as the Type bs_empvar
  3. The next steps will help in filtering data based on the output of QRCode /Barcode widget.
  4. Click on data tab and select eid field binding icon. bs_empvar_data
  5. Navigate to use expression tab as per the below screenshot and search for the widget with name text1 in the search box and bind its data value to the eid field. bs_empvar_databind
  6. Click on Save and Close button bs_empvar_data2

Widget Bindings

For the various widgets dropped in the UI Design step, do the following:

  1. For text1 set value from barcode data value. This would display the barcode value and we are passing the same value to the above variable bs_text1_bind

bs_text1_bind2

  1. For text2 set value from empSearchVariable variable -> firstname. This would display name of the product as per the filter.

bs_text2_bind

  1. Similarly for text3 set value from empSearchVariable variable->jobtitle and for picture1 set Source value from empSearchVariable variable->picurl

Widget Events

For the various widgets dropped in the UI Design step, do the following:

  1. For button1 set On tap event value as empSearchVariable. Hence, on click of the button, the variable would be called. bs_but_event
  • Save and run the project. Based on the Barcode generated the Employee name, job title and image changes in UI.
  • Generate APK file for using the App in mobile
  • Working with generated APK. Click here for Demo Apk file generated for the application.
note

For demo purpose, we have used Employee ids as 1,2,3... You can create a QR code for numbers and scan it for the respective product name, description etc. Sample QR Code generators online: http://www.qr-code-generator.com/.

Last updated on 12/31/2019 by Swetha Kundaram
← Sliding left navigation for Mobile AppCustom Date Picker in Mobile →
  • Create Mobile App
  • Adding Datasource - Database
  • UI Design
  • Variable Creation
  • Widget Bindings
  • Widget Events
WaveMaker
  • PRICING
  • PARTNERS
  • CUSTOMERS
  • ABOUT US
  • CONTACT US
Terms of Use | Copyright © 2013-2023 WaveMaker, Inc. All rights reserved.