WaveMaker Docs

WaveMaker Docs

  • Get started
  • Widgets
  • Mobile
  • How-to
  • Enterprise
  • Releases
  • Blog
  • Sign-in

›Deployment to external web servers

Getting started

  • Introduction
  • Walkthrough

Pages

  • Pages Overview
  • Creating a Page
  • Layout and Styles

    • Page Layout
    • Templates
    • Themes
    • Accessibility

    Page Configure

    • Page Artefacts
    • Page Cache
    • Partial Page
    • Page Parameters
    • Examples

    Page Actions

    • Navigation
    • Events

    Custom Development

    • Theme Editor
    • Manual Theme
    • Create Template

SSPA

  • Micro Frontend App

Databases

  • Database Services Overview
  • Database Tools
  • Database Designing

    • Working with Databases
    • Data Modelling
    • DataBase Schema Modes
    • Working with DB Schema
    • Database Views
    • Temporal Support

    Accessing Database

    • Accessing Database

    Queries and Procedures

    • Working with Queries
    • Working with Stored Procedures
    • Version Queries & Procedures
    • Blob Queries and Procedures
    • Queries & Procedures - Java Services

    Database Variables & API

    • Database CRUD
    • CRUD Event Listeners
    • Database APIs
    • Database Service APIs

REST & SOAP

  • Web Services Overview
  • Restful

    • REST Services
    • Secure Server-side Properties
    • REST Request Timeouts
    • REST Services using OAuth 2.0

    SOAP

    • Working with SOAP Services
    • Imported SOAP APIs

    Websocket

    • Working with WebSockets

    APIs

    • API Designer
    • Mocking APIs
    • Mocking REST API
    • Swagger Import

    Variables

    • CRUD Variable
    • Service Variable
    • WebSocket Variable

Java Services

  • Java Service
  • Java Services

    • Java Integration Services
    • DB Service Integration
    • API Composition
    • Variables for Invocation
    • Generated REST APIs (API Designer)

    Java Services Variables & API

    • Variable for Java Service
    • Java Service APIs

    Source Files

    • Resources and Third-party Libraries
    • Using 3rd party JavaScript files
    • Using 3rd party jar files

Variables & Actions

    Variables

    • Variables Overview
    • Model Variable
    • Device Variables

    Binding

    • Variable Binding
    • Custom Formatter

    Actions

    • Actions
    • Navigation Action
    • Login Action
    • Logout Action
    • Timer Action
    • Notification Action

    Events

    • Events
    • JavaScript Access

Security

    App Security

    • Overview
    • Authentication
    • Authorization
    • Access Levels & Permissions
    • Login Configuration
    • Session Persistence
    • SSL Encryption
    • XSS antisamy policy configuration
    • OWASP
    • XSS Prevention
    • Central Authentication System
    • Token Based Authentication
    • SAML Integration
    • Secure Connection for Deployed Apps
    • Concurrent Sessions
    • HostHeader Injection

    Security Variable and API

    • Security Variables
    • Remember Me
    • Variable for Security Service
    • Security Service APIs

Developer options

  • Test and Run (Preview) Apps
  • Chrome Extension: Devtool
  • Debugging
  • Inspection Framework
  • Build Options
  • WaveMaker Mobile Apps Automation
  • Developer Integration

    • Project User Management
    • Developer Collaboration
    • Extending the Application using IDEs
    • Import, Export & Update Apps
    • Project Shells

    Add-ons

    • Localization
    • Artifacts Repository

Deployment

  • Overview
  • Deployment Profile
  • One-click Deployment
  • WaveMaker CI/CD Pipeline

    • Overview
    • Configuration Profiles
    • Configuration Management
    • Pipelines and Phases

    Pipeline Configuration

    • Default Pipelines in WMO
    • Configure Pipeline in WME

    Deploy to Cloud Providers

    • AWS
    • Azure
    • Google Cloud
    • DigitalOcean

    Pipeline Configuration cont.

    • Phase configurations
    • Webhooks Integration
    • Tests Integration

    Manage Deployed Apps

    • Manage Deployed Apps

    Integrate with your CI/CD Providers

    • Push Code to External repo
    • Custom VCS Integration
    • Export WaveMaker Application
    • Building Project with Maven
    • Build with Docker
    • Jenkins Integration
    • Deploy using Docker Compose
    • Deployment to Heroku

    WaveMaker apps Interation with CDN

    • App Integration with AWS CDN
    • App Integration with Azure CDN

    Deployment to external web servers

    • Application Server Overview
    • Deploy to Tomcat
    • WebSphere
    • JBoss - WildFly
    • WebLogic Server

Connectors

  • Introduction
  • Architecture
  • Import Connectors
  • List of Connectors
  • Build a New Connector

Teams

  • Overview
  • Team Setup
  • Dashboard
  • Manage Users
  • Manage Projects
  • Manage Prefabs
  • Project Branches
  • Manage Roles
  • Code Repository
  • Import VCS Project
  • Team Profile
  • Manage Subscription
  • FAQs
Edit

Application deployment to JBoss

Learn how to deploy your WaveMaker app to JBoss server.


WaveMaker Apps can be exported as a WAR file. This generated file can be deployed to any standard Java Web Server running on JDK 1.8. This section walks through the steps to deploy WaveMaker app to JBoss - WildFly. For more infomation, see Deployment to Web Server.

Prerequisites

JBoss Server setup

  • You need to configure JBoss server. Learn more.
note

Deployment has been tested on JBoss WildFly versions 11.0.0.CR1 and 10.1.0.Final.

  • Login to JBoss server with valid username and password.

Start JBoss Server

  • Navigate to jboss-[version]jboss-[version]bin.
    • Windows: Double click on standalone.bat file to start JBoss server
    • Linux: Double click on standalone.sh file to start JBoss server
  • Open Browser and navigate to http://localhost:9990 as JBoss by default starts in 9990 port.

The Project sources zip/directory Export Project as zip from WaveMaker.

Preparing WAR File

From WaveMaker Studio, for the app that you want to deploy to JBoss, Export the app as WAR file using the appropriate configurations. For more information, see Generate a WAR file.

Deploy to JBOSS Server

note

The screenshots from JBoss website were current at the time of documentation. The actual images might differ.

JBoss-WildFly

  • Copy prepared war file into JBoss home dir\standalone\deployments
  • Open JBoss terminal and check app deployment logs for deployment status
  • Once success message is displayed in the terminal navigate to http://localhost:8080/ to view the deployed application.

Deploying Application that uses JNDI Datasource


Configure JNDI in JBOSS Server

Configuring JNDI for Oracle database server

  • Navigate to folder ..\Jboss Home Directory\modules\system\layers\base\com. Create structure ..\oracle\oracle\main.
  • Copy ojdbc6-11.2.0.jar in the main directory.
  • Add following details to module.xml file (in main directory).
<module xmlns="urn:jboss:module:1.1" name="com.oracle.oracle">
    <properties>
        <property name="jboss.api" value="unsupported"/>
    </properties>
    <resources>
        <resource-root path="ojdbc6-11.2.0.jar"/>
        <!-- Insert resources here -->
    </resources>
    <dependencies>
        <module name="javax.api"/>
        <module name="javax.transaction.api"/>
        <module name="javax.servlet.api" optional="true"/>
    </dependencies>
</module>
  • Open standalone.xml file in '..Jboss home directory\standalone\configuration'.
  • Add following details in profile.
<subsystem xmlns="urn:jboss:domain:datasources:1.2">
    <datasources>
        <datasource jndi-name="java:/jdbc/oracle" pool-name="poolname" enabled="true" use-java-context="true">
            <connection-url>jdbc:oracle:thin:@//<host>:<port>/<SID></connection-url>
            <driver>oracledriver</driver>
            <security>
                <user-name>username</user-name>
                <password>password</password>
            </security>
        </datasource>
        <drivers>
            <driver name="oracledriver" module="com.oracle.oracle">
                <xa-datasource-class>oracle.jdbc.driver.OracleDriver</xa-datasource-class>
            </driver>
        </drivers>
    </datasources>
</subsystem>

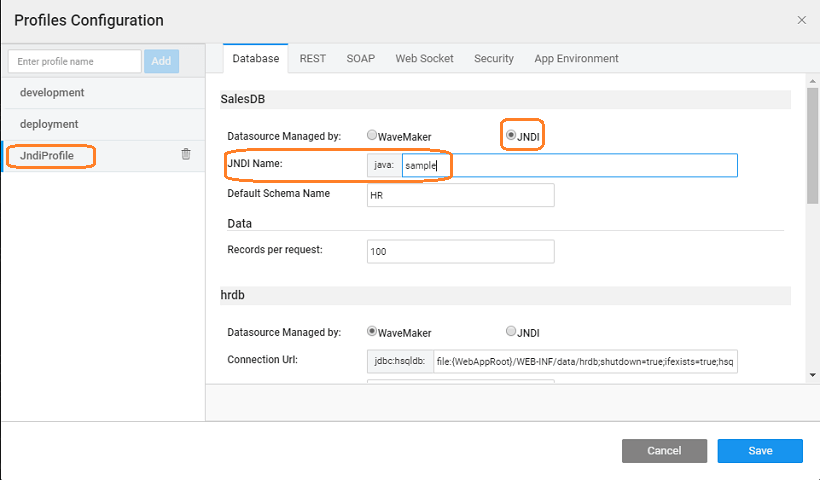
Use JNDI name in the application using Config Profiles

  • Click on settings menu in project workspace and create a new profile.
  • Select datasource as JNDI and provide jndi name in the respective text box.
  • Save profile and close settings.
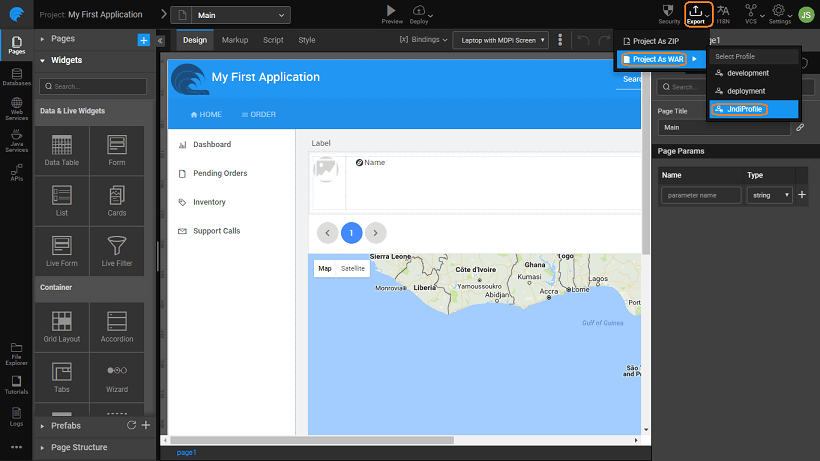
  • Export war for the newly created profile.
  • Save the war file

Troubleshooting

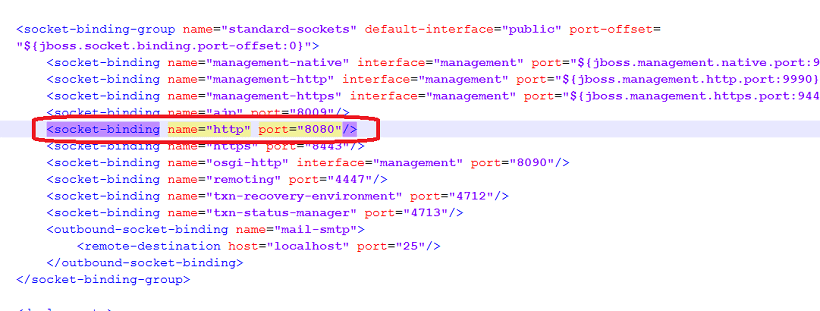
    • To know on which port the application is being running open \jboss-home-directory\standalone\configuration\standalone.xml
      • And search <socket-binding name="http"
      • On this port the application will be running.

Last updated on 7/15/2020 by Swetha Kundaram
← WebSphereWebLogic Server →
  • Prerequisites
  • Preparing WAR File
  • Deploy to JBOSS Server
    • JBoss-WildFly
  • Configure JNDI in JBOSS Server
  • Troubleshooting
WaveMaker
  • PRICING
  • PARTNERS
  • CUSTOMERS
  • ABOUT US
  • CONTACT US
Terms of Use | Copyright © 2013-2023 WaveMaker, Inc. All rights reserved.