Core and Implementation Projects
WaveMaker is here with Core and Implementation (IMPL) projects where,
Core Project
- Acts as the base with all the common functionalities. This allows multiple teams to work collectively on top of it.
Implementation Project
- Created as child projects of the Core project to add more features or customizations. Changes made to the Core project can be pulled into the IMPL projects periodically, making reusability seamless and boosting team collaboration.
Core and IMPL projects primarily help in code reusability, maintenance, and steady upgrades.
Example
To understand working of Core and IMPL, you can refer to the example where the core application is designed to start with onboarding a user and creating an account. Later credit and debit transactions through physical or virtual cards are enabled to make any purchase.
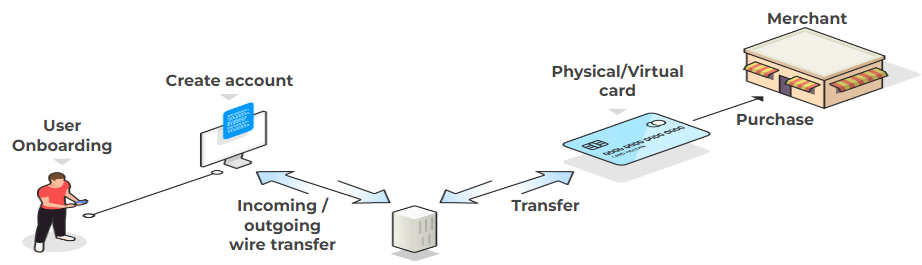
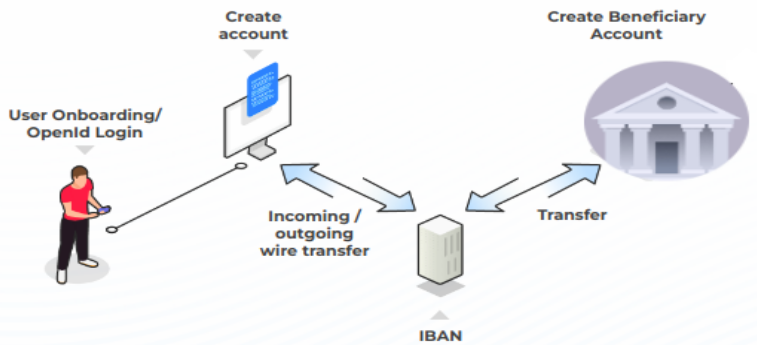
After publishing Core application, you can proceed with IMPL creation on top of the Core application and modify the flow so that purchases use a beneficiary account for credit and debit transactions instead of physical or virtual cards.
Enabling Core and IMPL Project
Core and IMPL projects can be created by enabling the App Customization option for each user type in a team. Enabling App Customization is a restricted privilege, done by the super admin of the project.
Super admins can enable it in Team Portal where they can view the Launch Pad option.
- Go to Team Portal > Launch Pad > Teams section to view the team details like Team Name, Created Date, Last Modified details, and configuration action items.
- In the Teams section, click the key icon under Actions to edit the permissions for team members.
- You get directed to Manage Permissions where you switch to Product Role. User roles and specific permissions are listed here for configuration. Click Edit.
- Go to each role, and enable App Customization allowing users to create Core and IMPL projects. Click Save.
Publishing Core Project
You can create a Core project that would become the foundation for the IMPL projects. It includes three major steps to get started with using Core Application.
A Core project can be used across the teams by publishing it to Marketplace. Once published to Marketplace it will be visible in ProjectsHub to all the teams in the environment.
Creating Core Project
You can create a blank project with fundamental functionalities to become the base for the IMPL projects.
- In ProjectsHub, click Create App.
- Create Application dialog opens with Web and Mobile as application creation options. Select the type of application and click Create a blank project. Click Continue.
- The next screen is Create application details, enter Application name and Repo name. Click Continue.
- Invite your team members is the next screen, add Team Member email IDs and Assign roles like Project Admin, and Contributor. Click Create Application.
Publishing Core Project to Team Portal
Once created, the project is published as Core for the team members to access the application.
- You get redirected to WaveMaker studio where you can click the Publish icon to publish the project as core.
- Publish Application To Teams As Core dialog opens. In the Information screen mainly enter the project Category, New Version, and Change Log. Click Next.
- In the Configuration screen, add applicable Tags and click Next.
- Verify the project details in the Summary screen and click Publish. This publishes the application in the Team Portal.
Approving Core Application
The projects can only be published as Core after approval. Once approved, the Core project can be viewed and accessed by team members.
- Go to Team Portal > Core Apps, verify the provided information, and click Approve.
- You get redirected to the Approve core application dialog where you add the Remarks and click Confirm. You can go to ProjectsHub to find the published Core application.
Creating Implementation Project
IMPL project is created on top of the base Core project with added features and customizations.
- In the ProjectsHub, click Create.
- Create Application dialog opens with Web and Mobile as application creation options. Select the type of application then select Create from Core. Click Continue.
- In the next screen, Choose core & version, select a Core application on top of which the IMPL project is created.
- Create application details is the third screen, enter the Application Name and click Continue.
- In the final screen, Invite your team members, add Team Member email IDs and Assign roles like Project Admin, and Contributor. Click Create Application to finish IMPL project creation.
Linking Existing IMPL Project to Core
You can now link the previously created project, referred to as the IMPL project, to any base project, referred to as the Core project. You can analyze the existing project and link it to the suitable Core project.
Applicable for the Teams users who already use this flow outside WaveMaker Studio. Super admin is required to enable Link To Core permission for the team members in Launch Pad.
- Go to ProjectsHub and hover over the existing project that can be considered as IMPL.
- Click View branch & project details to open App overview.
- Go to the Menu icon and click Link_to_core App to view the list of Core applications.
- You land on the Link project to core dialog. Select suitable Core application and version details. Click Save to assign Core Application to the IMPL application.
Fetching Core Upgrades in IMPL Project
The added advantage of using Core and IMPL projects is, you can always fetch the Core upgrades in the IMPL project without necessarily creating a new IMPL project with the upgraded Core project. Whenever the Core is updated, IMPL projects created on top of the specific Core project get an upgrade icon to fetch the Core changes in IMPL without causing any code breakage.
You can implement this using two steps
Creating Branch with Changes
While fetching the Core changes to IMPL, a temporary branch gets created to contain all the upgrade changes.
- Once an updated Core version is available, you can view an upgrade icon in the IMPL project. Click the Upgrade icon to start fetching the Core application upgrades in the IMPL application.
- The Upgrade core dialog opens where you can view the new features added in Core. Click Upgrade to create a temporary branch to contain Core upgrades.
- Now, go to ProjectsHub and hover over the IMPL project to view and click the View branch & project details.
- The Branch details of the IMPL project pop up automatically where you can click Open Branch in studio. This opens the temporary branch containing upgrades fetched from the Core.
Merging Upgrade Changes
After the temporary branch creation, the upgraded changes are reviewed and the conflicts are resolved.
- You get redirected to the Merge Changes screen where you can find Core upgrade changes in Review Merge.
- You can view and resolve conflicts caused due to Core changes in Resolve Conflicts.
- Click Finish Merge to remove the temporary branch and merge the Core changes in IMPL project.
- You can now view the Finish Merge dialog, and enter commit message for merge.
- Once your branch is successfully merged, click Go Back To Projects List. This redirects you to Projectshub, where you can find the IMPL with Core upgrades.
Publishing Core Prefab Project
Prefab can also be published as a Core Prefab project with base properties. This allows the creation of Implementation (IMPL) Prefab with required customization on top of Core Prefab project. To make the Prefab a Core Project that can be accessed by every team member, you need to
Users can publish a Prefab as Core along with the Prefab artifact during the approval process. There is no separate option available to publish from the Prefab Project.
Publishing Prefab to Team
It is necessary to publish the Prefab as a Core Project for you to use it as a foundation for IMPL Prefab projects.
- Go to Prefabs and click Open in Studio. This opens the Prefab project in studio.
- Click the Publish icon and select To Team to publish the Prefab project to a specific team.
- Publish Prefab To Team dialog opens. In the Information screen mainly enter the Prefab Category, New Version, and Change Log. Click Next.
- In the Configuration screen, add applicable Tags and click Next.
- Verify the project details in the Summary screen and click Publish. This publishes the Prefab to the Team Portal.
Approving Prefab as Core
You can view a Prefab as Core toggle that publishes the Prefab Core Project and Prefab artifact. You can next approve the publication and make it accessible for team members to create IMPL Prefab project on top of it.
Upon disabling the Prefab as Core toggle, you approve publishing the Prefab artifact that does not support the creation of IMPL Prefabs on top of the Prefab artifact. To know more on how to publish Prefab as an artifact, see Publish Prefab to Team.
- Go to Team Portal > Prefab Artifacts to view the list of Prefabs to be approved for publication.
- Select the Prefab that redirects you to testPrefabCore dialog.
- Enable Prefab as Core toggle to publish the Prefab Core Project.
- Verify the provided information, and click Approve.
- You get redirected to the Approve Prefab dialog where you add the Remarks and click Confirm. You can go to ProjectsHub > Prefabs section to find the published Core Prefab Project.
Creating Implementation Prefab Project
Similar to IMPL application, you can create IMPL Prefab project. This would include additional customizations on top of the existing Core Prefab project.
- In the ProjectsHub, go to Prefabs and click Create.
- Create Application dialog opens with Web and Mobile as application creation options. Select the type of application then select Create from Core. Click Continue.
- In the next screen, Choose core & version, select a Core application on top of which the IMPL project is created.
- Create application details is the third screen, enter the Application Name and click Continue.
- In the final screen, Invite your team members, add Team Member email IDs and Assign roles like Project Admin, and Contributor. Click Create Application to finish IMPL project creation.
Fetching Core Prefab project upgrades in the IMPL Prefab project involves the same steps as fetching Core application upgrades in the IMPL application.