Artifacts Repository
Artifact Repository is a collection of Artifacts or resources used across application development lifecycle in WaveMaker platform. It allows for easy exploration and discovery of Artifacts available to the developer network. These Artifacts include:
- Prefabs: Prefabs are a collection of one or more widgets that are bound to APIs or services.
- Project Shell: Project Shell is an app with functionality that is common to multiple apps across the teams. This can be used as a starting point in app development.
- Core Project: These projects act as the base with all the common functionalities. This allows multiple teams to work collectively on top of it. To know more, see Core and IMPL Projects.
- Implementation (IMPL) Project: These projects are created as child projects of the Core project to add more features or customizations. Changes made to the Core project can be pulled into the IMPL projects periodically, making reusability seamless and boosting team collaboration. To know more, see Core and IMPL Projects.
- Template Bundles: A template bundle is a collection of templates - a re-usable arrangement of one or more widgets in the page content that together capture the purpose of the page.
- Themes: Themes are style elements that work at the widget or UI component level. Themes help provide a consistent look and feel to your application.
Each of the above Artifacts has a workspace to develop the Artifact and then publish it for other developers across the team to import/use them.
Artifact Publishing Mechanism
There are three ways in which an Artifact can be published:
- Publish to Project: This will allow the Artifact developer to send it to a specific project for testing purposes.
- Publish to Team (only for team version): To make the Artifact available for the entire team for all applications to use, it needs to be published to the Team. After publishing, the Team Admin or Product Owner approves the Artifact for use within the team.
- Publish to Workspace (only for non-team version): Once tested and verified, it can be used for any project under development. This is done by publishing the Artifact to the developer's workspace and made available for any project he/she is currently working on.
Each of the Artifacts has a slightly different publishing flow as described in the sections for Prefab, [Project Shell] (#project-shell-publishing), Core, Template Bundle, and Themes.
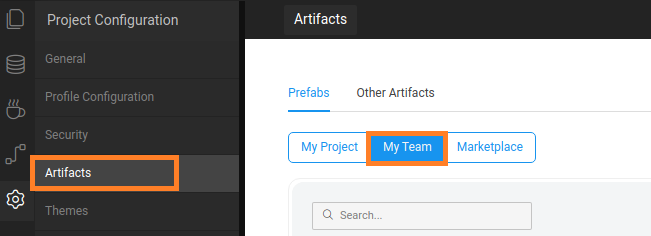
Once published the Artifacts can be viewed from the Artifacts dialog inside project settings.
Prefab Publishing
Prefab is developed from the Project Workspace, similar to any other app development, and then made available to other developers.  Publishing states for a Prefab include:
- Publish to Team (only for team version) – Approval by Team Admin. Once approved, Prefab has to be explicitly be imported for use within an application.
- Publish to Workspace (only for non-team version) - Once published to workspace the Prefab will implicitly be available for use across all projects within the developer's workspace.
- Publish to Project (both team and non-team versions)– This will result in the Prefab appearing in the specified project with a MOD tag. This can be used for testing purposes before publishing the Prefab.
For more information, see Creating and Publishing Prefabs.
Project Shell Publishing
A project shell is created by the App Owner from the studio workspace, by exporting the project being developed as a shell.

Export Project As Shell
Export Project As Shell behaves differently for the team and non-team versions:
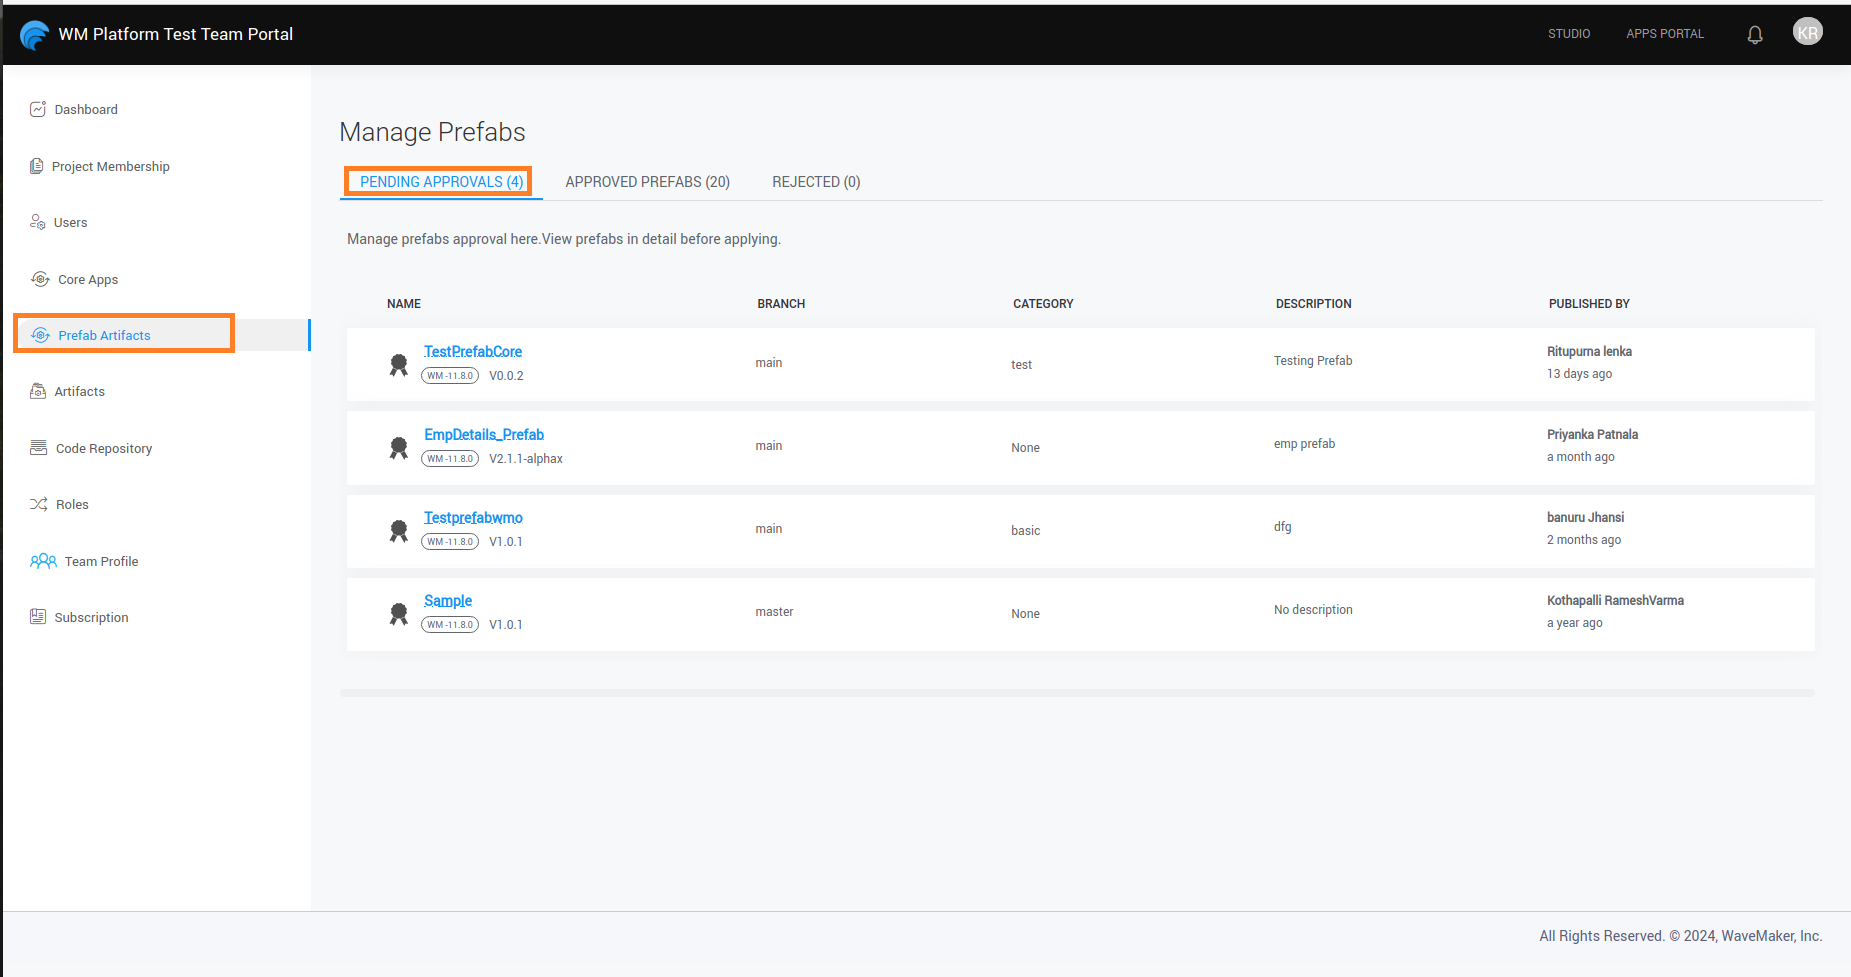
Team version: Once the developer exports a project as Shell to Team, they will be prompted to enter the publishing information, see Artifact features for more information. The Team Admin has to approve or reject the Shell as with any other Artifact. Once approved, developers can select the Shell when creating new projects.
Non-Team version: Export Project as Shell to Workspace will allow the developer to select the Shell when creating new projects within their workspace.
For more information, see Creating and Publishing Project Shell.
Core Publishing
A Core project is created by the application owner in the studio workspace by publishing an application to teams as Core. This becomes the base for many IMPL projects that can be created by team members.
For more information, see Core and Implementation Projects.
For teams with the App Customization option enabled, which allows the creation of Core and IMPL projects, shells will no longer be supported. Existing shells must be manually published as Core projects.
Template Bundle Publishing
Template Bundle can be created from the Project Workspace using the Template Bundles tab. The Template Bundles publishing process is different for the team and non-team versions:
- Team version: Once developed, Template Bundles can be published To Team.

The developer will be prompted to enter the publishing information, see Artifact features for more information. The Team Admin has to approve or reject the Shell as with any other Artifact. Once approved, the Template Bundle will appear in the Page Creation dialog for selection by the developers.
- Non-team version: The developer needs to export the Template Bundle as zip file and then import it in any application within their Dashboard.

To know more about creating and publishing Template Bundles, click here
Theme Publishing
Themes can be built by setting up WaveMaker Theme Repository and using Grunt commands.
- Team Version: Themes can be published using the Export > Theme to Team option:

- Non-team Version: There is no Theme publish option for non-team version, the theme zip file generated needs to be imported from the Themes dialog.
To know more about creating and publishing Themes, click here
Artifact Flow in Team Version
Artifact flow includes creating, publishing, and sharing Artifacts and applies only to the Team version of WaveMaker.
Artifact States
When publishing to Team Artifact goes through several stages:
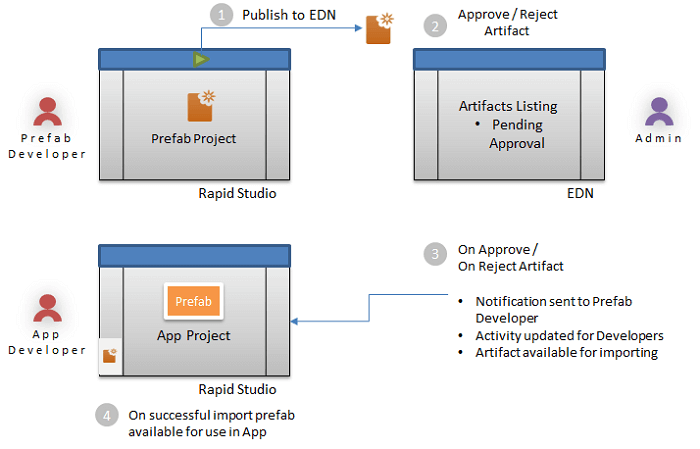
- In Development: Only the developer can work on it. It could be a new Artifact or a new version of the existing Artifact.
- UnPublished: The developer has published an artifact and applied for approval. EDN admin takes the next action.
- Rejected: Rejected by the EDN Admin, the developer can rectify/modify the Artifact and re-publish it.
- Approved: Once approved by the EDN Admin, the Artifact is available in the Artifact repository.
Artifact Features
Each Artifact needs the following information for proper tracking and identification from within the repository:
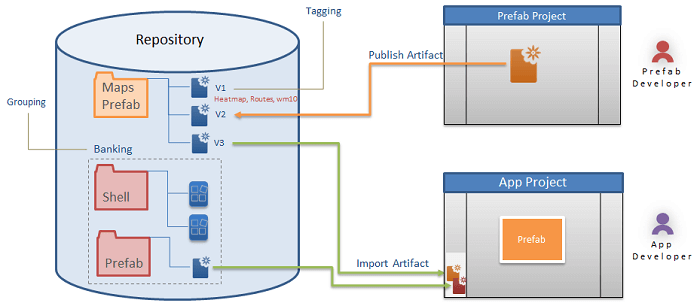
- Tag: this will be useful for searching. Each Artifact can have multiple tags.
- Category: this is used for grouping and is typically defined by EDN Admin and developers associate the Artifact with a given category at the time of publishing. The category can be selected from the available list or a new category can be entered. A new category needs to be approved by the EDN admin.
- Version Number: Each Artifact is associated with a version automatically during publishing.
- Change Log: These include the comments that the developer needs to add before publishing the Artifact.
Artifact Publishing
Artifacts are created and published to make them available in the ProjectsHub. You can update the Artifact and publish it with updated version details.
- In ProjectsHub, go to Prefabs and create or open a Prefab.
- Click Publish and enter the Category, Version, and Change Log. In case this Artifact has a dependency on other Artifacts like, Project Shell using a Prefab, the dependencies are listed here.
- Next, add Tags to aid in the discovery process of the Artifact. It also lists the Metadata like the platform version it was developed on. This information is generated by the platform by default.
- Details in Documentation are populated automatically by the platform, from the configuration settings entered at the time of the Prefab development. Any changes to this need to be done at the Prefab development time.
- In Summary, verify the details before proceeding with publishing. Click Publish.
Once published the Artifacts can be viewed from the Artifacts dialog.

Artifacts Dialog
Artifacts dialog will list all the Artifacts available with details like
- Basic: Includes the category, publisher, changelog, tags, dependency information, and metadata information
- Version History: Includes version history of the Artifact.
- Documentation: Includes properties, methods, and event details.
Prefabs can be imported from this dialog. Other Artifacts are available for use as soon as EDN Admin approves the Artifact.
Artifact Updates
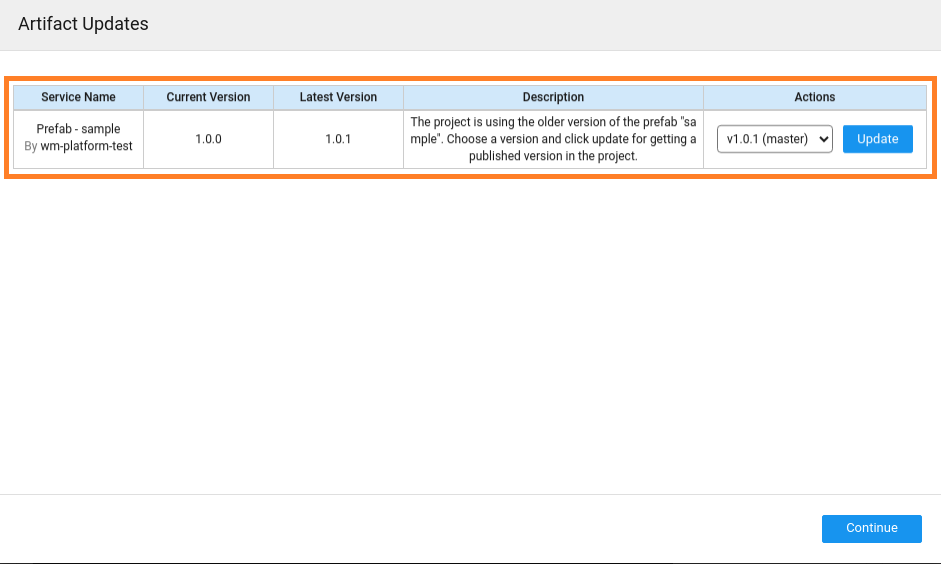
Every time there is a change or modification in an Artifact, it needs to be published again with updated version number. When a developer opens a project using the updated Artifact, Artifact updates are prompted. The developer can choose to update, downgrade, or ignore. Alternatively, notifications will be pushed for the developer within the studio to take action on Artifact upgrades.
Artifact Management
You can create and share Artifacts on your device and with your team members. This feature is now enhanced by allowing you to share Artifacts across different environments.
With this enhancement, you can create an Artifact in your environment, and after exporting it, you can access the Artifact in your Enterprise Marketplace. This process helps in improving collaboration across environments.
Artifact Management starts from creating an Artifact to accessing it in a different environment. This process can be categorized into two stages.
Pre-development: This involves defining the Categories, Custom Metadata, and importing Artifacts. These activities are accessed from Launchpad by the Super admin.
Post-development: This involves reviewing, approving/rejecting, and exporting Artifacts. These activities are accessed from the Team Portal by the team admin.
Exporting Artifact To Another Environment
You can export the approved Artifacts and publish its Core project in the Team Portal. It can be shared with any environment by providing the WaveMaker Enterprise (WME) domain address and its access token. This ensures secure collaboration between environments.
Sharing Artifacts is supported for only WME users.
- Go to Menu icon > Team Portal to find the Artifacts.
- In Prefab Artifacts, go to the Approved Artifacts where we can select the Artifact to share.
- Click the Export icon to export the Artifact to another environment. Select the version that you wish to export.
- Add the WME host address. You can get the Access token from the prompted page.
- Click Export which exports the selected version to the provided WME environment.
In case of dependent Prefabs, you can export a Prefab only after its dependencies are exported previously to the target WME environment.
Importing Artifact
Artifacts exported from other WME environments will be available in the Enterprise Marketplace and can be accessed by all the teams in the environment.
- Prefabs: These are listed in the studio Artifacts section under Marketplace.
- Core projects: Core projects are listed along with other Core projects in the Core Selection section during the application creation.
Once a new version is imported the update flow is triggered. To understand the steps to update, see Fetching Core Upgrades.