WaveMaker Docs

WaveMaker Docs

  • Get started
  • Widgets
  • Mobile
  • How-to
  • Enterprise
  • Releases
  • Blog
  • Sign-in

›Forms

How-to-documents

  • How-to Wiki
  • WaveMaker Best Practices

App solution

  • Creating a Registration Page
  • Support for Password Encryption
  • Error Handling in WaveMaker App
  • Leaving Page with Unsaved Changes
  • Micro frontend using iframes
  • Enabling PWA

UI design

  • Passing Parameters to Pages
  • Passing Parameters to Partial Page
  • Accessing Script
  • Use Static Variable to pass data between pages
  • Customise Login Page
  • Incorporating Additional Icons
  • Change Icon Color on Condition
  • Change Icon for the Global Spinner
  • Changing Default Favicon
  • Changing App Logo
  • Changing Page Title
  • Customise App Style
  • How to use Conditional Class Property
  • How to use Conditional Style Property
  • Customize an Existing Theme
  • Adjust Left Navigation Width
  • Customizing Theme
  • Enable SPA
  • Choose Widget Template and Layout
  • Widget Template and Icons
  • Custom Template for Widgets
  • Apply Custom Data Formatter

Nav & Dropdown

  • Dynamic Menu based on User Role
  • Restricting Menu Items based on the User Role
  • Localization for Dropdown Menu

Localization

  • Localization in WaveMaker Apps
  • Setting Language and Date Format
  • Localization Using Select Locale
  • Localization of Error Messages

Security

  • SAML Integration - OneLogin
  • SAML Integration - ADFS
  • OpenID Integration - Azure AD
  • Custom Security using Google OAuth Prefab
  • Multiple Security Provider Implementation
  • Customizing Post Authentication Handlers
  • Configuring Content-Security-Policy
  • Configuring MTLS

Databases

  • Queries with Dynamic Where Clause
  • Connect To Azure SQL Server
  • Recommended JDBC Driver Versions for Databases
  • How to fetch more than the default number(100) of records from database?
  • How To: One-to-Many Relationship
  • Working with Temporals
  • Connect To AWS Redshift Database
  • Connect To SAP Hana Cloud Database
  • Transactional History of Entity
  • Row-Level Security using DB Event Listeners
  • Validations using CRUD Listeners
  • Custom Logic DB Event Listeners
  • Connect to MySQL database using SSL
  • How to Switch MariaDB to MySQL Connector

Web services

  • Using App Environment Properties
  • Consuming an Existing WaveMaker API
  • Using POST method to send data to a REST API
  • Request-Response Processing for REST Services
  • How to Intercept Request and Response of all API Calls in One Place
  • WebSocket Usage - Chatroom App
  • UI for API Server-side Pagination
  • Working with API with different pagination formats

Java services

  • Sending Email using WaveMaker Connector
  • Implementing Forgot Password feature using Java Service
  • Accessing REST APIs from Java Service
  • Scheduling a Java Service
  • Integrating JUnit Tests for WaveMaker Application
  • ORM Artifacts
  • Pre-Post Processing for Database Service APIs
  • Accessing Logged-in User Details using Java Service
  • Design a workflow in Camunda BPM and integrate into a WaveMaker app
  • Integrate Azure File Storage
  • Insert Data from Excel into Database
  • Integrate Amazon S3 into WaveMaker App
  • Integrate Twilio Connector
  • Integrate OTP (One-Time Passcode) Verification with WaveMaker App

Variables

  • Using Filter Conditions on Variable
  • Using Live Variable APIs
  • Using Notification Actions
  • Using Navigation Action
  • Using Variables for Queries and Procedure
  • Using Service Variable in a Form
  • Using Filter Criteria for a Data and Live Widgets
  • Using Filter Criteria for a Database CRUD Variable

JavaScript

  • Using JavaScript in Binding
  • Using JavaScript from External URL
  • Using JavaScript to loop a command
  • Using function for evaluating conditions

Developer options

  • Synchronizing WaveMaker Apps with IDEs
  • Synchronizing Java Services Controller
  • Integrating Amazon Cognito for User Authentication
  • Integrating Sample Jasper Report in WaveMaker Application
  • How to generate PDF File using Jasper Reports
  • Upgrading an App from WaveMaker 9.x to WaveMaker 10.0
  • App Migration from WaveMaker 9x to 10x
  • Setup Fusion Reactor for Debugging Issues

Deployment

  • SSL Termination in LoadBalancer

Mobile App Solutions

  • Notify users about new update

Mobile gesture

  • Setting Swipe Gestures on a List Widget
  • Working with Pull to Refresh

Mobile widgets

  • Using Search Widget within the Navbar

Mobile UI design

  • Setting Splashscreen Images and App Icons
  • Using Cordova Plugins
  • Designing Tablet Views in Mobile Project
  • Sliding left navigation for Mobile App
  • Mobile App using Bar code
  • Custom Date Picker in Mobile

Cards

  • Capturing Card Items

DataTable

  • Customising Data Table Row Action
  • How to Configure Row Expansion in a Data Table
  • Using Widgets to represent Data Table Columns
  • View Master-Detail Data Records using Data Table
  • Add Master-Detail records using Data Table
  • Export Data from Data Table
  • Export Data from Data Table - 2
  • Setting Blob Filename
  • Dynamic Data Tables
  • Customize Dynamic Datatable
  • Data Table Column bound to Query
  • Combining Columns in Data Table
  • Custom Styling Data Table Columns & Rows
  • Formatting Data Table Columns
  • Concurrency and Record Locking in WaveMaker
  • Edit DataTable records bound to Query API

List

  • Creating an Employee List grouped by City
  • Creating an Employee List grouped by Birth Month and City
  • OnRender Event
  • Including a Data Table within a List
  • Building an Editable List
  • Building Cascading Lists
  • Accessing List Items
  • Localization of Data Table Column Headings

Forms

  • Using Live Form
  • How Tos: Form
  • Building Tabbed Live Form
  • How Tos: Live Form
  • Linking Live Form with another Widget for Input
  • Handling Related Fields in a Live Form
  • How to Get Validation Messages from a Form
  • Adding Master-Detail records in the same transaction
  • Submit Parent and Child Records in a Single Transaction
  • Submit Parent and Child Records in a Single Transaction using Form and Data Table
  • Using Cascading Select & Autocomplete for Live Form Fields
  • Using Cascading Select within Live Form
  • Using cascading Filter to populate Live Form
  • Using Wizard for Master-Detail Live Form
  • Copy to Clipboard
  • Create a form with multiple wizard steps
  • Smart Forms: Conditional Flows for form Widget

Calendar

  • How Tos: Calendar
  • Calendar Usage - Create an Event
  • Calender Usage - Google Calendar Integration

CheckboxSet

  • CheckboxSet to Filter List data

FileUpload

  • FileUpload - Basic Usage
  • File Upload Widget Operations
  • Upload File & Save in Database
  • File Upload & Blob Data
  • File Upload - Custom Directory
  • Accessing File Upload from Java Code
  • Upload Files from Live Form & Form

Radioset

  • Radioset to Filter a List

Rating

  • Building Rating Widget using Static Data
  • Building Rating Widget using Static Variable
  • Build Rating Widget using Model Variable
  • Building an Interactive Rating Widget

Select

  • Configuring Select Widget from a Static List of Values
  • Configuring Select Widget from a Static Variable
  • Configuring Select Widget from a Variable
  • Configuring Select Widget using Display and Data Fields
  • Configuring Select Widget from Database Fields
  • Configuring Cascading Select
  • Selection Widgets - Use Case

Progress Circle

  • Using Progress Circle Widget

Charts

  • Working with Charts
  • Display User Selection in another Widget
  • Handling Dynamic Data
  • Custom Data

Richtext Editor

  • Adding Custom Fonts to Richtext Editor

Live filter

  • Applying Live Filter to a Data Table or a Chart
  • Building a Multiple Selection Live Filter
  • Building a Range Live Filter

Container

  • Setting partial page content for Accordion within a List
  • Setting partial page content for Panel within a List using JavaScript
  • How Tos: Wizard
  • Dynamic Tabs and Accordions

Tree

  • Tree using Static Variable
  • Tree using Java Service
  • Tree using Dynamic Tree

Prefabs

  • Creating Partials in a Prefab
  • Create Prefab using Third Party UI Widgets
  • Create a Simple Prefab
  • Create Prefab Using D3 & NVD3 Charts
  • Create Prefab Using D3 Library DataMaps
  • Create Prefab using JQuery Plugin
  • Create Prefab using Angular Module
  • Create Prefab using Angular, React Components
  • Azure OAuth Prefab Integration

Team Poral Configure Vcs

  • Configure Azure Repos In CodeRepository
Edit

How Tos: Live Form


Tabbed Live Form

Learn how to build the following tabbed Live Form.

  1. Drag and drop a Live Form onto the canvas
  2. From the Variables tab select the data source, for this example we are using HrdbEmployeeData
  3. Select a two-column layout and retain the default Editable Mode
  4. Retain all the Form Fields and their default bindings
  5. Edit Field properties: To set the Department and Employee by Managerid fields
    1. Click on Advanced Settings

    2. Select the Fields tab

    3. Select Department field, and set the Display Expression to name by selecting it from the list on its right.

    4. Similarly, for Employee by Managerid select the firstname and lastname.

note

Selecting both will form an expression combining or concatenating both the fields.

  • Save the settings
  • From the canvas, select the Employee by Managerid field and set the Title to Manager Name.
  1. Drag and drop Tabs Container onto the Live Form, below the Layoutgrid that has been generated by the above steps. Set the Tab Heading to Profile.
  2. Drag and drop a Grid Layout onto the tabcontent, set columns to 2. Note: This will set the width of each column to 6 and add additional rows. You can choose to retain or delete the additional rows, we need only two rows.
  3. Drag and drop the fields corresponding to Username, Password and Role from the Live Form into the respective gridcolumns.
  4. Add a tab pane and set the Heading as Department
  5. Drag and drop a Grid Layout onto the new tab pane added. Set columns to 2. Note: This will set the width of each column to 6 and add additional rows. You can choose to retain or delete the additional rows, we need only one row.
  6. Drag and drop from the Live Form, fields corresponding to Department and Manager Name into the respective Grid Columns.
  7. Run the app

Linking Live Form with another Live Widget

To use form for updating the table, it needs to be bound to a Data Table or a List widget's Selected row property. Here we will see linking Data Table to a Live Form, the same can be replicated for a List. Another easy way to achieve this would be to use the Editable Data Table with Live Form layout.

  • Drag and drop a Data Table for the Employee Variable.
  • Choose the Data Table (grid) selected item as the datasource for the Live Form. This will set the initial values that will be displayed in the form.

form_bind_dt

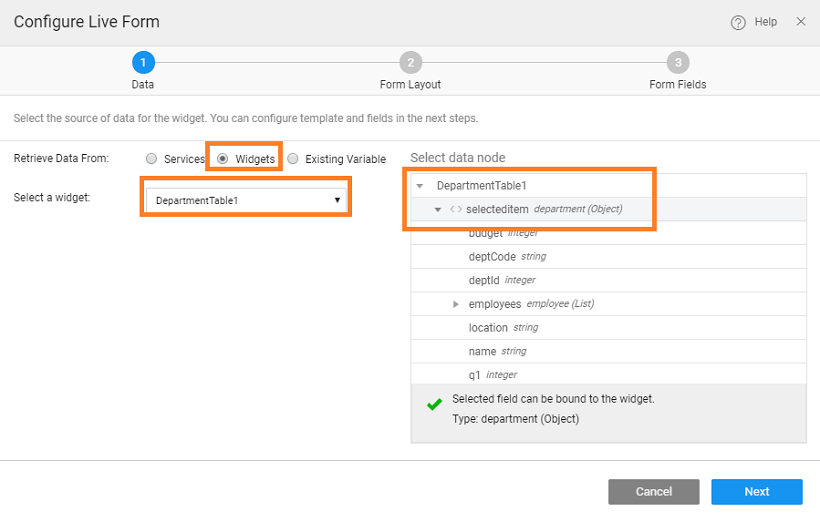
  • At runtime, the row selected from the table will be displayed in the form. Make changes and click on save to commit the changes to the database.

Using Widgets for Live Form Fields

Widgets like select, autocomplete, radioset, checkboxset and switch can be used for various fields within Live Form. These widgets can be used to show the predefined options to the user.

  • When they are limited number of options: Select, Radioset and Switch widgets can be used,
  • When number of options are more - autocomplete widget can be used, as user can search from list of available options,
  • When multiple options are to be selected - Checkboxset and Select (with multiple option) widgets are recommended.
  1. Drag and drop a Live Form and bind it to a Live Variable.
  2. Configure layout options, as per your needs.
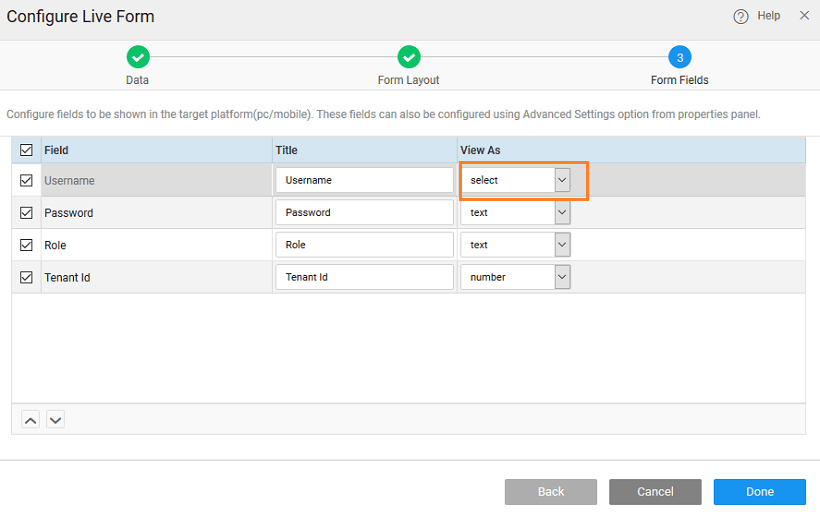
  3. In fields configuration step, change the required field widget type to Select.

lf_widget_fields

  1. Select the field from the designer.
  2. Dataset for the form field widget is auto populated with the Variable Dataset field. Data field and display field is set to field’s key. Here, the dataset can be bound to any other variable or widget.

lf_widget_propss

  1. The widget can be changed from Live Form advanced settings also.

lf_widget_as

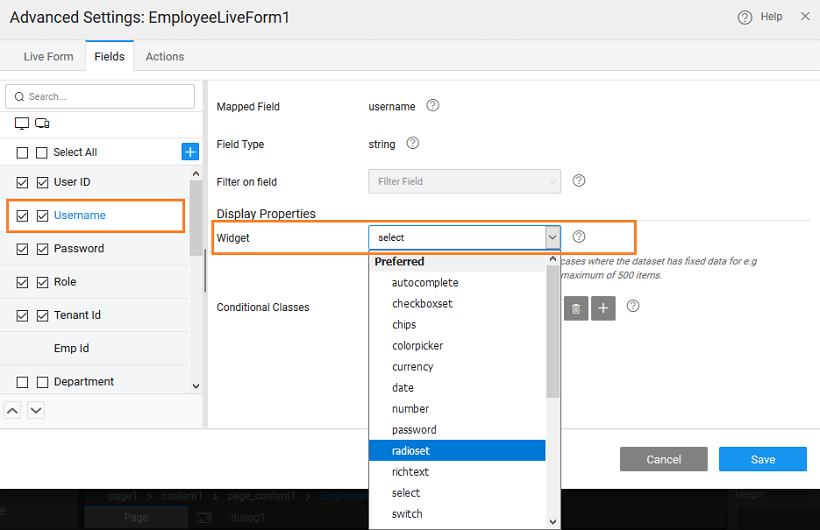
  1. Now, user can use this widget to select a value from predefined options.

lf_widget_run

Handling Related Fields in a Live Form

When dealing with tables with foreign key relationships, for related fields in the Live Form Select widget is set as default for the Live Form field.

  1. Drag and drop a Live Form and bind it to a Live Variable. Here we are using the Vacation table from the hrdb sample database, which is related to the Employee table.

  2. Configure layout options, as per your needs.

  3. In the form fields configuration, you will see that for related fields (Employee) widget is set to select by default.

  4. For the related fields, widget dataset value is empty as Live form fetches the data for related fields, by default.

  5. From the advanced settings, display expression can be changed by selecting additional fields from the list alongside and order by can be configured for this field. The widget can be changed from live form advanced settings also.

  • User can select a value from available options.

  • The form field can be bind to any other variable. Note that datafield should be set as ‘All Fields’. As this is a foreign key, it expects an object. Here we have changed the binding to the Live Variable for Employee table and the display field has been set to lastname.

  • As form field is bound to an variable, Live form will not fetch the data for this field. The bound variable will fetch the data for this field.

Using Live Form Methods

When dealing with tables with foreign key relationships, for related fields in the Live Form Select widget is set as default for the Live Form field.Live Form has few methods exposed on widget scope to Edit, Delete, Add record and trigger actions like reset and cancel.

For the following script samples, we are considering the hrdb Employee table. EmployeeForm is bound to the SelectedItem of a Data Grid corresponding to Employee Live Variable.

To delete a record:

$scope.Widgets.EmployeeForm.delete(); //Deletes the current record that is bound to EmployeeForm.

To update a record:

$scope.Widgets.EmployeeForm.save(); //Updates the current record bound

To add a new record:

$scope.Widgets.EmployeeForm.new(); //Adds a new record to dataset that is bound to EmployeeForm.

To reset a form:

$scope.Widgets.EmployeeForm.reset(); //Resets the form to initial state.

To cancel an edit operation:

$scope.Widgets.EmployeeForm.cancel(); //Cancels the form edit.

Using Live Form Callback Events

When dealing with tables with foreign key relationships, for related fields in the Live Form Select widget is set as default for the Live Form field.Live Form behavior can be customised with the help of the call-back events. These events can be accessed from the events tab on the Properties panel. The trigger for the event can be JavaScript, another Variable call etc..

EventTrigger and JavaScript Usage
On before service callThis event will be called on saving the live form. Any validation checks can be performed here. Returning false from the script will stop the live form save.
//$operation: Current operation being performed - INSERT or UPDATE or DELETE
//$data has the data of the all widgets inside the live form. This data can be modified and validated before sending the request.
        function isValidData(data) {
            /*restrict password to be minimum of 6 characters*/
            if (data.password) {
                if (data.password.length < 6) {
                    return {
                        'error': "Password too small"
                    };
                }
            } else {
                return {
                    'error': "Password field required"
                };
            }
        }
        return isValidData($data)
};
On resultThis event will be called after live form is saved and API returns a response. Event is triggered in both success and failure cases.
$scope.liveform1Result = function($event, $operation, $data) {
//$operation: operation  performed - INSERT or UPDATE or DELETE
//$data has the response returned from the API.
console.log("server response:", $data);
};
On successThis event will be called after live form is saved and API returns a success response.
//$operation: operation performed - INSERT or UPDATE or DELETE
//$data has the response returned from the API.
console.log("The inserted/updated/deleted data:", $data);
};
On errorThis event will be called after live form is saved and API returns a failure response.
//$operation: operation performed - INSERT or UPDATE or DELETE
//$data has the error message returned from the API.
console.log("Error returned from server:", $data);
};
Last updated on 7/15/2020 by Swetha Kundaram
← Building Tabbed Live FormLinking Live Form with another Widget for Input →
  • Tabbed Live Form
  • Linking Live Form with another Live Widget
  • Using Widgets for Live Form Fields
  • Handling Related Fields in a Live Form
  • Using Live Form Methods
    • To delete a record:
    • To update a record:
    • To add a new record:
    • To reset a form:
    • To cancel an edit operation:
  • Using Live Form Callback Events
WaveMaker
  • PRICING
  • PARTNERS
  • CUSTOMERS
  • ABOUT US
  • CONTACT US
Terms of Use | Copyright © 2013-2023 WaveMaker, Inc. All rights reserved.