WaveMaker Docs

WaveMaker Docs

  • Get started
  • Widgets
  • Mobile
  • How-to
  • Enterprise
  • Releases
  • Blog
  • Sign-in

›Forms

How-to-documents

  • How-to Wiki
  • WaveMaker Best Practices

App solution

  • Creating a Registration Page
  • Support for Password Encryption
  • Error Handling in WaveMaker App
  • Leaving Page with Unsaved Changes
  • Micro frontend using iframes
  • Enabling PWA

UI design

  • Passing Parameters to Pages
  • Passing Parameters to Partial Page
  • Accessing Script
  • Use Static Variable to pass data between pages
  • Customise Login Page
  • Incorporating Additional Icons
  • Change Icon Color on Condition
  • Change Icon for the Global Spinner
  • Changing Default Favicon
  • Changing App Logo
  • Changing Page Title
  • Customise App Style
  • How to use Conditional Class Property
  • How to use Conditional Style Property
  • Customize an Existing Theme
  • Adjust Left Navigation Width
  • Customizing Theme
  • Enable SPA
  • Choose Widget Template and Layout
  • Widget Template and Icons
  • Custom Template for Widgets
  • Apply Custom Data Formatter

Nav & Dropdown

  • Dynamic Menu based on User Role
  • Restricting Menu Items based on the User Role
  • Localization for Dropdown Menu

Localization

  • Localization in WaveMaker Apps
  • Setting Language and Date Format
  • Localization Using Select Locale
  • Localization of Error Messages

Security

  • SAML Integration - OneLogin
  • SAML Integration - ADFS
  • OpenID Integration - Azure AD
  • Custom Security using Google OAuth Prefab
  • Multiple Security Provider Implementation
  • Customizing Post Authentication Handlers
  • Configuring Content-Security-Policy
  • Configuring MTLS

Databases

  • Queries with Dynamic Where Clause
  • Connect To Azure SQL Server
  • Recommended JDBC Driver Versions for Databases
  • How to fetch more than the default number(100) of records from database?
  • How To: One-to-Many Relationship
  • Working with Temporals
  • Connect To AWS Redshift Database
  • Connect To SAP Hana Cloud Database
  • Transactional History of Entity
  • Row-Level Security using DB Event Listeners
  • Validations using CRUD Listeners
  • Custom Logic DB Event Listeners
  • Connect to MySQL database using SSL
  • How to Switch MariaDB to MySQL Connector

Web services

  • Using App Environment Properties
  • Consuming an Existing WaveMaker API
  • Using POST method to send data to a REST API
  • Request-Response Processing for REST Services
  • How to Intercept Request and Response of all API Calls in One Place
  • WebSocket Usage - Chatroom App
  • UI for API Server-side Pagination
  • Working with API with different pagination formats

Java services

  • Sending Email using WaveMaker Connector
  • Implementing Forgot Password feature using Java Service
  • Accessing REST APIs from Java Service
  • Scheduling a Java Service
  • Integrating JUnit Tests for WaveMaker Application
  • ORM Artifacts
  • Pre-Post Processing for Database Service APIs
  • Accessing Logged-in User Details using Java Service
  • Design a workflow in Camunda BPM and integrate into a WaveMaker app
  • Integrate Azure File Storage
  • Insert Data from Excel into Database
  • Integrate Amazon S3 into WaveMaker App
  • Integrate Twilio Connector
  • Integrate OTP (One-Time Passcode) Verification with WaveMaker App

Variables

  • Using Filter Conditions on Variable
  • Using Live Variable APIs
  • Using Notification Actions
  • Using Navigation Action
  • Using Variables for Queries and Procedure
  • Using Service Variable in a Form
  • Using Filter Criteria for a Data and Live Widgets
  • Using Filter Criteria for a Database CRUD Variable

JavaScript

  • Using JavaScript in Binding
  • Using JavaScript from External URL
  • Using JavaScript to loop a command
  • Using function for evaluating conditions

Developer options

  • Synchronizing WaveMaker Apps with IDEs
  • Synchronizing Java Services Controller
  • Integrating Amazon Cognito for User Authentication
  • Integrating Sample Jasper Report in WaveMaker Application
  • How to generate PDF File using Jasper Reports
  • Upgrading an App from WaveMaker 9.x to WaveMaker 10.0
  • App Migration from WaveMaker 9x to 10x
  • Setup Fusion Reactor for Debugging Issues

Deployment

  • SSL Termination in LoadBalancer

Mobile App Solutions

  • Notify users about new update

Mobile gesture

  • Setting Swipe Gestures on a List Widget
  • Working with Pull to Refresh

Mobile widgets

  • Using Search Widget within the Navbar

Mobile UI design

  • Setting Splashscreen Images and App Icons
  • Using Cordova Plugins
  • Designing Tablet Views in Mobile Project
  • Sliding left navigation for Mobile App
  • Mobile App using Bar code
  • Custom Date Picker in Mobile

Cards

  • Capturing Card Items

DataTable

  • Customising Data Table Row Action
  • How to Configure Row Expansion in a Data Table
  • Using Widgets to represent Data Table Columns
  • View Master-Detail Data Records using Data Table
  • Add Master-Detail records using Data Table
  • Export Data from Data Table
  • Export Data from Data Table - 2
  • Setting Blob Filename
  • Dynamic Data Tables
  • Customize Dynamic Datatable
  • Data Table Column bound to Query
  • Combining Columns in Data Table
  • Custom Styling Data Table Columns & Rows
  • Formatting Data Table Columns
  • Concurrency and Record Locking in WaveMaker
  • Edit DataTable records bound to Query API

List

  • Creating an Employee List grouped by City
  • Creating an Employee List grouped by Birth Month and City
  • OnRender Event
  • Including a Data Table within a List
  • Building an Editable List
  • Building Cascading Lists
  • Accessing List Items
  • Localization of Data Table Column Headings

Forms

  • Using Live Form
  • How Tos: Form
  • Building Tabbed Live Form
  • How Tos: Live Form
  • Linking Live Form with another Widget for Input
  • Handling Related Fields in a Live Form
  • How to Get Validation Messages from a Form
  • Adding Master-Detail records in the same transaction
  • Submit Parent and Child Records in a Single Transaction
  • Submit Parent and Child Records in a Single Transaction using Form and Data Table
  • Using Cascading Select & Autocomplete for Live Form Fields
  • Using Cascading Select within Live Form
  • Using cascading Filter to populate Live Form
  • Using Wizard for Master-Detail Live Form
  • Copy to Clipboard
  • Create a form with multiple wizard steps
  • Smart Forms: Conditional Flows for form Widget

Calendar

  • How Tos: Calendar
  • Calendar Usage - Create an Event
  • Calender Usage - Google Calendar Integration

CheckboxSet

  • CheckboxSet to Filter List data

FileUpload

  • FileUpload - Basic Usage
  • File Upload Widget Operations
  • Upload File & Save in Database
  • File Upload & Blob Data
  • File Upload - Custom Directory
  • Accessing File Upload from Java Code
  • Upload Files from Live Form & Form

Radioset

  • Radioset to Filter a List

Rating

  • Building Rating Widget using Static Data
  • Building Rating Widget using Static Variable
  • Build Rating Widget using Model Variable
  • Building an Interactive Rating Widget

Select

  • Configuring Select Widget from a Static List of Values
  • Configuring Select Widget from a Static Variable
  • Configuring Select Widget from a Variable
  • Configuring Select Widget using Display and Data Fields
  • Configuring Select Widget from Database Fields
  • Configuring Cascading Select
  • Selection Widgets - Use Case

Progress Circle

  • Using Progress Circle Widget

Charts

  • Working with Charts
  • Display User Selection in another Widget
  • Handling Dynamic Data
  • Custom Data

Richtext Editor

  • Adding Custom Fonts to Richtext Editor

Live filter

  • Applying Live Filter to a Data Table or a Chart
  • Building a Multiple Selection Live Filter
  • Building a Range Live Filter

Container

  • Setting partial page content for Accordion within a List
  • Setting partial page content for Panel within a List using JavaScript
  • How Tos: Wizard
  • Dynamic Tabs and Accordions

Tree

  • Tree using Static Variable
  • Tree using Java Service
  • Tree using Dynamic Tree

Prefabs

  • Creating Partials in a Prefab
  • Create Prefab using Third Party UI Widgets
  • Create a Simple Prefab
  • Create Prefab Using D3 & NVD3 Charts
  • Create Prefab Using D3 Library DataMaps
  • Create Prefab using JQuery Plugin
  • Create Prefab using Angular Module
  • Create Prefab using Angular, React Components
  • Azure OAuth Prefab Integration

Team Poral Configure Vcs

  • Configure Azure Repos In CodeRepository
Edit

Smart Forms: Conditional Flows for form Widget

What's a Smart Form?

Whenever using long forms, chances are higher that users drop off. Use conditional logic in long forms to keep engagement high and improve conversion rates.

In the most basic sense, smart forms are dynamic based on conditional logic. Instead of static inputs on a screen, smart forms can change based on how a user enters input to a question using conditional logic. Want to segment questions to different types of users? Perform calculations? Smart forms get the job done.

Smart forms function according to if/then or if/else conditions, for instance, if a user is paying for a subscription, then they will be asked about their usage; if a user is not paying for a subscription, then they will be asked if they want to sign up for one.

Conditional logic changes how your form behaves based on specific inputs. It allows you to dynamically customize the form experience based on your respondents’ answers.

Here are some use case scenarios:

  • Showing additional questions when a user chooses a specific answer

  • Skipping form steps in a multipage survey depending on user answers

  • Not showing the submit button until the user makes a particular choice.

Conditional Logic Options in WaveMaker

  • Show/Hide Form Fields
  • Calculate Values and set the value on other fields.
  • Enable Required based on other field inputs.
  • Enable ReadOnly based on condition.
  • Show fields in disable state based on condition
  • Apply display format(international phone numbers display formats)

Show/Hide Form Fields

The Show/Hide field shows or hides a form field when a specified condition is met.

Usecase

If a user answers "Did you use our product for building apps?" with "Yes," then the form will show "How would you rate it?". If a user answers "Did you use our product?" with "No" then the form will hide "How would you rate it?"

How to implement?

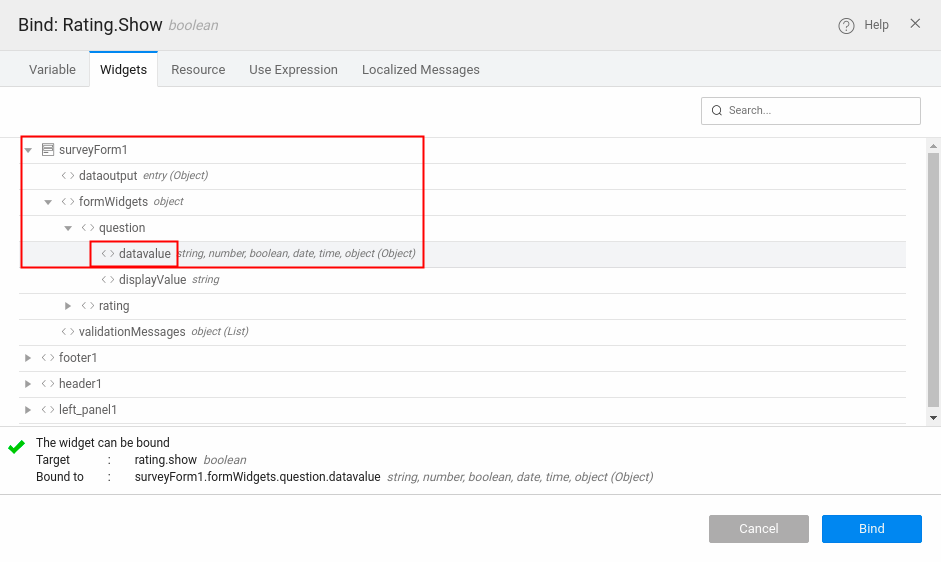
  • Select the rating form field you want to hide based on the value given for the question form field.
  • Click on bind icon for the show property of the rating field from the properties panel.
  • Select the Widgets tab in binding dialog, select the question field datavalue as shown in the below image.

  • Now switch to Use Expression tab and add condition for "Yes" for the question field value as below.
Widgets.surveyForm1.formWidgets.question.datavalue==="Yes".

So the above given will is the conditional expression. If the question field value is equal to Yes then rating field will be shown because the condition given above is bound to the Show property of the rating field.

Other Ways to handle conditional logics

  • One can also use ternary operator to handle conditions. Under UseExpression tab in the bind dialog for the Show property one can bind as below.
Widgets.surveyForm1.formWidgets.question.datavalue==="Yes"?true:false

Returning true when the value is "Yes" else returning false.

(or)

  • You can also bind Show property to the function written in the script tab. Show or Hide by returning true or false in the function when condition is met.

Add below function in Script tab.

Page.showPropertyFunc = function() {
    if (Page.Widgets.surveyForm1.formWidgets.question.datavalue === "Yes") {
        return true;
    } else {
        return false;
    }
};

Now Click on bind icon for the Show property and call the function showPropertyFunc() under UseExpression tab.

Calculate Values and set the value on other fields

You can create conditional logic rules to perform calculations.

Usecase

Let's say you want to add values from two different fields and have the solution appear in a text box labeled "Total." You can specify the fields to be added and when they should be added. (or) Calculate BMI based on Height and Weight of the person.

How to implement?

  • Select the field you want to show the calculated value(example: Total or BMI field).
  • From the properties panel click on bind icon for the Default Value property.
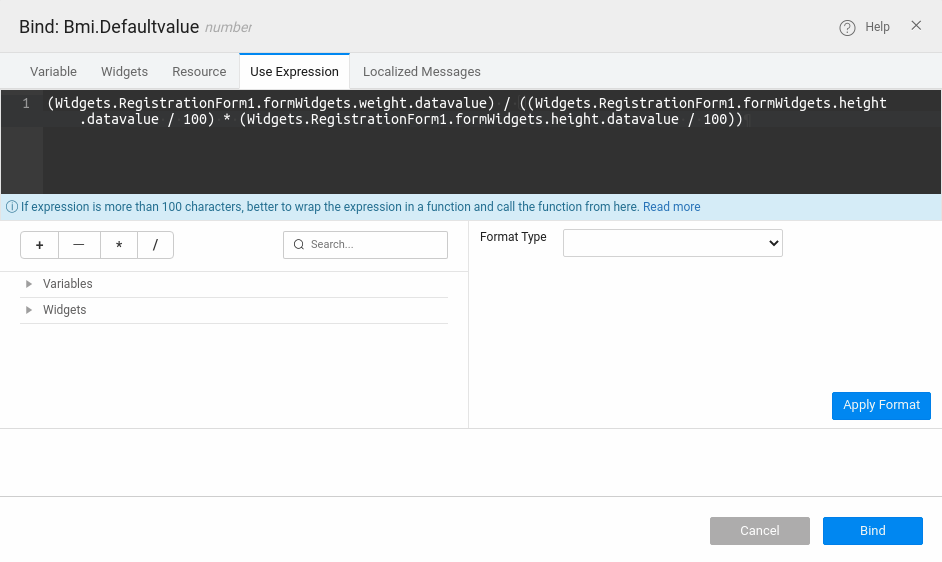
  • Now under Use Expression tab, select the Number1 field value and also add the conditional operator (+) and then Number2 field value as shown in below image.

Below image shows the calculation of BMI of the person based on height and weight.

Enable Required option

This option allows you to set a form field as REQUIRED or NOT REQUIRED depending on the user's input.

Usecase

When you have a form for patient's to fill in the details for hospital management, you may ask if the patient is allergic to? If Yes then you may ask allergic type which may be a REQUIRED field based on allergic value.

How to Implement?

  • Select the AllergicType form field. Click on bind icon for the Required property under properties panel.
  • Now under Use Expression tab, bind the expression as below.
Widgets.PatientForm.formWidgets.allergic.datavalue==="Yes"

or

Widgets.PatientForm.formWidgets.allergic.datavalue==="Yes"?true:false

Enable Readonly

We use READONLY for form fields to prevent user from type/select the form control but we get value from the input. A read-only field can’t be modified, but you can tab into it, highlight it, and copy its contents.

Usecase

You can apply read only for the HealthCard Number for the patient which is entered during Patient details registration.

How to implement?

  • Select the field that you want to enable ReadOnly. Now under properties panel you can enable READONLY property to true. Also you can apply READONLY using conditional logic through bind icon.

Show fields in disable state

When any form field element is disabled that means it can’t be selected, clicked on, typed into nor does accept focus anymore. Also, by default, browsers display such form controls grayed out.

Usecase

Apply DISABLE for the form field for the form fields such as CreditCard Numbers(even masked). Preventing the user from copying or selected.

How to implement?

  • Select the field that you want to enable DISABLE option. Under properties panel you can enable the DISABLE property for the form field. Also you can apply DISABLE property using conditional logic through bind icon.

Apply display format

Apply display formats for the form fields directly from the properties panel or also apply different formats depending on the value of the other field.

Usecase

Apply the display format for the phone number based on country selected form field.

How to implement?

  • Select the phoneNumber field that you want to apply display based on Country.
  • Click on bind icon and add the logic as below. If the country is US then apply one set of display formats else other display format while entering phone number.
Widgets.UserForm.formWidgets.country.datavalue==="US"?'(999) 999-9999':'9999 999999'
Last updated on 5/25/2021 by saraswathi rekhala
← Create a form with multiple wizard stepsHow Tos: Calendar →
  • What's a Smart Form?
  • Conditional Logic Options in WaveMaker
    • Show/Hide Form Fields
    • Calculate Values and set the value on other fields
    • Enable Required option
    • Enable Readonly
    • Show fields in disable state
    • Apply display format
WaveMaker
  • PRICING
  • PARTNERS
  • CUSTOMERS
  • ABOUT US
  • CONTACT US
Terms of Use | Copyright © 2013-2023 WaveMaker, Inc. All rights reserved.