WaveMaker Docs

WaveMaker Docs

  • Get started
  • Widgets
  • Mobile
  • How-to
  • Enterprise
  • Releases
  • Blog
  • Sign-in

›Container

How-to-documents

  • How-to Wiki
  • WaveMaker Best Practices

App solution

  • Creating a Registration Page
  • Support for Password Encryption
  • Error Handling in WaveMaker App
  • Leaving Page with Unsaved Changes
  • Micro frontend using iframes
  • Enabling PWA

UI design

  • Passing Parameters to Pages
  • Passing Parameters to Partial Page
  • Accessing Script
  • Use Static Variable to pass data between pages
  • Customise Login Page
  • Incorporating Additional Icons
  • Change Icon Color on Condition
  • Change Icon for the Global Spinner
  • Changing Default Favicon
  • Changing App Logo
  • Changing Page Title
  • Customise App Style
  • How to use Conditional Class Property
  • How to use Conditional Style Property
  • Customize an Existing Theme
  • Adjust Left Navigation Width
  • Customizing Theme
  • Enable SPA
  • Choose Widget Template and Layout
  • Widget Template and Icons
  • Custom Template for Widgets
  • Apply Custom Data Formatter

Nav & Dropdown

  • Dynamic Menu based on User Role
  • Restricting Menu Items based on the User Role
  • Localization for Dropdown Menu

Localization

  • Localization in WaveMaker Apps
  • Setting Language and Date Format
  • Localization Using Select Locale
  • Localization of Error Messages

Security

  • SAML Integration - OneLogin
  • SAML Integration - ADFS
  • OpenID Integration - Azure AD
  • Custom Security using Google OAuth Prefab
  • Multiple Security Provider Implementation
  • Customizing Post Authentication Handlers
  • Configuring Content-Security-Policy
  • Configuring MTLS

Databases

  • Queries with Dynamic Where Clause
  • Connect To Azure SQL Server
  • Recommended JDBC Driver Versions for Databases
  • How to fetch more than the default number(100) of records from database?
  • How To: One-to-Many Relationship
  • Working with Temporals
  • Connect To AWS Redshift Database
  • Connect To SAP Hana Cloud Database
  • Transactional History of Entity
  • Row-Level Security using DB Event Listeners
  • Validations using CRUD Listeners
  • Custom Logic DB Event Listeners
  • Connect to MySQL database using SSL
  • How to Switch MariaDB to MySQL Connector

Web services

  • Using App Environment Properties
  • Consuming an Existing WaveMaker API
  • Using POST method to send data to a REST API
  • Request-Response Processing for REST Services
  • How to Intercept Request and Response of all API Calls in One Place
  • WebSocket Usage - Chatroom App
  • UI for API Server-side Pagination
  • Working with API with different pagination formats

Java services

  • Sending Email using WaveMaker Connector
  • Implementing Forgot Password feature using Java Service
  • Accessing REST APIs from Java Service
  • Scheduling a Java Service
  • Integrating JUnit Tests for WaveMaker Application
  • ORM Artifacts
  • Pre-Post Processing for Database Service APIs
  • Accessing Logged-in User Details using Java Service
  • Design a workflow in Camunda BPM and integrate into a WaveMaker app
  • Integrate Azure File Storage
  • Insert Data from Excel into Database
  • Integrate Amazon S3 into WaveMaker App
  • Integrate Twilio Connector
  • Integrate OTP (One-Time Passcode) Verification with WaveMaker App

Variables

  • Using Filter Conditions on Variable
  • Using Live Variable APIs
  • Using Notification Actions
  • Using Navigation Action
  • Using Variables for Queries and Procedure
  • Using Service Variable in a Form
  • Using Filter Criteria for a Data and Live Widgets
  • Using Filter Criteria for a Database CRUD Variable

JavaScript

  • Using JavaScript in Binding
  • Using JavaScript from External URL
  • Using JavaScript to loop a command
  • Using function for evaluating conditions

Developer options

  • Synchronizing WaveMaker Apps with IDEs
  • Synchronizing Java Services Controller
  • Integrating Amazon Cognito for User Authentication
  • Integrating Sample Jasper Report in WaveMaker Application
  • How to generate PDF File using Jasper Reports
  • Upgrading an App from WaveMaker 9.x to WaveMaker 10.0
  • App Migration from WaveMaker 9x to 10x
  • Setup Fusion Reactor for Debugging Issues

Deployment

  • SSL Termination in LoadBalancer

Mobile App Solutions

  • Notify users about new update

Mobile gesture

  • Setting Swipe Gestures on a List Widget
  • Working with Pull to Refresh

Mobile widgets

  • Using Search Widget within the Navbar

Mobile UI design

  • Setting Splashscreen Images and App Icons
  • Using Cordova Plugins
  • Designing Tablet Views in Mobile Project
  • Sliding left navigation for Mobile App
  • Mobile App using Bar code
  • Custom Date Picker in Mobile

Cards

  • Capturing Card Items

DataTable

  • Customising Data Table Row Action
  • How to Configure Row Expansion in a Data Table
  • Using Widgets to represent Data Table Columns
  • View Master-Detail Data Records using Data Table
  • Add Master-Detail records using Data Table
  • Export Data from Data Table
  • Export Data from Data Table - 2
  • Setting Blob Filename
  • Dynamic Data Tables
  • Customize Dynamic Datatable
  • Data Table Column bound to Query
  • Combining Columns in Data Table
  • Custom Styling Data Table Columns & Rows
  • Formatting Data Table Columns
  • Concurrency and Record Locking in WaveMaker
  • Edit DataTable records bound to Query API

List

  • Creating an Employee List grouped by City
  • Creating an Employee List grouped by Birth Month and City
  • OnRender Event
  • Including a Data Table within a List
  • Building an Editable List
  • Building Cascading Lists
  • Accessing List Items
  • Localization of Data Table Column Headings

Forms

  • Using Live Form
  • How Tos: Form
  • Building Tabbed Live Form
  • How Tos: Live Form
  • Linking Live Form with another Widget for Input
  • Handling Related Fields in a Live Form
  • How to Get Validation Messages from a Form
  • Adding Master-Detail records in the same transaction
  • Submit Parent and Child Records in a Single Transaction
  • Submit Parent and Child Records in a Single Transaction using Form and Data Table
  • Using Cascading Select & Autocomplete for Live Form Fields
  • Using Cascading Select within Live Form
  • Using cascading Filter to populate Live Form
  • Using Wizard for Master-Detail Live Form
  • Copy to Clipboard
  • Create a form with multiple wizard steps
  • Smart Forms: Conditional Flows for form Widget

Calendar

  • How Tos: Calendar
  • Calendar Usage - Create an Event
  • Calender Usage - Google Calendar Integration

CheckboxSet

  • CheckboxSet to Filter List data

FileUpload

  • FileUpload - Basic Usage
  • File Upload Widget Operations
  • Upload File & Save in Database
  • File Upload & Blob Data
  • File Upload - Custom Directory
  • Accessing File Upload from Java Code
  • Upload Files from Live Form & Form

Radioset

  • Radioset to Filter a List

Rating

  • Building Rating Widget using Static Data
  • Building Rating Widget using Static Variable
  • Build Rating Widget using Model Variable
  • Building an Interactive Rating Widget

Select

  • Configuring Select Widget from a Static List of Values
  • Configuring Select Widget from a Static Variable
  • Configuring Select Widget from a Variable
  • Configuring Select Widget using Display and Data Fields
  • Configuring Select Widget from Database Fields
  • Configuring Cascading Select
  • Selection Widgets - Use Case

Progress Circle

  • Using Progress Circle Widget

Charts

  • Working with Charts
  • Display User Selection in another Widget
  • Handling Dynamic Data
  • Custom Data

Richtext Editor

  • Adding Custom Fonts to Richtext Editor

Live filter

  • Applying Live Filter to a Data Table or a Chart
  • Building a Multiple Selection Live Filter
  • Building a Range Live Filter

Container

  • Setting partial page content for Accordion within a List
  • Setting partial page content for Panel within a List using JavaScript
  • How Tos: Wizard
  • Dynamic Tabs and Accordions

Tree

  • Tree using Static Variable
  • Tree using Java Service
  • Tree using Dynamic Tree

Prefabs

  • Creating Partials in a Prefab
  • Create Prefab using Third Party UI Widgets
  • Create a Simple Prefab
  • Create Prefab Using D3 & NVD3 Charts
  • Create Prefab Using D3 Library DataMaps
  • Create Prefab using JQuery Plugin
  • Create Prefab using Angular Module
  • Create Prefab using Angular, React Components
  • Azure OAuth Prefab Integration

Team Poral Configure Vcs

  • Configure Azure Repos In CodeRepository
Edit

How Tos: Wizard


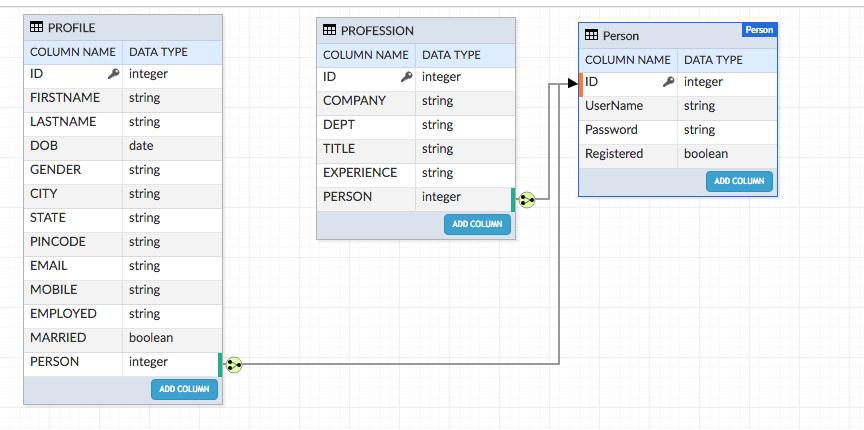
A basic usage scenario is used to go through the wizard interface step by step trying to build a Registration Form. A Generic Registration Form that can be used by any web sites to get their users registered to their sites for example accessing trial versions of products, or for buying goods online etc. In this scenario, the user is asked to register when they need to access some resources that needs registration. To register, user is provided a Registration form for creating username and password for that user. Once the user has given the inputs, the user navigates to a page where the user has to add personal information and if the user is employed the professional data also has to be supplied by the user. Once the required data is provided by the user the user is registered and is informed of the success of registration. The scenario assumes that you will be creating the required data model for taking the login data (Person Entity), profile (Profile Entity) and professional (Profession Entity) data inputs from the user.

WZ_usage_dm

This is the set-up of an existing page - Getting Basic Details from the User for Registration with a button to invoke the Wizard to add Profile and Professional data.

  • Create a page named UserRegistration to take the basic user data for Person entity.
  • UI Design for the Page: use datagrid to display/add/edit person details
  • Add button to invoke wizard to add profile and profession data - Click event should navigate to the wizard page (WizardBasic) which will be designed in the next step
  • Run the App and give the inputs as needed.

wz_userregistrationpage

  1. Create a Page named WizardBasic in WaveMaker App
  2. Drag and Drop a wizard on the canvas
  3. Once the Wizard is dropped on to the canvas, you will see the UI as shown below. By default only one step with the Title as Step Title is created. Note there are two action buttons – Cancel and Done respectively wz_usage_design
  4. Edit the Title of the Step: Click on the step and in the properties panel change the Title to Personal Data. wz_usage_titleprops
  5. Adding More Steps to the Wizard: Add one more step – click on the wizard canvas and click on Add Step. Change Step Title to Professional Data by using the Title property of the step. wz_usage_addsteps

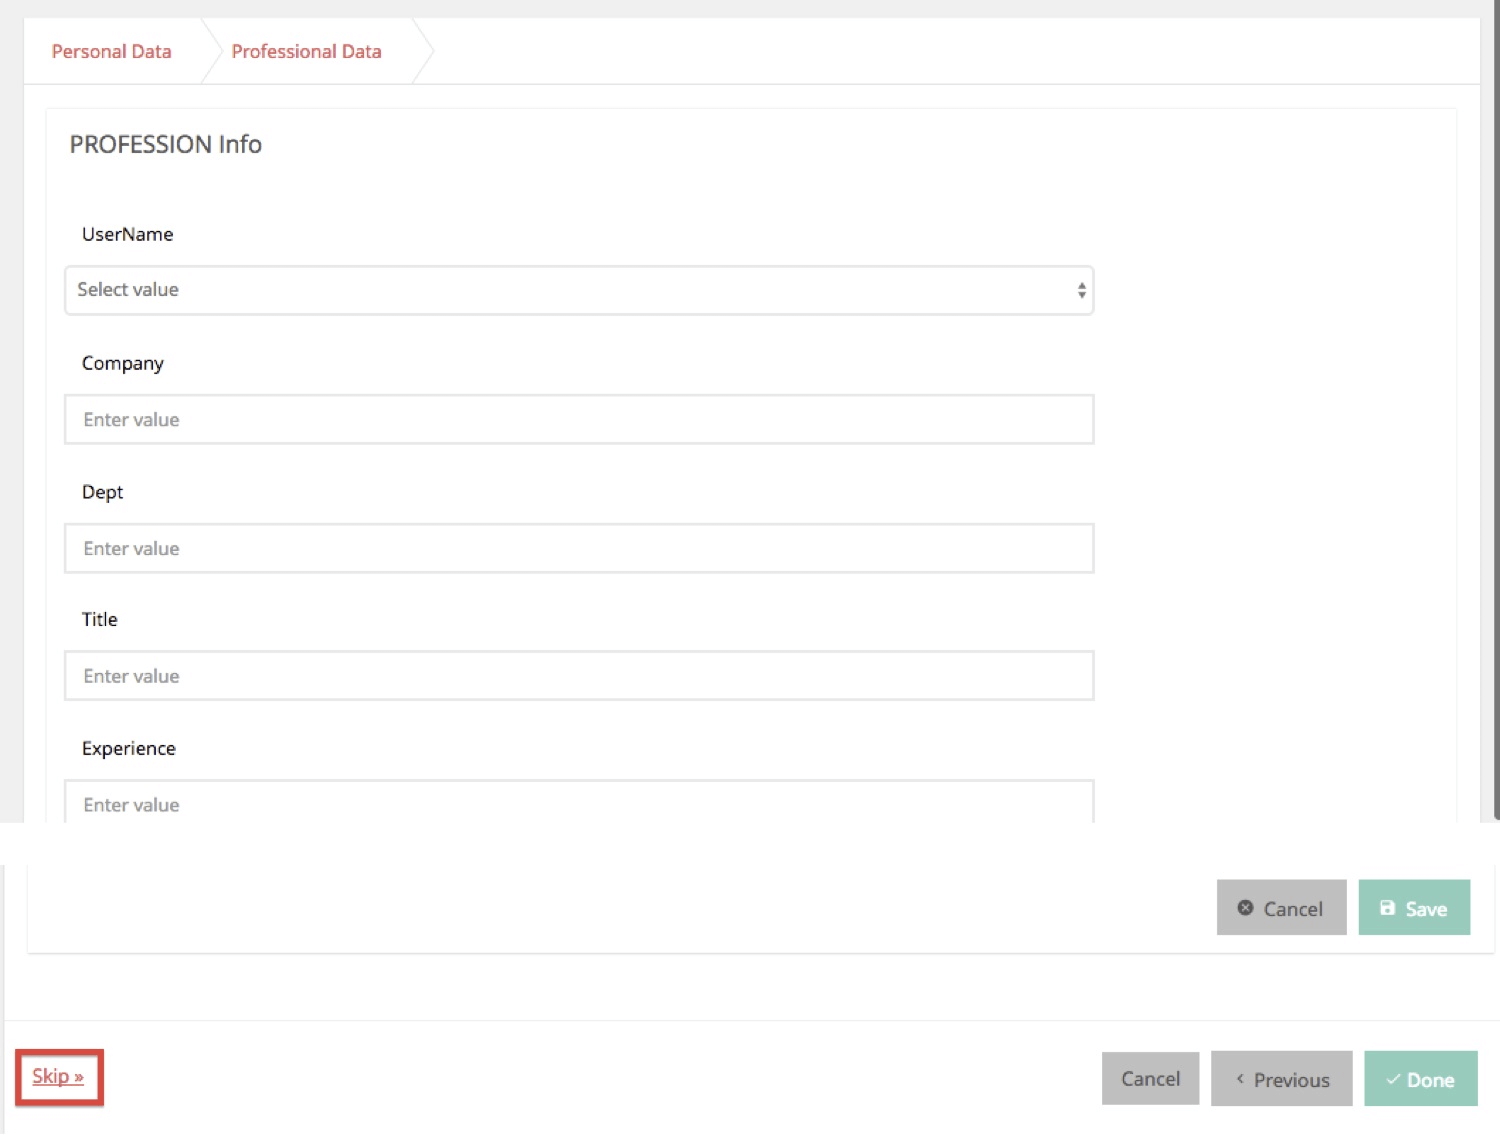
Design the UI for Personal Data Step: Live Form bound to the Personal entity, using 3-column layout. WZ_usage_step1design 
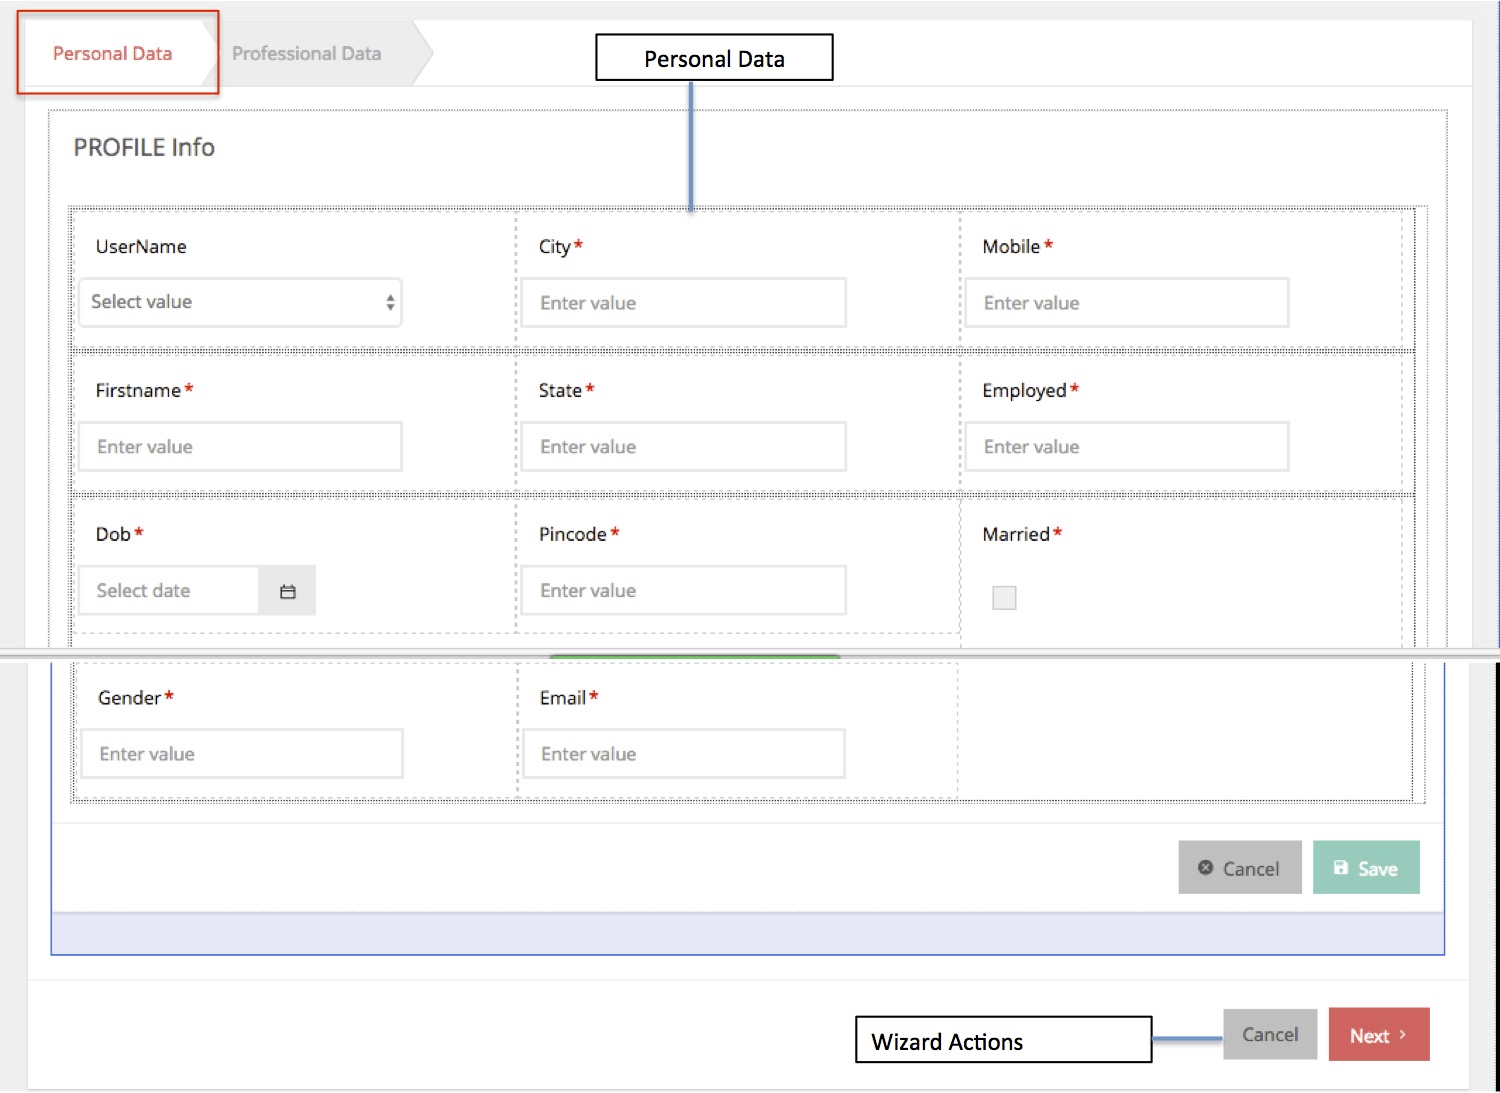
Design UI for Professional Data Step: Live Form bound to the Professional entity, using 1-column layout. WZ_usage_step2design

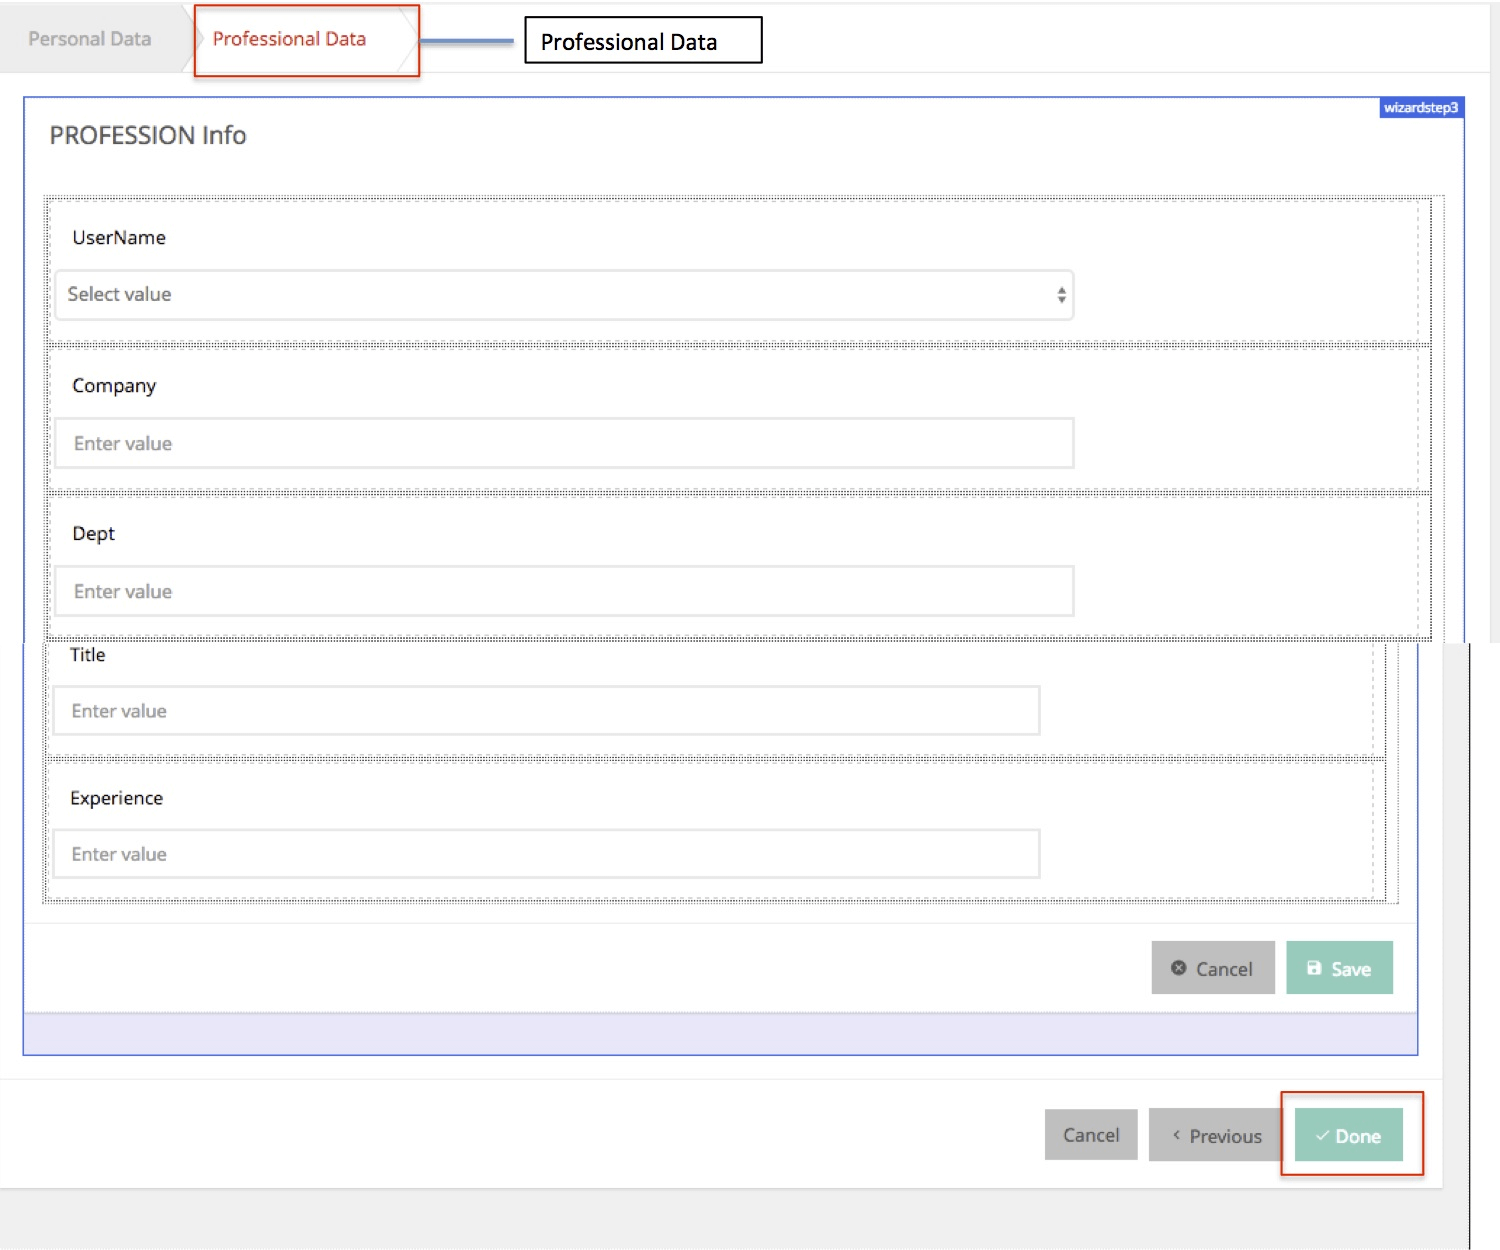
  • Writing Event on the Wizard Step1 (Personal Data)
  • On Next: Use Case – When the User is not Employed – On Blur Event of employed field In Personal Data Step when user tabs out after entering a value in employed form field of liveform On Blur event is fired. In the above use case mentioned the user would not want to go to next step to input Professional data as the user is not employed in which case the appropriate handler has to be plugged into the On Blur of the employed field. This example has a On Blur Javascript handler that does the following:
Application.$controller("liveform2Controller", ["$scope",
function($scope) {
"use strict";
$scope.ctrlScope = $scope;

$scope.employedBlur = function($event, $isolateScope) {
debugger;
var employed = $scope.Widgets.employed.datavalue;
if (employed == "No")
$scope.Widgets.wizardstep2.enabledone = true;
else
$scope.Widgets.wizardstep2.enabledone = false;
};
}
]);
  • Gets the datavalue of the employed widget and assigns it to employed variable.
  • If the is employed datavalue is “No” it enables the Done button in this step itself as the user can complete the registration in step 1 itself without going to step 2.
  • Writing Event on the Wizard Step 2 (Professional Data) – On Done:
    • On Done: Use Case –When the User is Employed. In this case the user is allowed to move to the next step to enter professional data. Once entered and Done button is clicked, On Done event fires. A Javascript handler is added to On Done Event which does the following:
$scope.wizard1Done = function($isolateScope, steps) {
var liveData = $scope.Widgets.liveform2.dataset.data;
var ctrOfData = liveData.length;
var profileData = $scope.Widgets.liveform2.dataset.data[ctrOfData -
1];
var userName = profileData.personByPerson.userName;
$scope.Variables.UpdateRegistered.setInput('uid', userName);
$scope.Variables.UpdateRegistered.update();
DialogService.open('alertdialog1', $scope, {
'mode': 'edit',
'showInUserMode': true
});
};
  • Gets the UserName from the Live Form Dataset

  • Sets the UserName Input for the Update Query on the Person Service Variable to set the Registered field to true.

  • Updates the service variable.

  • Shows the Alert Dialog with Successful Message – Registration Successful – To create Alert Dialog and show up in a page – Refer Dialog Documentation

  • Navigates to Registration Details Page

  • Run the app and click on Update Personal Data on User Registration page

WZ_usage2_run1

  • Enter the Personal Details and click on NEXT to enter Professional Data

wz_usage2_run2

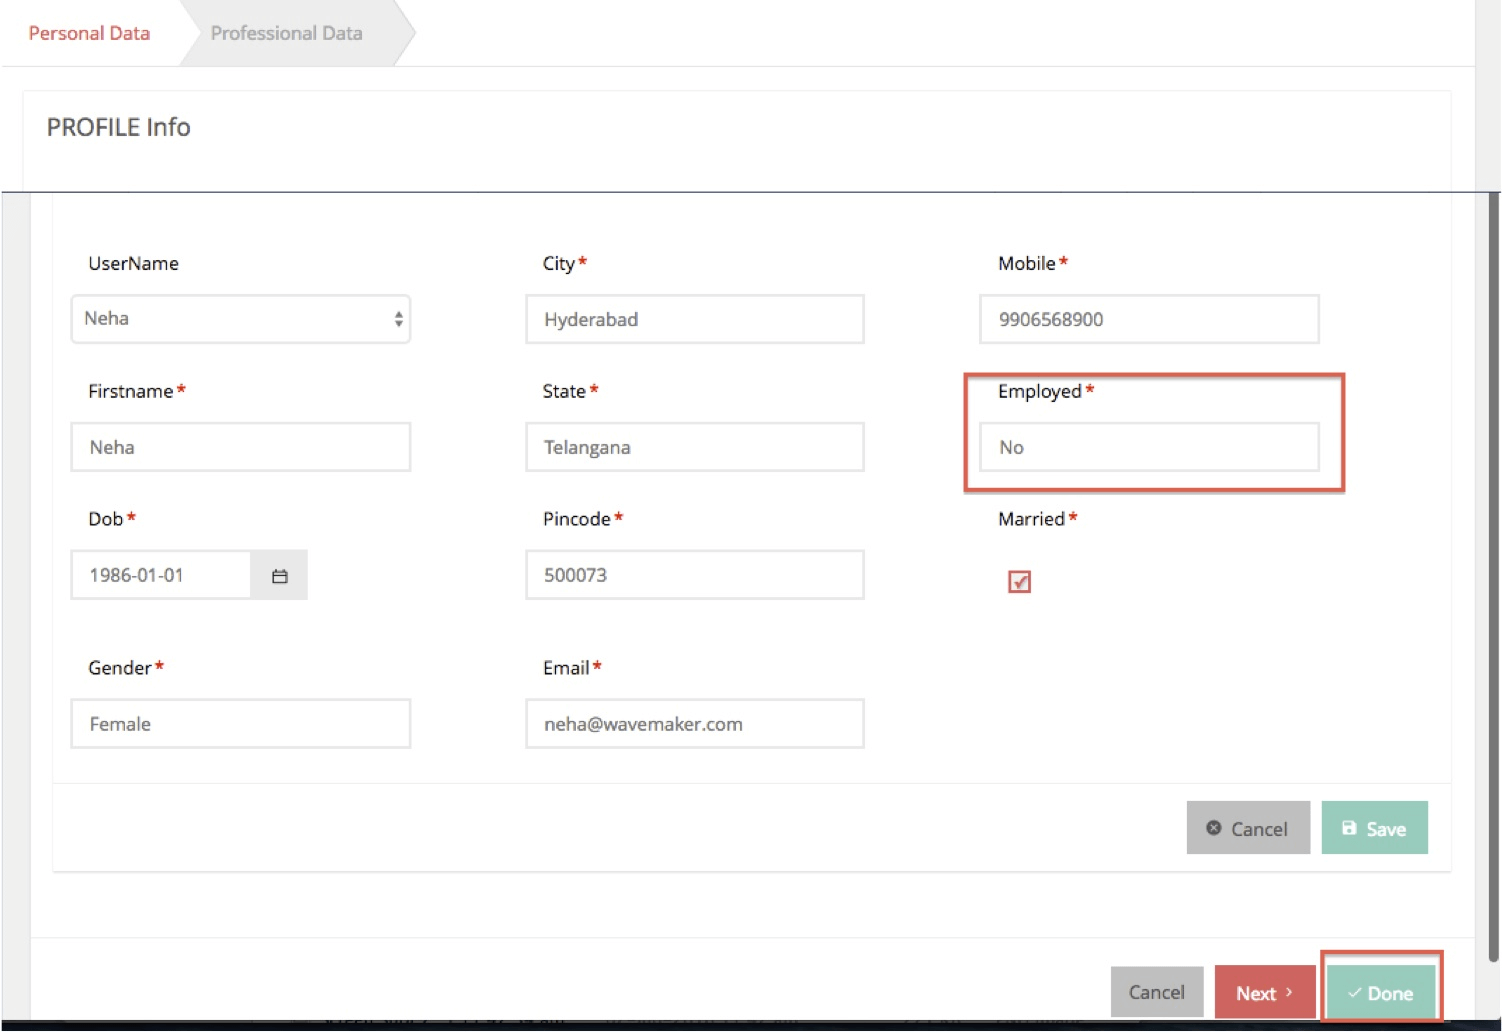
  • Run the app again and Enter the Personal Details with Employed set to NO, observe the DONE button with no navigation to Professional Data step

WZ_usage_run1

Last updated on 7/15/2020 by Swetha Kundaram
← Setting partial page content for Panel within a List using JavaScriptDynamic Tabs and Accordions →
WaveMaker
  • PRICING
  • PARTNERS
  • CUSTOMERS
  • ABOUT US
  • CONTACT US
Terms of Use | Copyright © 2013-2023 WaveMaker, Inc. All rights reserved.