Secure Connection for Deployed Apps
Authentication is a process by which the access to the app is restricted to known/authentic users.
A WaveMaker application can include a login page that requires users to sign on in order to gain access to the application. In order to set up user authentication, you need to configure a data source that stores the user IDs and passwords. You have the following options for storing this data:
- Any database supported by WaveMaker
- Lightweight Directory Access Protocol (LDAP)
- Active Directory (AD)
- Central Authentication Service (CAS)
- Security Assertion Markup Language (SAML)
- Custom Java Service
- WaveMaker Studio also provides a simple Demo data source. You can use this data source to set up and test your login page during development. We do not recommend the Demo data source for production applications.
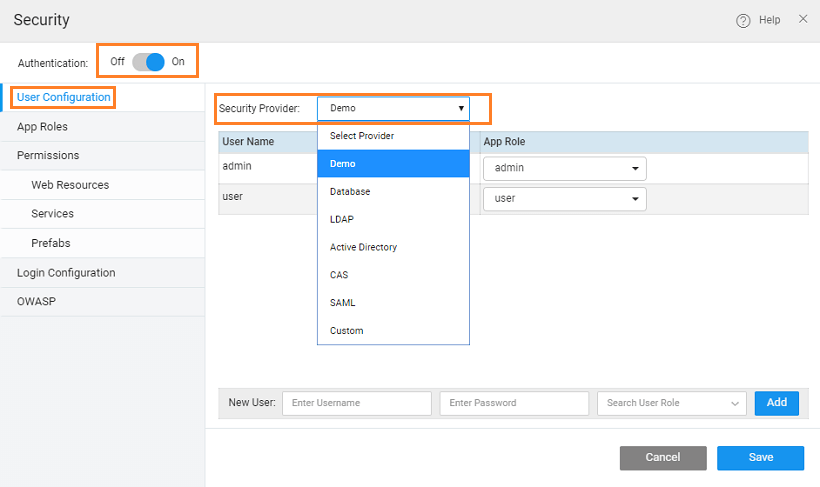
Selecting Security Providers
You can choose any of the following security providers for your WaveMaker applications:
Demo
When the WaveMaker developer enables security, the demo is the default option. This option, as the name suggests, is for demo purpose, ease the user into security features. Demo option provides by default two out of box users called “admin” and “user” with password same as username. Developers can add/remove users.
The Demo data source provides a great design-time tool for authentication. With this data source, you can quickly define a few usernames and passwords to use while creating and testing the login functionality for your application. It is recommended that you set up a more robust data source for authentication before you deploy your application into production.
By default, the Demo data source provides two users - user and admin. These users are assigned to the user and admin role respectively. You can create roles on the Roles tab. You can add new users and assign them roles created in the Roles tab. You can also delete existing users by clicking the Delete icon next to a user row.
Database
You can use a database to store your authentication data. The database must include a table that provides a column for usernames and passwords. The usernames and passwords must be stored in the same table in the database.
When you choose Database as the Security Provider, you can perform the following configurations on the Users tab:
- Database Configuration:
- Database: The Database that contains the tables for the username and password fields. Choose the Database from the pull-down menu. (You have to import the database first. See Database Integration. If you have imported the database and it does not appear in this list, try closing and reopening the project).
- User Table: Select the table that contains the columns for the usernames and passwords.
- User:
- User Id Column: Select the column for the user id
- Username Column: Select the column for the user (login) name
- Password Column: Select the column for the password.
- Role Mapping: This will build the query to fetch the role values from the user table based on the logged in user details. See User Onboarding for more information.
LDAP
LDAP (Lightweight Directory Access Protocol) is a software protocol for enabling anyone to locate organizations, individuals, and other resources such as files and devices in a network, whether on the public Internet or on a corporate intranet.
To set up authentication using an LDAP data source, choose LDAP as the Security Provider.
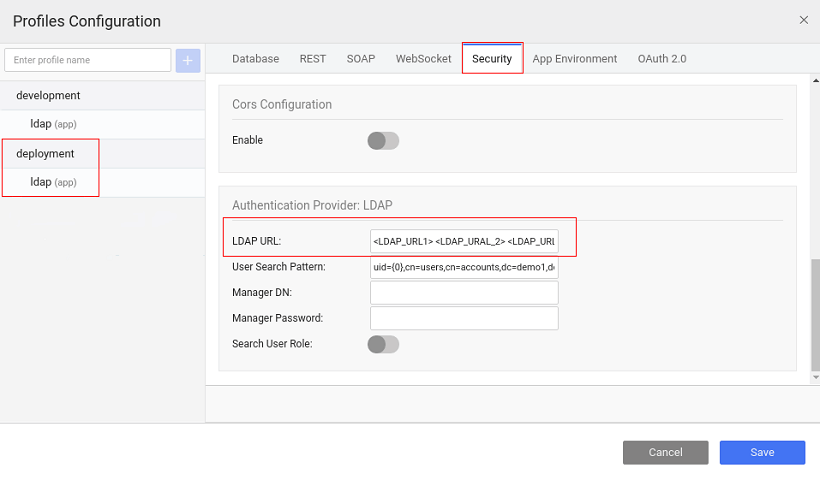
When you choose _LDAP _as the Security Provider, you can perform the following configurations:
- LDAP URL: This field specifies the host name and port number of the LDAP server. This is the root node of which security will be able to use - ldap://localhost:389/dc=wavemaker,dc=com. For deployment profile, you can specify multiple LDAP server URLs, if required, by providing the multiple LDAP URLs as space-separated values, from the security tab of the Profile Configuration.
- Manager DN: Distinguished Name for admin access, this is an optional field
- Manager Password: Password in case admin access is mentioned above, this is an optional field
- User Search Pattern: Filter used to find the user in the directory, relative to the root specified above. The only valid variable is {0} which is replaced with the user's login name. For example: "cn={0},ou=people"
- Test user DN: Full DN of the user account for testing connection URL. Example: someUser
- Test user Password: The password for the test account that you use to test the LDAP URL.
Once you have configured the security provider, click the Test Connection button. The Test Connection button only verifies that the Test User DN and Password can be used to "bind" using the URL. You must specify a full DN for the Test User DN. A search is not performed for Test Connection as is normally done for login.
Role Mapping
Role Mapping for logged in users can come from the configured LDAP security provider or an imported Database.
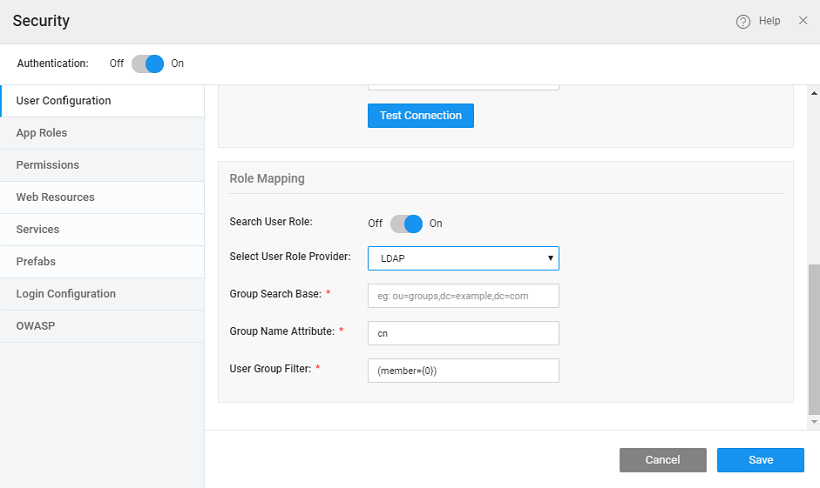
- Search User Role: Check this box to select the user role provider - Database or LDAP.
- If you select _LDAP _then both authentication and authorization (roles) will be retrieved from the LDAP security provider. You need to provide:
- Group Search Base the search base from which the search for group membership should be performed. Eg: ou=roles, where ou is organizational unit
- Group Name Attribute the attribute that holds data about the role name for a group. Eg: cn (common name)
- User Group Filter the search filter used to search through the LDAP directory to find the roles to which an authenticated user belongs. {0} would be substituted with the user's DN. Eg: (member={0})
- If you select _Database _then authentication is performed using LDAP and authorization (roles) content is retrieved from the database. This allows you to use username and password credentials from LDAP while retrieving role content from a separate database. For role configuration using database see here.
- If you select _LDAP _then both authentication and authorization (roles) will be retrieved from the LDAP security provider. You need to provide:
Active Directory
Active Directory Domain Service is Microsoft's Directory Server. It provides authentication and authorization mechanisms as well as a framework within which other related services can be deployed (AD Certificate Services, AD Federated Services, etc). It is an LDAP compliant database that contains objects.
To set up authentication using an Active Directory data source, choose Active Directory as the Security Provider.
When you choose _Active Directory _as the Security Provider, you can perform the following configurations:
- URL: This field specifies the protocol and hostname of the AD server. Example: ldap://ad.mydomain.com
- Domain: The fully qualified domain name (FQDN) of the Active Directory domain is an optional field. For instance: example.com
- Root Dn: It will be automatically populated based on domain entry only the first time. The user can change this later and subsequent changes to the domain will have no effect on rootDn. Example: When Domain is example.com; then RootDn is automatically updated as dc=example, dc=com.
- User Search Pattern is a filter which is prepopulated by default. Users can change it, as per their requirement.
- Test username: Full DN of the user account for testing connection URL. Example: user1. If the domain is provided, then simply enter the username. On the other hand, if a domain is not provided, then username must be appended to the domain name.
- Test user password: The password for the test account that you use to test the AD URL.
Once you have configured the security provider, click the Test Connection button, test user credentials are authenticated in this step. Keep in mind, during runtime, the authentication will happen based on user credentials and user search pattern. See here for more use cases.
Role Mapping
Role Mapping for logged in users can come from the configured Active Directory security provider or an imported Database. 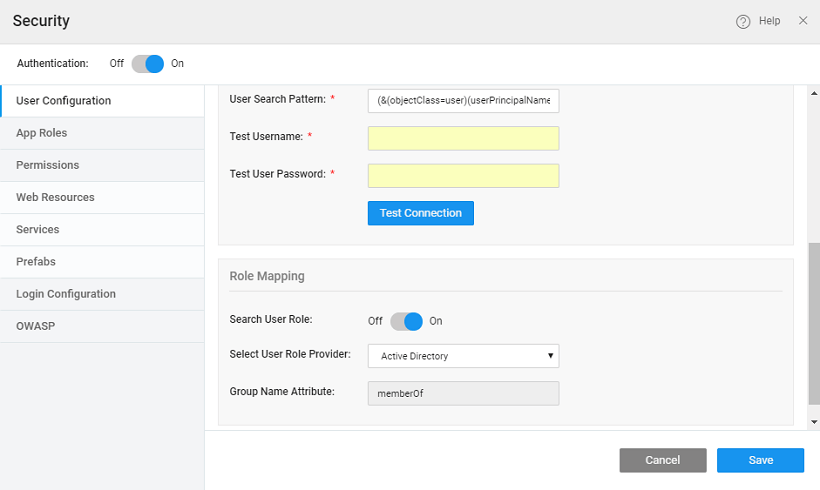
- Search User Role: Check this box to select the user role provider - Database or AD.
- If you select AD _then both authentication and authorization (roles) will be retrieved from the AD security provider. You need to configure the _Group Role Attribute.
- If you select _Database _then authentication is performed using AD and authorization (roles) content is retrieved from the database. This allows you to use username and password credentials from AD while retrieving role content from a separate database. For role configuration using database see here.
CAS
The Central Authentication Service (CAS) is a single sign-on protocol for the web. Its purpose is to permit a user to access multiple applications while providing their credentials (such as user id and password) only once. It also allows web applications to authenticate users without gaining access to a user's security credentials, such as a password.
To set up authentication using a Central Authentication Service, choose CAS as the Security Provider. Know more about single sign-on using CAS.
When you choose _CAS _as the Security Provider, you can perform the following configurations on the Setup tab:
- Server URL: This field specifies the protocol and hostname of the CAS server. Example: http://mydomain.com:8080/cas
- Login URL: This field is the login URL of the CAS server
- Validation URL: This field specifies the URL used for validating the service ticket issued by the CAS server.
- Service Parameter Name: This field configures the request parameter to look for when sending request to CAS E.g./cas-server-webapp-4.0.0/login?service=https%3A%2F%2Flocalhost%3A8443%2Fcassample-1.0%2Flogin%2Fcas
- Ticket Parameter Name: This field configures the Request Parameter to look for when attempting to see if a CAS ticket was sent from the server. The default value is “ticket”. Eg. /cassample-1.0/login/cas?ticket=ST-1-lCYeRuXfmhKid1auqdy2-cas01.example.org
Role Mapping
Role Mapping for logged in users can come from the configured CAS security provider or an imported Database. 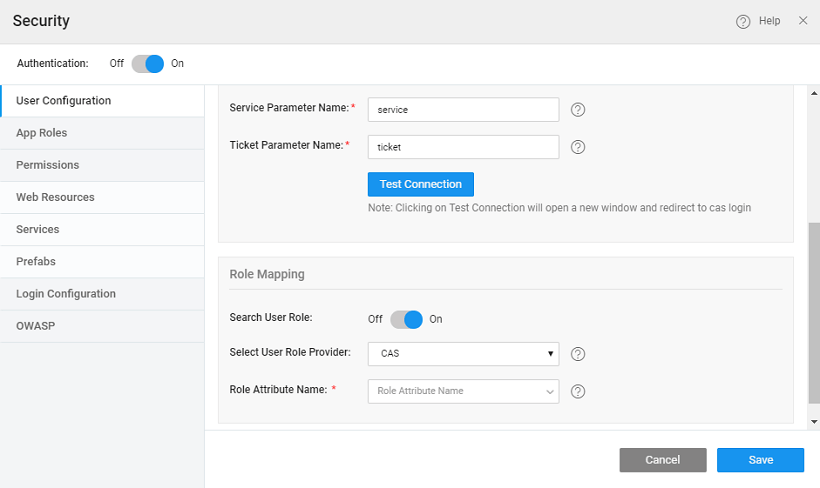
- Select User Role Provider: Choose the user role provider. There are two role providers - CAS and Database.
- The user can configure CAS role attribute and the same role can be configured in the WaveMaker application. The Role Attribute Name needs to be configured.
- If you select Database then authentication is performed using CAS and authorization (roles) content is retrieved from the database. This allows you to use username and password credentials from CAS while retrieving role content from a separate database.For role configuration using database see here.
SAML
Security Assertion Markup Language (SAML) is an XML-based standard for exchanging authorization and authentication data between security domains. SAML exchanges are between
- an identity provider (IdP) – producer of assertions, and
- service provider (SP) – consumer of assertions.
SAML Configuration in WaveMaker helps you configure the WaveMaker application with any SAML 2.0 compliant Identity provider. Know more about SAML.
Custom
To set up authentication using Java Services, choose Custom as the Security Provider.
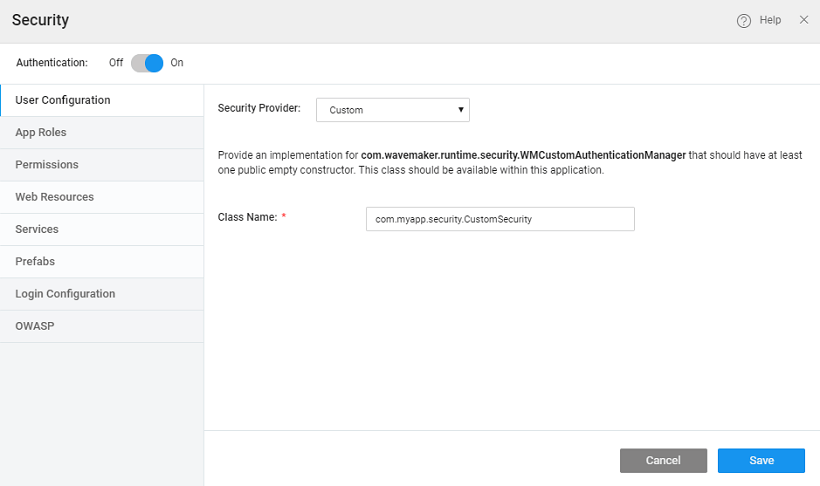
When you choose Custom _as the Security Provider, you need to specify the _fully qualified Java Class name, if this does not exist a sample implementation will be generated at the location as shown below.
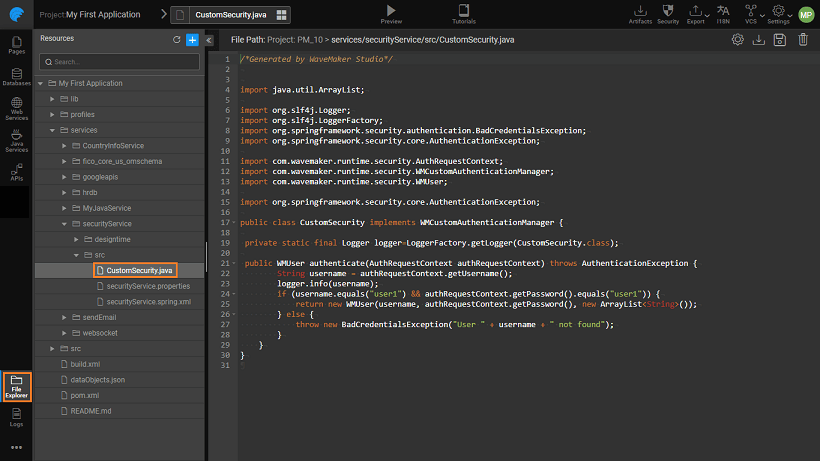
This Java Class should:
- implement the WMCustomAuthenticationManager, whose signature is given below:
You can handle exceptions by throwing subclasses of AuthenticationException. 2. and returns a WMUser object which can be initialized by a call to the following constructor:
JWS
Json Web Signature (JWS) is a type of Json Web Token (JWT) which is an open standard (RFC 7519) that defines a compact and self-contained way for securely transmitting information between parties as a JSON object. This information can be verified and trusted because it is digitally signed.
In WaveMaker studio, we have introduced JWS as a secondary provider that accepts JWS tokens during API authentication.
For example, any Open ID server after a successful authentication returns an ID token that is of type JWS and can be accepted by the JWS secondary provider.
Opaque Token
Opaque tokens, unlike JWS, cannot be decoded to read any user information, and are represented by a random, unique string of characters. They are identifiers that are mapped to user information stored on the server. These tokens can be validated only by the server which has issued them using the introspection endpoint.
In WaveMaker studio, we have introduced the Opaque token as a secondary security provider to accept opaque tokens during authentication.
For example, few Open ID servers after a successful authentication return an access token which is of type Opaque.