WaveMaker Docs

WaveMaker Docs

  • Get started
  • Widgets
  • Mobile
  • How-to
  • Enterprise
  • Releases
  • Blog
  • Sign-in

›Java services

How-to-documents

  • How-to Wiki
  • WaveMaker Best Practices

App solution

  • Creating a Registration Page
  • Support for Password Encryption
  • Error Handling in WaveMaker App
  • Leaving Page with Unsaved Changes
  • Micro frontend using iframes
  • Enabling PWA

UI design

  • Passing Parameters to Pages
  • Passing Parameters to Partial Page
  • Accessing Script
  • Use Static Variable to pass data between pages
  • Customise Login Page
  • Incorporating Additional Icons
  • Change Icon Color on Condition
  • Change Icon for the Global Spinner
  • Changing Default Favicon
  • Changing App Logo
  • Changing Page Title
  • Customise App Style
  • How to use Conditional Class Property
  • How to use Conditional Style Property
  • Customize an Existing Theme
  • Adjust Left Navigation Width
  • Customizing Theme
  • Enable SPA
  • Choose Widget Template and Layout
  • Widget Template and Icons
  • Custom Template for Widgets
  • Apply Custom Data Formatter

Nav & Dropdown

  • Dynamic Menu based on User Role
  • Restricting Menu Items based on the User Role
  • Localization for Dropdown Menu

Localization

  • Localization in WaveMaker Apps
  • Setting Language and Date Format
  • Localization Using Select Locale
  • Localization of Error Messages

Security

  • SAML Integration - OneLogin
  • SAML Integration - ADFS
  • OpenID Integration - Azure AD
  • Custom Security using Google OAuth Prefab
  • Multiple Security Provider Implementation
  • Customizing Post Authentication Handlers
  • Configuring Content-Security-Policy
  • Configuring MTLS

Databases

  • Queries with Dynamic Where Clause
  • Connect To Azure SQL Server
  • Recommended JDBC Driver Versions for Databases
  • How to fetch more than the default number(100) of records from database?
  • How To: One-to-Many Relationship
  • Working with Temporals
  • Connect To AWS Redshift Database
  • Connect To SAP Hana Cloud Database
  • Transactional History of Entity
  • Row-Level Security using DB Event Listeners
  • Validations using CRUD Listeners
  • Custom Logic DB Event Listeners
  • Connect to MySQL database using SSL
  • How to Switch MariaDB to MySQL Connector

Web services

  • Using App Environment Properties
  • Consuming an Existing WaveMaker API
  • Using POST method to send data to a REST API
  • Request-Response Processing for REST Services
  • How to Intercept Request and Response of all API Calls in One Place
  • WebSocket Usage - Chatroom App
  • UI for API Server-side Pagination
  • Working with API with different pagination formats

Java services

  • Sending Email using WaveMaker Connector
  • Implementing Forgot Password feature using Java Service
  • Accessing REST APIs from Java Service
  • Scheduling a Java Service
  • Integrating JUnit Tests for WaveMaker Application
  • ORM Artifacts
  • Pre-Post Processing for Database Service APIs
  • Accessing Logged-in User Details using Java Service
  • Design a workflow in Camunda BPM and integrate into a WaveMaker app
  • Integrate Azure File Storage
  • Insert Data from Excel into Database
  • Integrate Amazon S3 into WaveMaker App
  • Integrate Twilio Connector
  • Integrate OTP (One-Time Passcode) Verification with WaveMaker App

Variables

  • Using Filter Conditions on Variable
  • Using Live Variable APIs
  • Using Notification Actions
  • Using Navigation Action
  • Using Variables for Queries and Procedure
  • Using Service Variable in a Form
  • Using Filter Criteria for a Data and Live Widgets
  • Using Filter Criteria for a Database CRUD Variable

JavaScript

  • Using JavaScript in Binding
  • Using JavaScript from External URL
  • Using JavaScript to loop a command
  • Using function for evaluating conditions

Developer options

  • Synchronizing WaveMaker Apps with IDEs
  • Synchronizing Java Services Controller
  • Integrating Amazon Cognito for User Authentication
  • Integrating Sample Jasper Report in WaveMaker Application
  • How to generate PDF File using Jasper Reports
  • Upgrading an App from WaveMaker 9.x to WaveMaker 10.0
  • App Migration from WaveMaker 9x to 10x
  • Setup Fusion Reactor for Debugging Issues

Deployment

  • SSL Termination in LoadBalancer

Mobile App Solutions

  • Notify users about new update

Mobile gesture

  • Setting Swipe Gestures on a List Widget
  • Working with Pull to Refresh

Mobile widgets

  • Using Search Widget within the Navbar

Mobile UI design

  • Setting Splashscreen Images and App Icons
  • Using Cordova Plugins
  • Designing Tablet Views in Mobile Project
  • Sliding left navigation for Mobile App
  • Mobile App using Bar code
  • Custom Date Picker in Mobile

Cards

  • Capturing Card Items

DataTable

  • Customising Data Table Row Action
  • How to Configure Row Expansion in a Data Table
  • Using Widgets to represent Data Table Columns
  • View Master-Detail Data Records using Data Table
  • Add Master-Detail records using Data Table
  • Export Data from Data Table
  • Export Data from Data Table - 2
  • Setting Blob Filename
  • Dynamic Data Tables
  • Customize Dynamic Datatable
  • Data Table Column bound to Query
  • Combining Columns in Data Table
  • Custom Styling Data Table Columns & Rows
  • Formatting Data Table Columns
  • Concurrency and Record Locking in WaveMaker
  • Edit DataTable records bound to Query API

List

  • Creating an Employee List grouped by City
  • Creating an Employee List grouped by Birth Month and City
  • OnRender Event
  • Including a Data Table within a List
  • Building an Editable List
  • Building Cascading Lists
  • Accessing List Items
  • Localization of Data Table Column Headings

Forms

  • Using Live Form
  • How Tos: Form
  • Building Tabbed Live Form
  • How Tos: Live Form
  • Linking Live Form with another Widget for Input
  • Handling Related Fields in a Live Form
  • How to Get Validation Messages from a Form
  • Adding Master-Detail records in the same transaction
  • Submit Parent and Child Records in a Single Transaction
  • Submit Parent and Child Records in a Single Transaction using Form and Data Table
  • Using Cascading Select & Autocomplete for Live Form Fields
  • Using Cascading Select within Live Form
  • Using cascading Filter to populate Live Form
  • Using Wizard for Master-Detail Live Form
  • Copy to Clipboard
  • Create a form with multiple wizard steps
  • Smart Forms: Conditional Flows for form Widget

Calendar

  • How Tos: Calendar
  • Calendar Usage - Create an Event
  • Calender Usage - Google Calendar Integration

CheckboxSet

  • CheckboxSet to Filter List data

FileUpload

  • FileUpload - Basic Usage
  • File Upload Widget Operations
  • Upload File & Save in Database
  • File Upload & Blob Data
  • File Upload - Custom Directory
  • Accessing File Upload from Java Code
  • Upload Files from Live Form & Form

Radioset

  • Radioset to Filter a List

Rating

  • Building Rating Widget using Static Data
  • Building Rating Widget using Static Variable
  • Build Rating Widget using Model Variable
  • Building an Interactive Rating Widget

Select

  • Configuring Select Widget from a Static List of Values
  • Configuring Select Widget from a Static Variable
  • Configuring Select Widget from a Variable
  • Configuring Select Widget using Display and Data Fields
  • Configuring Select Widget from Database Fields
  • Configuring Cascading Select
  • Selection Widgets - Use Case

Progress Circle

  • Using Progress Circle Widget

Charts

  • Working with Charts
  • Display User Selection in another Widget
  • Handling Dynamic Data
  • Custom Data

Richtext Editor

  • Adding Custom Fonts to Richtext Editor

Live filter

  • Applying Live Filter to a Data Table or a Chart
  • Building a Multiple Selection Live Filter
  • Building a Range Live Filter

Container

  • Setting partial page content for Accordion within a List
  • Setting partial page content for Panel within a List using JavaScript
  • How Tos: Wizard
  • Dynamic Tabs and Accordions

Tree

  • Tree using Static Variable
  • Tree using Java Service
  • Tree using Dynamic Tree

Prefabs

  • Creating Partials in a Prefab
  • Create Prefab using Third Party UI Widgets
  • Create a Simple Prefab
  • Create Prefab Using D3 & NVD3 Charts
  • Create Prefab Using D3 Library DataMaps
  • Create Prefab using JQuery Plugin
  • Create Prefab using Angular Module
  • Create Prefab using Angular, React Components
  • Azure OAuth Prefab Integration

Team Poral Configure Vcs

  • Configure Azure Repos In CodeRepository
Edit

Integrate OTP (One-Time Passcode) Verification with WaveMaker App


Security for applications and phone verification is a simple way to secure your application and help prevent bot accounts. Sending a one-time password to a user's phone to validate tells that they have access the app is a common security tool used when people sign up for application or give you their phone number for the first time.

This document will let you build one-time passcode (OTP) experience using SMS, voice or email with twilio-connector during authentication.

How it works

During login authentication,

  1. User enters the application credentials
  2. Once the credentials are valid, OTP validation is required
  3. User enters their phone number or email to receive OTP.
  4. App generates an authentication token(OTP)
  5. App sends the token via selected channel(SMS, Voice or Email) to the user
  6. User enters the correct token
  7. App verifies the token

Once the token is matched, the login for the application is successful.

Integrating OTP into App

Step1: Enable Authentication

  1. Enable Security in WaveMaker app Check here

  2. Write Success handler on authentication success Check here.

In this handler, add an attribute to check verify OTP validation is pending state while redirecting to pages after success authentication.

Example:

@Override
public void onAuthenticationSuccess(HttpServletRequest request, HttpServletResponse response, WMAuthentication authentication) {
    //Adding attribute to check otp verification is pending or not.
    authentication.addAttribute("otpverification", "pending", Attribute.AttributeScope.ALL);
}

Add the bean in project-user-spring.xml.

<bean id="customAuthenticationSuccessHandler" class="com.security.service.handler.CustomAuthenticationSuccessHandler"/>

Step2: Import Twilio-connector and Access API's

Check how to integrate twilio-connector and access API's into your app from Check here

Create JavaService and integrate twilio one-time passcode API's in the application Check here

Once the OTP is validated, change the securityInfo.userAttribute(added in Step1 in security success handler) value to success from pending.

import com.wavemaker.connector.twilio.TwilioConnector;
import com.wavemaker.connector.twilio.constant.Channel;
import com.wavemaker.connector.twilio.model.VerificationResult;
import com.wavemaker.runtime.security.Attribute;
import com.wavemaker.runtime.security.SecurityService;
import com.wavemaker.runtime.security.WMAuthentication;

@ExposeToClient
public class TwilioAuthService {

    private static final Logger logger = LoggerFactory.getLogger(TwilioAuthService.class);

    @Autowired
    private TwilioConnector twilioConnector;

    @Autowired
    private SecurityService securityService;

    public boolean sendOTPCode(String phoneNumber, Integer channelId) {
        switch (channelId) {
            case 1:
                return twilioConnector.sendOTP(phoneNumber, Channel.SMS).isValid();
            case 2:
                return twilioConnector.sendOTP(phoneNumber, Channel.CALL).isValid();
            case 3:
                return twilioConnector.sendOTP(phoneNumber, Channel.EMAIL).isValid();
            default:
                return false;
        }
    }

    public boolean validateOTP(String phoneNumber, String otpCode) {
        VerificationResult result = twilioConnector.verifyOTP(phoneNumber, otpCode);
        //Updating the added otpverification attribute to success from pending.
        if(result.isValid()){
            Authentication authentication = SecurityContextHolder.getContext().getAuthentication();
            WMAuthentication wmAuthentication = (WMAuthentication) authentication;
            wmAuthentication.addAttribute("otpverification", "success", Attribute.AttributeScope.ALL);
        }
        return result.isValid();
    }
}

Step3: Integrate OTP into the application

Add below filter under src/main/java/com/security/service/filter

  1. To prevent the user from navigating to OTPPage instead of user landing page after successful authentication without OTP verification, add a filter to check if the securityInfo.userAttribute.otpverification added is still pending. If yes then redirect to OTPPage.

import java.io.IOException;
import java.util.Arrays;
import java.util.List;
import javax.servlet.Filter;
import javax.servlet.FilterChain;
import javax.servlet.FilterConfig;
import javax.servlet.ServletException;
import javax.servlet.ServletRequest;
import javax.servlet.ServletResponse;
import javax.servlet.http.HttpServletRequest;
import javax.servlet.http.HttpServletResponse;
import org.slf4j.Logger;
import org.slf4j.LoggerFactory;
import org.springframework.beans.factory.annotation.Autowired;
import com.wavemaker.runtime.security.SecurityService;

public class OTPFilter implements Filter {

    private static final Logger logger = LoggerFactory.getLogger(OTPFilter.class);

    protected FilterConfig config;

    private final List<String> pageNames = Arrays.asList("header", "topnav", "footer", "leftnav", "rightnav");

    @Autowired
    private SecurityService securityService;

    @Override
    public void init(FilterConfig filterConfig) throws ServletException {
        logger.info("----------Initialize filter: {}", getClass().getSimpleName());
        this.config = filterConfig;
    }

    @Override
    public void doFilter(ServletRequest request, ServletResponse response, FilterChain chain) throws IOException, ServletException {
        HttpServletRequest httpRequest = (HttpServletRequest) request;
        HttpServletResponse httpResponse = (HttpServletResponse) response;

        String requestURI = httpRequest.getRequestURI();

        if (requestURI.contains("/pages/")
                && securityService.getAllAttributes().get("otpverification").equals("pending")){
            String url = httpRequest.getRequestURI();
            String pageName = url.substring(url.indexOf("/pages/") + 7, url.indexOf("/page.min.json"));
            if (!pageName.equals("OTPPage") && !pageNames.contains(pageName)) {
                logger.info("----OTP Verification is pending so redirecting to OTPPage-------");
                url = url.replace(pageName, "OTPPage");
                httpResponse.sendRedirect(url);
            } else {
                chain.doFilter(httpRequest, httpResponse);
            }
        } else {
            chain.doFilter(httpRequest, httpResponse);
        }
    }

    @Override
    public void destroy() {
        logger.info("Destroy filter: {}", getClass().getSimpleName());
    }
}

Add the bean in project-user-spring.xml file.

Example:

<bean id="otpFilter" name="otpFilter" class="com.security.service.filter.OTPFilter"/>

Also add below Custom Filter in general-options.json file.

"customFilterList": [
        {
            "name": "otpFilter",
            "ref": "otpFilter",
            "position": "LAST"
        }
    ]

Once this filter is added in general-options.json file, open security dialog and click on save to automatically add below code in project-security.xml file.

<security:custom-filter position="LAST" ref="otpFilter"/>
note

If you donot want to open and save the security dialog then add the above code in project-security.xml below the default security:custom-filter.

  1. Create Variable for the JavaService methods written in Step2(both sendOTP and validateOTP API's using twilio-connector).

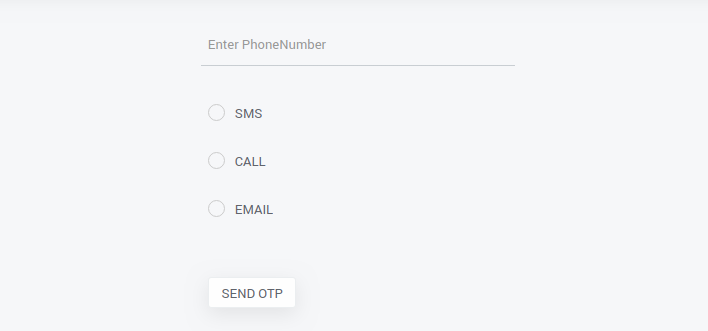
  2. Create and design an OTPPage to send OTP to the device or email.

In the above image, Send OTP button triggeres the sendOTP variable created. Bind the variable data parameters in the variable dialog. OnSuccess of this variable open the dialog to accept OTP.

example

Below code helps you to open the ValidateOTP dialog only when sendOTP response is true.

Page.sendOTPCodeonSuccess = function(variable, data) {
    //If the variable response is success then opening the OTP verification dialog.
    if (data.value) {
        Page.Widgets.dialog1.open();
    } else {
        App.Actions.appNotification.setMessage("Enter valid PhoneNumber");
        App.Actions.appNotification.invoke();
    }
};

Also Design the dialog to accept OTP code and validate the OTP.

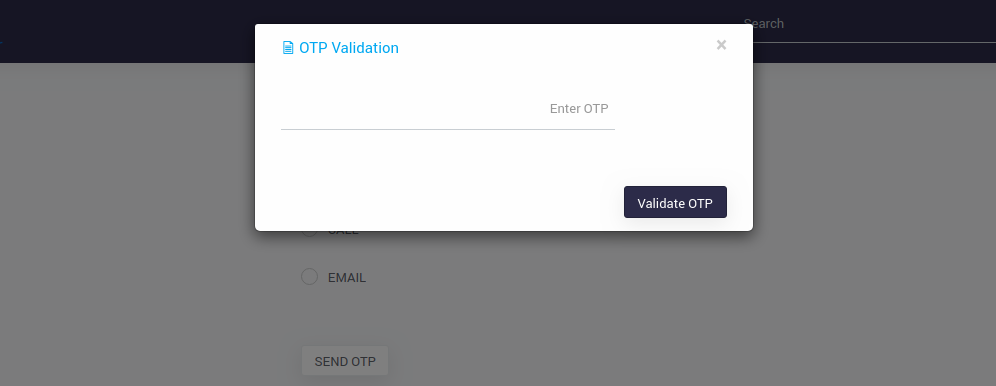
In the above image, Validate OTP button triggeres the validateOTP variable created. Bind the variable data parameters in the variable dialog. OnSuccess of this variable close the dialog and check the securityInfo.userAttributes.otpverification if value is success then navigate to landing page.

example

Below code helps you to close the ValidateOTP dialog and check the userAttribute, if success then navigates to the landing page.

Page.validateOTPonSuccess = function(variable, data) {
    if (data.value) {
        Page.Widgets.dialog1.close();  //Close validate OTP dialog
        //Invoking the security service getSecurityInfo variable and verifying the userAttribute
        Page.Variables.getSecurityInfo.invoke({}, function(data) {
            if (data.userInfo.userAttributes.otpverification == "success") {
                //Reload the page once OTP is validated which will go to the landing page.
                location.reload();      
            }
        });
    } else {
        App.Actions.appNotification.setMessage("Enter valid OTP");
        App.Actions.appNotification.invoke();
    }
};
  1. Now preview the app, enter login credentials in Login page. Once authentication is successful, it will be redirected to OTPPage. Enter phoneNumber or email and select the channel and then click on Send OTP button. A dialog will be popped up to validate OTP. Once OTP is validated you will be redirected to user landing page.
Last updated on 5/31/2021 by saraswathi rekhala
← Integrate Twilio ConnectorUsing Filter Conditions on Variable →
  • How it works
  • Integrating OTP into App
    • Step1: Enable Authentication
    • Step2: Import Twilio-connector and Access API's
    • Step3: Integrate OTP into the application
WaveMaker
  • PRICING
  • PARTNERS
  • CUSTOMERS
  • ABOUT US
  • CONTACT US
Terms of Use | Copyright © 2013-2023 WaveMaker, Inc. All rights reserved.