Publish Expo Module and Use in WaveMaker Project
Expanding the capabilities of your app goes beyond merely installing Expo packages or third-party libraries. When you need to tap into native platform APIs or leverage existing Android or iOS dependencies, you can write custom native code. Fortunately, Expo offers excellent support for this through Expo Modules.
With Expo Modules, you can write native code in a way that feels natural and straightforward, with minimal boilerplate. It ensures consistency across both iOS and Android platforms and provides a set of APIs and utilities specifically designed to streamline the development of native modules for Expo and React Native. This empowers you to enhance your app's functionalities and take advantage of native device features effectively.
In this How-to series we’ll walk you through the following:
- How to create an Expo Module
- Publish the Expo Module and
- Use the Module in WaveMaker project
How to create an Expo Module
To begin using the Expo Modules API, you have two options: You can either start by creating a new module from scratch or integrate the Expo Modules API into an existing module. Both approaches allow you to harness the power of Expo Modules and access native device features in a seamless and consistent manner for your Expo and React Native projects. In this section of How-to we’ll show you how-to create an Expo module in Isolation and we’ll be walking you through on how to use the same in the WaveMaker project in a couple of sections.
For this demonstration, we’ll be creating an Expo Module for Android to show a blank screen in Recent Tasks.
Initialize a new module
First, we'll create a new module. On this page we will use the name expo-flagsecure. You can name it whatever you like, just adjust the instructions accordingly:
If you aren't going to actually ship this library, you can hit return for all of the prompts to accept the default values.
The above command internally relies on pipenv and has restrictions in using them in PowerShell. Request readers to an use appropriate system (Linux/Mac).
Set up your workspace
create-expo-module bootstraps your module with number of files that might not be actually required.
So, it's good clean up the default module a little for a clean slate. We're deleting the view module as we'll be not covering Expo's view here.
Core File Changes
Find the following files and replace them with the provided minimal boilerplate:
android/src/main/java/expo/modules/flagsecure/ExpoFlagsecureModule.kt
src/index.ts
Build Compile the Module
Start the TypeScript compiler to watch for changes and rebuild the JavaScript module.
Publish the Module
Before publishing your package to npm, you must have an npm account. If you don't have one yet, you can easily create it on the npm website. Once you have successfully registered, log in to your npm account to proceed with the package publishing process.
To login from terminal use the following command:
Then, navigate to root of your module and publish using the following command:
In addition to publishing your module to npm, there are alternative ways to utilize it in your project:
Create a tarball of your module using
npm packand directly install it in your project by runningnpm install /path/to/tarball. This approach is helpful for testing your module locally before publishing it to npm or for sharing it with others who may not have access to the npm registry.Set up a local npm registry, like Verdaccio, and install your module from there. This method is beneficial when you want to host a private npm registry to manage internal packages within your company or organization securely.
Consider publishing a private package or using a private registry in conjunction with EAS Builds, a service provided by Expo. This option allows you to manage and use your proprietary packages securely in your projects.
Use the Module in WaveMaker Project:
The published plugin can be installed in a few steps in WaveMaker. Please refer to this page on how to install a plugin.
ExpoFlagSecure can be leveraged in your WaveMaker app through the following ways:
- Enabling and Disabling App Preview on Demand
- Disabling App Preview on App Launch
Enabling and Disabling App Preview on Demand
Some apps may require the ability to enable or disable app preview only in certain situations i.e. on demand. For example, some users may want to disable app previews when their device is locked or when the app is in the background to prevent sensitive information from being displayed.
For our example, we will create a simple app that allows users to enable or disable app preview on click of a button. The following is the mockup of the app:
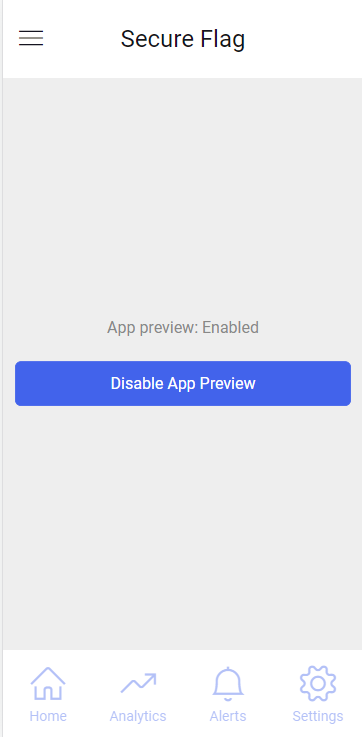
The following is the code snippet for the above mockup:
Disabling App Preview on App Launch
Some apps may require the ability to disable app preview on app launch. For example, a banking app may want to disable app preview to prevent sensitive information. In such cases, the ExpoFlagsecure plugin can be leveraged as shown below:
In your WaveMaker project, navigate to the src/main/webapp/app.js file and add the following code snippet, which imports the plugin into the app.
Add the following code snippet to the onPageReady function, which disables app preview while using the app.
Effectively, the onPageReady function should look like this:
To run your app locally, run the prebuild command and then compile the app
Then,