Security Assertion Markup Language (SAML) is an XML-based open standard for exchanging authentication and authorization data between different parties. The SAML exchanges are usually between
- Identity provider (IdP) - producer of assertions, and
- A service provider (sp) - the consumer of assertions.
The identity provider could be any vendor like ADFS, OneLogin, Okta etc. which supports SAML-based Single Sign-On (SSO). The service provider is your WaveMaker application which makes use of Identity Provider to enable single sign-on across all your WaveMaker applications.
Why SAML upgrade is required?
WaveMaker offers many security providers which can be enabled by the user based on their requirements. SAML is one of the security providers which depends on spring security extensions dependency. The spring-security-saml2-core has reached end of life as per the spring documentation. It means there will no longer be any support or bug fixes for this library from spring.
The saml2-service-provider is the replacement of spring-security-saml2-core and all the WaveMaker projects that are using SAML as a security provider will be migrated.
User changes required after SAML upgrade
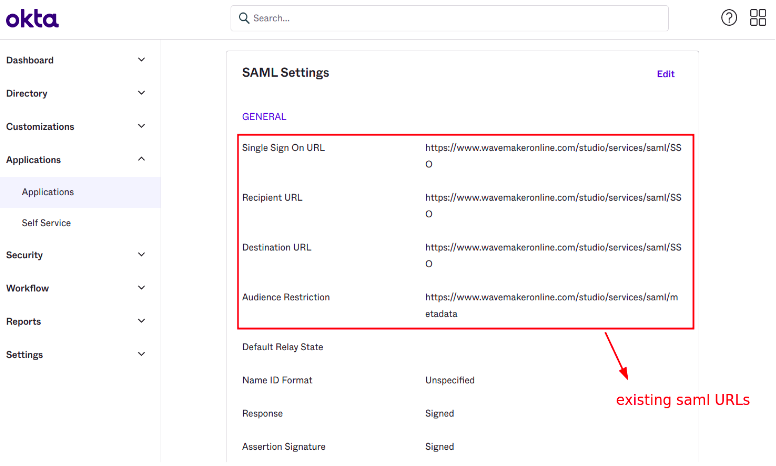
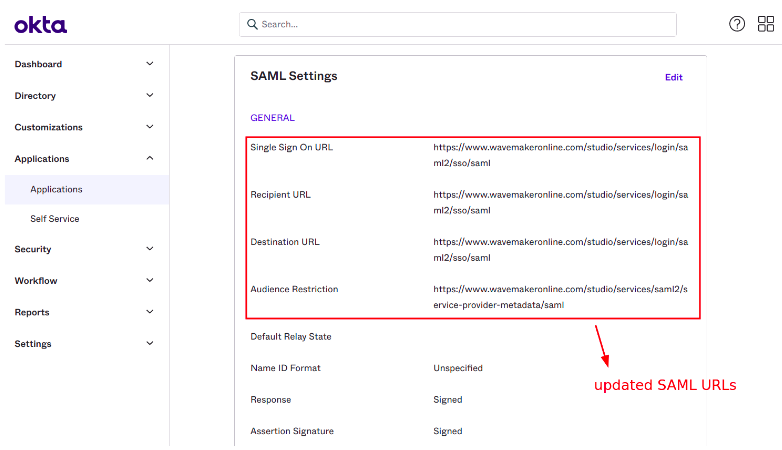
The new SAML library provided by spring suggests the metadata, audience url, SSO, SLO URLs which are different from the old one. So the user has to update the new URLs in their respective IDP providers. Below is a table that differentiates the old and new SAML URLs.
| URL Type | spring-security-saml2-core (Existing) | saml2-service-provider (New) |
|---|---|---|
| Metadata | {app-url}/saml/metadata | {app-url}/saml2/service-provider-metadata/saml |
| Audience | {app-url}/saml/metadata | {app-url}/saml2/service-provider-metadata/saml |
| SSO | {app-url}/saml/SSO | {app-url}/login/saml2/sso/saml |
| SLO | {app-url}/saml/SingleLogout | {app-url}/logout/saml2/slo |
Here app-url can be preview or deployed URL.
Steps to update the URLs in Okta provider
Login to the okta provider and open the configured saml application.
Click on the General Settings where the metadata, audience, SSO and SLO URLs are configured.
Click on edit and update all the 4 URLs as shown in the below screenshot.
If SLO is enabled in the application then SLO URL should also be updated.
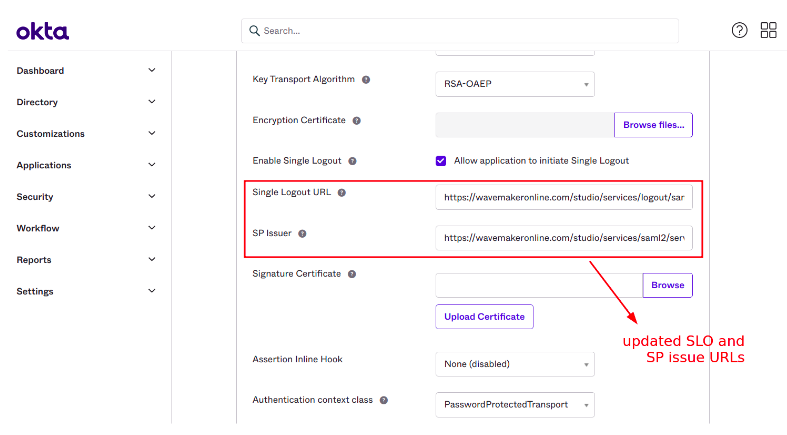
Here SP issue URL is same as metadata URL.
After updating the URLs you can preview the application and verify the SAML flow.