WaveMaker Docs

WaveMaker Docs

  • Get started
  • Widgets
  • Mobile
  • How-to
  • Enterprise
  • Releases
  • Blog
  • Sign-in

›Prefabs

How-to-documents

  • How-to Wiki
  • WaveMaker Best Practices

App solution

  • Creating a Registration Page
  • Support for Password Encryption
  • Error Handling in WaveMaker App
  • Leaving Page with Unsaved Changes
  • Micro frontend using iframes
  • Enabling PWA

UI design

  • Passing Parameters to Pages
  • Passing Parameters to Partial Page
  • Accessing Script
  • Use Static Variable to pass data between pages
  • Customise Login Page
  • Incorporating Additional Icons
  • Change Icon Color on Condition
  • Change Icon for the Global Spinner
  • Changing Default Favicon
  • Changing App Logo
  • Changing Page Title
  • Customise App Style
  • How to use Conditional Class Property
  • How to use Conditional Style Property
  • Customize an Existing Theme
  • Adjust Left Navigation Width
  • Customizing Theme
  • Enable SPA
  • Choose Widget Template and Layout
  • Widget Template and Icons
  • Custom Template for Widgets
  • Apply Custom Data Formatter

Nav & Dropdown

  • Dynamic Menu based on User Role
  • Restricting Menu Items based on the User Role
  • Localization for Dropdown Menu

Localization

  • Localization in WaveMaker Apps
  • Setting Language and Date Format
  • Localization Using Select Locale
  • Localization of Error Messages

Security

  • SAML Integration - OneLogin
  • SAML Integration - ADFS
  • OpenID Integration - Azure AD
  • Custom Security using Google OAuth Prefab
  • Multiple Security Provider Implementation
  • Customizing Post Authentication Handlers
  • Configuring Content-Security-Policy
  • Configuring MTLS

Databases

  • Queries with Dynamic Where Clause
  • Connect To Azure SQL Server
  • Recommended JDBC Driver Versions for Databases
  • How to fetch more than the default number(100) of records from database?
  • How To: One-to-Many Relationship
  • Working with Temporals
  • Connect To AWS Redshift Database
  • Connect To SAP Hana Cloud Database
  • Transactional History of Entity
  • Row-Level Security using DB Event Listeners
  • Validations using CRUD Listeners
  • Custom Logic DB Event Listeners
  • Connect to MySQL database using SSL
  • How to Switch MariaDB to MySQL Connector

Web services

  • Using App Environment Properties
  • Consuming an Existing WaveMaker API
  • Using POST method to send data to a REST API
  • Request-Response Processing for REST Services
  • How to Intercept Request and Response of all API Calls in One Place
  • WebSocket Usage - Chatroom App
  • UI for API Server-side Pagination
  • Working with API with different pagination formats

Java services

  • Sending Email using WaveMaker Connector
  • Implementing Forgot Password feature using Java Service
  • Accessing REST APIs from Java Service
  • Scheduling a Java Service
  • Integrating JUnit Tests for WaveMaker Application
  • ORM Artifacts
  • Pre-Post Processing for Database Service APIs
  • Accessing Logged-in User Details using Java Service
  • Design a workflow in Camunda BPM and integrate into a WaveMaker app
  • Integrate Azure File Storage
  • Insert Data from Excel into Database
  • Integrate Amazon S3 into WaveMaker App
  • Integrate Twilio Connector
  • Integrate OTP (One-Time Passcode) Verification with WaveMaker App

Variables

  • Using Filter Conditions on Variable
  • Using Live Variable APIs
  • Using Notification Actions
  • Using Navigation Action
  • Using Variables for Queries and Procedure
  • Using Service Variable in a Form
  • Using Filter Criteria for a Data and Live Widgets
  • Using Filter Criteria for a Database CRUD Variable

JavaScript

  • Using JavaScript in Binding
  • Using JavaScript from External URL
  • Using JavaScript to loop a command
  • Using function for evaluating conditions

Developer options

  • Synchronizing WaveMaker Apps with IDEs
  • Synchronizing Java Services Controller
  • Integrating Amazon Cognito for User Authentication
  • Integrating Sample Jasper Report in WaveMaker Application
  • How to generate PDF File using Jasper Reports
  • Upgrading an App from WaveMaker 9.x to WaveMaker 10.0
  • App Migration from WaveMaker 9x to 10x
  • Setup Fusion Reactor for Debugging Issues

Deployment

  • SSL Termination in LoadBalancer

Mobile App Solutions

  • Notify users about new update

Mobile gesture

  • Setting Swipe Gestures on a List Widget
  • Working with Pull to Refresh

Mobile widgets

  • Using Search Widget within the Navbar

Mobile UI design

  • Setting Splashscreen Images and App Icons
  • Using Cordova Plugins
  • Designing Tablet Views in Mobile Project
  • Sliding left navigation for Mobile App
  • Mobile App using Bar code
  • Custom Date Picker in Mobile

Cards

  • Capturing Card Items

DataTable

  • Customising Data Table Row Action
  • How to Configure Row Expansion in a Data Table
  • Using Widgets to represent Data Table Columns
  • View Master-Detail Data Records using Data Table
  • Add Master-Detail records using Data Table
  • Export Data from Data Table
  • Export Data from Data Table - 2
  • Setting Blob Filename
  • Dynamic Data Tables
  • Customize Dynamic Datatable
  • Data Table Column bound to Query
  • Combining Columns in Data Table
  • Custom Styling Data Table Columns & Rows
  • Formatting Data Table Columns
  • Concurrency and Record Locking in WaveMaker
  • Edit DataTable records bound to Query API

List

  • Creating an Employee List grouped by City
  • Creating an Employee List grouped by Birth Month and City
  • OnRender Event
  • Including a Data Table within a List
  • Building an Editable List
  • Building Cascading Lists
  • Accessing List Items
  • Localization of Data Table Column Headings

Forms

  • Using Live Form
  • How Tos: Form
  • Building Tabbed Live Form
  • How Tos: Live Form
  • Linking Live Form with another Widget for Input
  • Handling Related Fields in a Live Form
  • How to Get Validation Messages from a Form
  • Adding Master-Detail records in the same transaction
  • Submit Parent and Child Records in a Single Transaction
  • Submit Parent and Child Records in a Single Transaction using Form and Data Table
  • Using Cascading Select & Autocomplete for Live Form Fields
  • Using Cascading Select within Live Form
  • Using cascading Filter to populate Live Form
  • Using Wizard for Master-Detail Live Form
  • Copy to Clipboard
  • Create a form with multiple wizard steps
  • Smart Forms: Conditional Flows for form Widget

Calendar

  • How Tos: Calendar
  • Calendar Usage - Create an Event
  • Calender Usage - Google Calendar Integration

CheckboxSet

  • CheckboxSet to Filter List data

FileUpload

  • FileUpload - Basic Usage
  • File Upload Widget Operations
  • Upload File & Save in Database
  • File Upload & Blob Data
  • File Upload - Custom Directory
  • Accessing File Upload from Java Code
  • Upload Files from Live Form & Form

Radioset

  • Radioset to Filter a List

Rating

  • Building Rating Widget using Static Data
  • Building Rating Widget using Static Variable
  • Build Rating Widget using Model Variable
  • Building an Interactive Rating Widget

Select

  • Configuring Select Widget from a Static List of Values
  • Configuring Select Widget from a Static Variable
  • Configuring Select Widget from a Variable
  • Configuring Select Widget using Display and Data Fields
  • Configuring Select Widget from Database Fields
  • Configuring Cascading Select
  • Selection Widgets - Use Case

Progress Circle

  • Using Progress Circle Widget

Charts

  • Working with Charts
  • Display User Selection in another Widget
  • Handling Dynamic Data
  • Custom Data

Richtext Editor

  • Adding Custom Fonts to Richtext Editor

Live filter

  • Applying Live Filter to a Data Table or a Chart
  • Building a Multiple Selection Live Filter
  • Building a Range Live Filter

Container

  • Setting partial page content for Accordion within a List
  • Setting partial page content for Panel within a List using JavaScript
  • How Tos: Wizard
  • Dynamic Tabs and Accordions

Tree

  • Tree using Static Variable
  • Tree using Java Service
  • Tree using Dynamic Tree

Prefabs

  • Creating Partials in a Prefab
  • Create Prefab using Third Party UI Widgets
  • Create a Simple Prefab
  • Create Prefab Using D3 & NVD3 Charts
  • Create Prefab Using D3 Library DataMaps
  • Create Prefab using JQuery Plugin
  • Create Prefab using Angular Module
  • Create Prefab using Angular, React Components
  • Azure OAuth Prefab Integration

Team Poral Configure Vcs

  • Configure Azure Repos In CodeRepository
Edit

Create a Simple Prefab


This post walks you through the creation and usage of a simple Prefab. We will be creating a Prefab which compares two text strings and returns the result. For string comparison, we will be writing a simple Java code.

Creating the Prefab

  1. Click on Create from the Prefab tab of the Project Dashboard
  2. Enter a name and description for the Prefab
  3. From Project Configurations, choose Config Prefab under Settings:
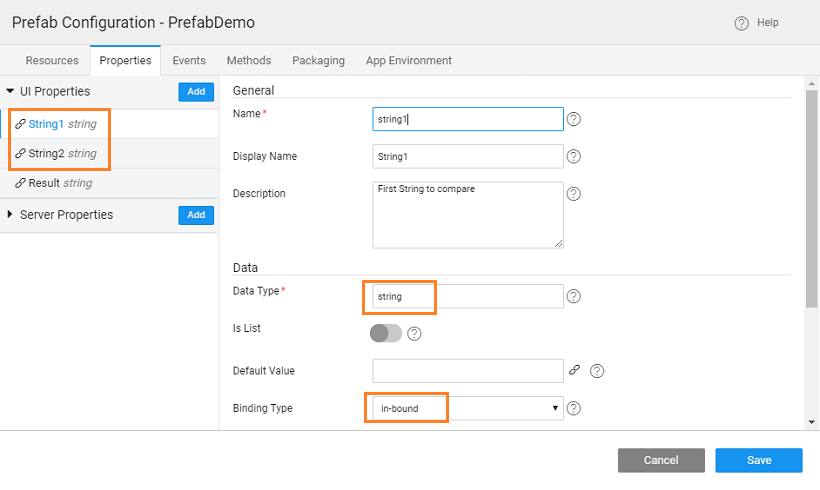
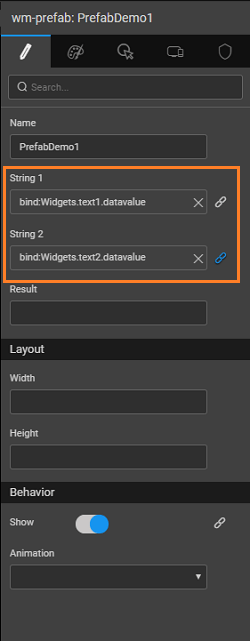
    • In the Properties tab, add two inbound properties which will take in the two strings to compare 
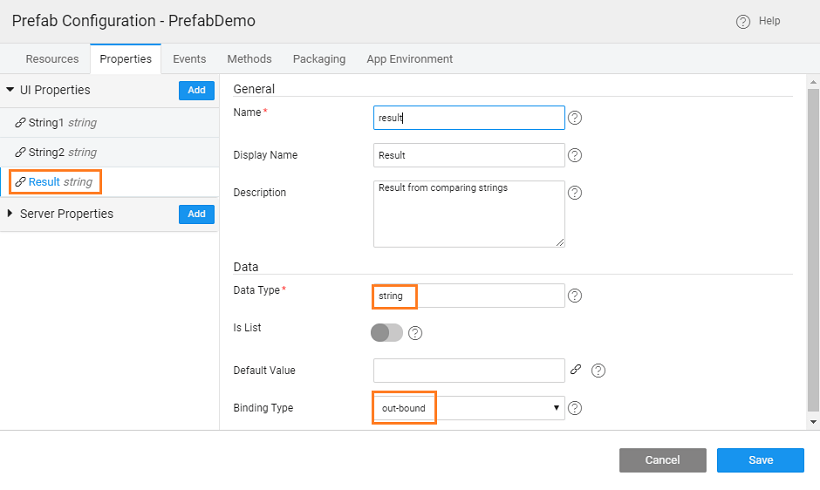
and one outbound property to return the result
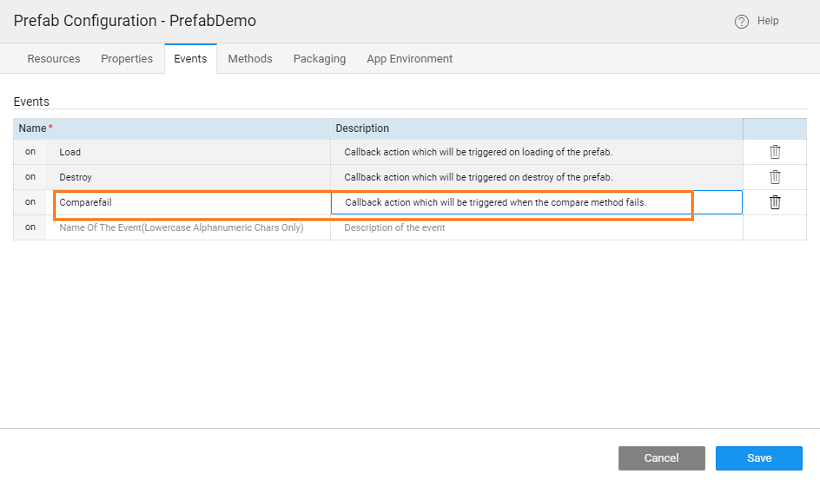
    • In the Events tab, add an event (Comparefail) which will be triggered when the comparison of strings fails. The event will be defined in the JavaScript of the Prefab, the application using this Prefab will be defining the action for this event. Note, by default two events are already given - Load and Destroy
    • You can set the display icon and mention the group for Prefab from the Packaging tab
  4. Add a Java Service for the string comparison logic. Use the same names that you gave in the Methods of Prefab Settings, in this case, String_compare for Java Service and confirm for the method Enter the following method to compare strings:
public String confirm(String a, String b) {
    String result = null;
    if (a.equals(b))
    {
        result = "matched";
    }
    else
    { 
        result = "invalid";
    }
    return result;
}

}

The final Java service should look like this:

/*Copyright (c) 2015-2016 wavemaker-com All Rights Reserved.


This software is the confidential and proprietary information of wavemaker-com You shall not disclose such Confidential Information and shall use it only in accordance with the terms of the source code license agreement you entered into with wavemaker-com*/.

package com.prefabdemo.string_compare;

import javax.servlet.http.HttpServletRequest;

import org.slf4j.Logger;
import org.slf4j.LoggerFactory;

import org.springframework.beans.factory.annotation.Autowired;

import com.wavemaker.runtime.security.SecurityService;
import com.wavemaker.runtime.service.annotations.ExposeToClient;
import com.wavemaker.runtime.service.annotations.HideFromClient;

//import com.prefabdemo.string_compare.model.*;

/**
    * This is a singleton class with all its public methods exposed as REST APIs via generated controller class.
    * To avoid exposing an API for a particular public method, annotate it with @HideFromClient.
    *
    * Method names will play a major role in defining the Http Method for the generated APIs. For example, a method name
    * that starts with delete/remove, will make the API exposed as Http Method "DELETE".
    *
    * Method Parameters of type primitives (including java.lang.String) will be exposed as Query Parameters &
    * Complex Types/Objects will become part of the Request body in the generated API.
    */
@ExposeToClient
public class String_compare {

    private static final Logger logger = LoggerFactory.getLogger(String_compare.class);

    @Autowired
    private SecurityService securityService;

    /**
        * This is sample java operation that accepts an input from the caller and responds with "Hello".
        *
        * SecurityService that is Autowired will provide access to the security context of the caller. It has methods like isAuthenticated(),
        * getUserName() and getUserId() etc which returns the information based on the caller context.
        *
        * Methods in this class can declare HttpServletRequest, HttpServletResponse as input parameters to access the
        * caller's request/response objects respectively. These parameters will be injected when request is made (during API invocation).
        */
    public String sampleJavaOperation(String name, HttpServletRequest request) {
        logger.debug("Starting sample operation with request url " + request.getRequestURL().toString());

        String result = null;
        if (securityService.isAuthenticated()) {
            result = "Hello " + name + ", You are logged in as "+  securityService.getLoggedInUser().getUserName();
        } else {
            result = "Hello " + name + ", You are not authenticated yet!";
        }
        logger.debug("Returning {}", result);
        return result;
    }

    public String confirm(String a, String b) {
        String result = null;
        if (a.equals(b))
        {
            result = "matched";
        }
        else
        { 
            result = "invalid";
        }
        return result;
    }

}
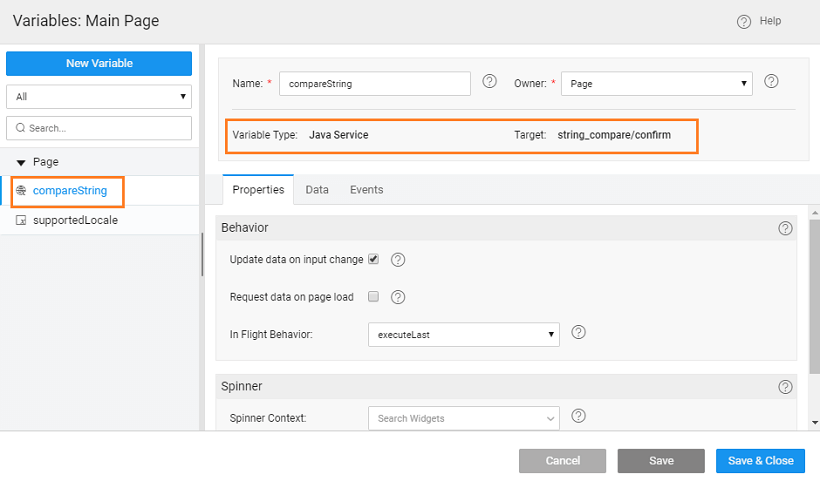
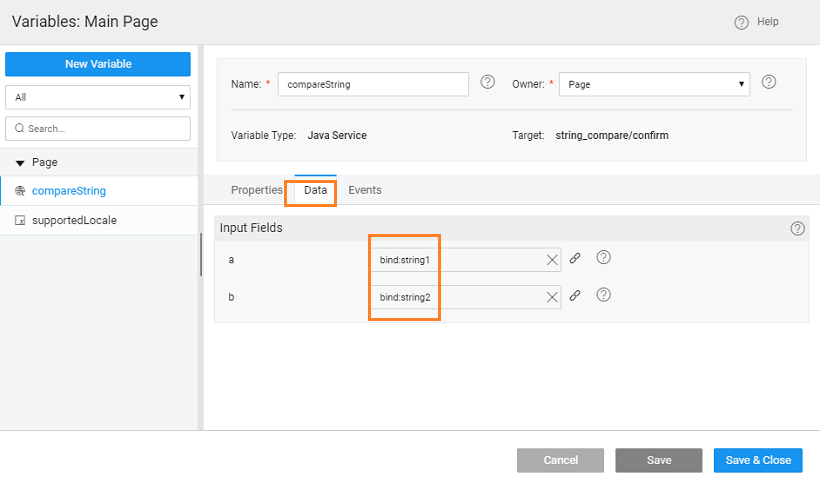
  1. Create a Variable to invoke the Java Service (string_compare) and method (confirm) within that service.

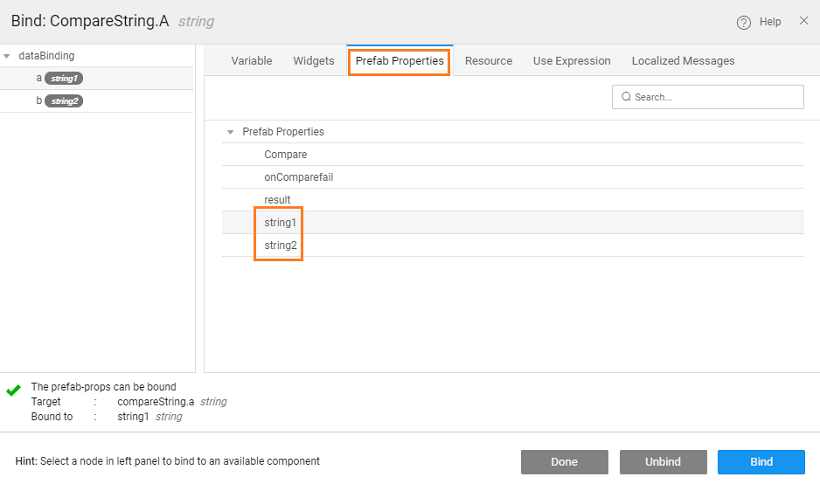
  1. Pass the inbound parameters of the Prefab to the Java Service, by binding them to the input fields accessible from the Data tab.

  1. We want the event of the Prefab to be triggered when the method returns an "invalid" message. This can be achieved by writing the appropriate JavaScript for the onSuccess event of the method accessible from the Events tab of the Variable.

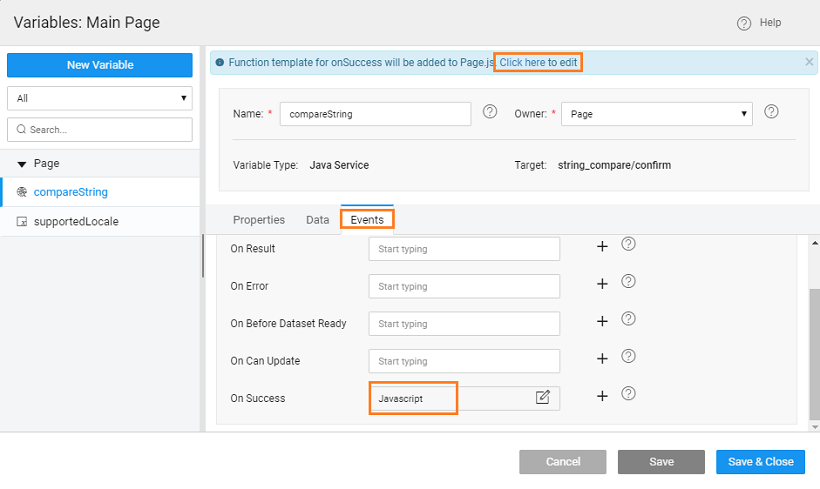
You will find a message guiding you to the location of the JavaScript file. Click the link and use the following code in the JavaScript in the snippet.

Prefab.compareStringonSuccess = function(variable, data) {
    if (data === "invalid") {
        if (Prefab.onComparefail) {
            Prefab.onComparefail();
        }
    }
};
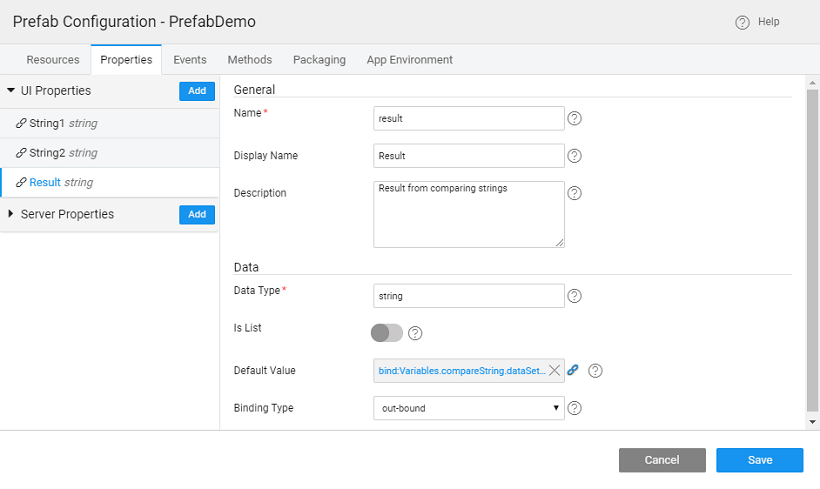
  1. The result from the Java method needs to be bound to the outbound property declared in the above steps. From the Prefab Settings, Properties tab bind the result of the Java Service to the outbound property of the Prefab.

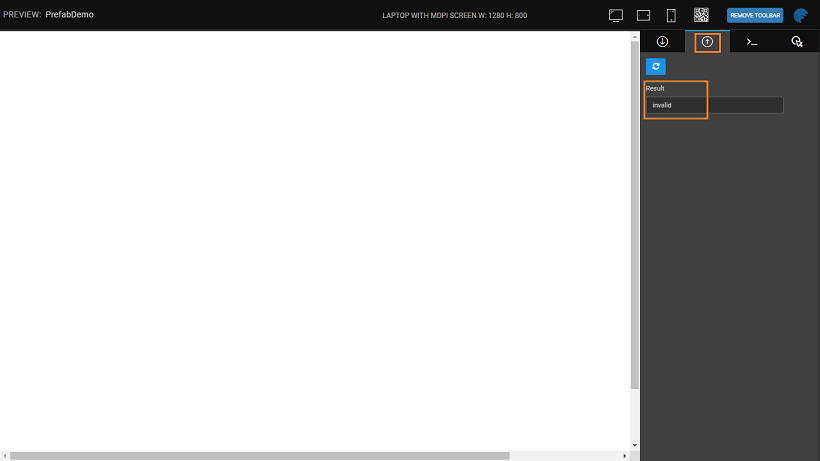
  1. Save and Preview the Prefab. Give the In-bound values:

and see the result in the Out-bound properties tab:

  1. Publish the Prefab.

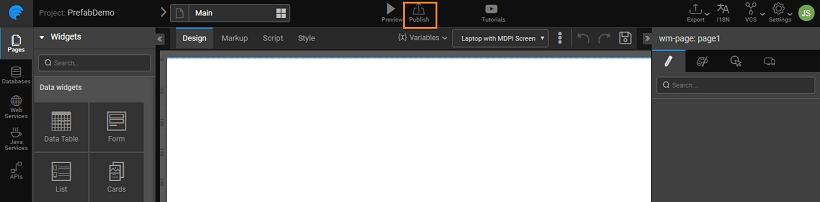
  1. You can set the version for the Prefab and Publish it. Know more about publishing Prefabs from here.
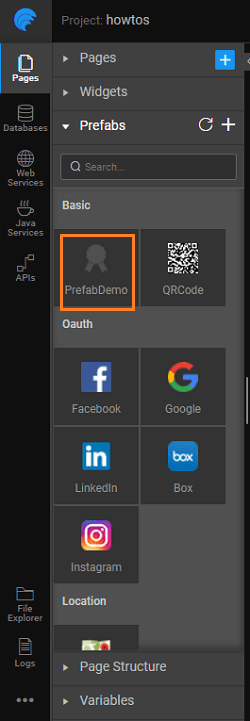
  2. The Prefab will be available for use across the Projects. You can see the entry in the Artifacts list from the Developer Utilities on the Project Workspace and in the Widget Toolbox of any Project within your workspace.

Using the Prefab in Project

  1. Let us now use the above-created Prefab in an application. Create or Open an application.
  2. From the Artifact Listing, import the above published Prefab.
  3. See the Prefab appear in the Prefab section of the Toolbox. The group name (Basic, in this example) and the icon are the values set from the Packaging tab of Prefab Settings.

demo_prefab_toolbox

  1. Drop two texts strings for comparison input to Prefab, a label to hold the result from the Prefab, a button to trigger the Prefab and the Prefab on the canvas. Your canvas should look like this (we have used a Grid Layout for widget placement)

demo_prefab_design

  1. Bind the properties (inbound) of the Prefab to the two text box.

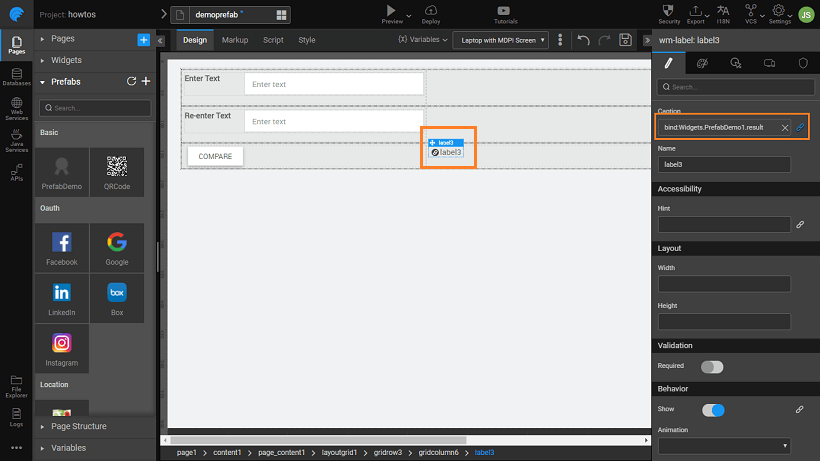
  1. Bind the label on the canvas to the result (outbound) from Prefab.

demo_prefab_design_result

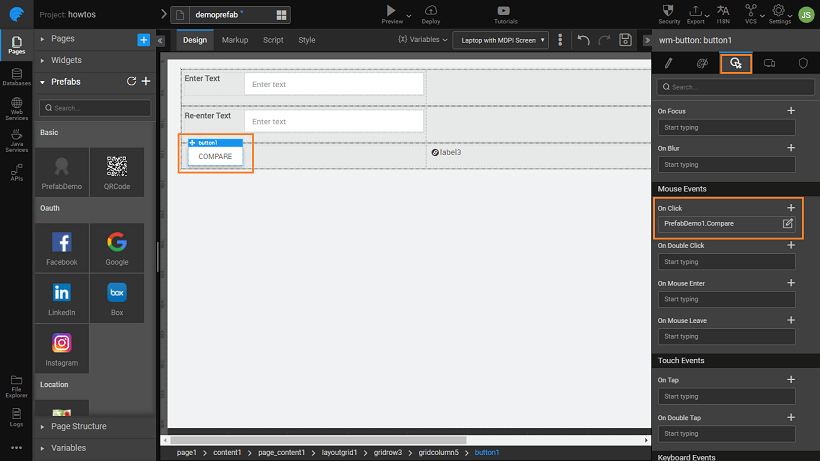
  1. Click event of the button invokes the Prefab method.

demo_prefab_design_event

  1. Run the application:
    1. Enter the same string in both the text boxes and see the comparison result.
    2. Enter different string in the text boxes and see the comparison result.

See Also

Prefab using 3rd Party UI Widgets
Prefab Using D3 & NVD3 Charts
Prefab Using D3 Library (DataMaps)
Prefab Using JQuery Plugin - showcases using Events and Methods

Last updated on 12/31/2019 by Swetha Kundaram
← Create Prefab using Third Party UI WidgetsCreate Prefab Using D3 & NVD3 Charts →
  • Creating the Prefab
  • Using the Prefab in Project
  • See Also
WaveMaker
  • PRICING
  • PARTNERS
  • CUSTOMERS
  • ABOUT US
  • CONTACT US
Terms of Use | Copyright © 2013-2023 WaveMaker, Inc. All rights reserved.